Lately I’ve been testing out the new Zimbra 8 Beta appliance in both my lab as well as on the cluster where I host my blog and some other sites. One of the first things I noticed was that by default the appliance version only ships with a 12GB VMDK for the message store. This would probably be more then enough for lab purposes but I decided that I needed to expand it to 50GB, which is probably a much more reasonable size for an SMB.
We know that the appliance runs on Ubuntu 10.04 LTS and that its using LVM for volume management. Basically what we need to do is go into the properties and find “Hard Disk 2”, then we raise it from 12GB to whatever size we want, I picked 50GB. Then we need to login to the Zimbra CLI, to do this use root as the username and vmware as the password, unless you changed it during the Zimbra setup.
Overview of LVM
Before I get into the nuts and bolts of what to type to get things expanded I thought I would first talk a little about how LVM works, as it might help you understand some of the steps and why we need to do what we are going to do.
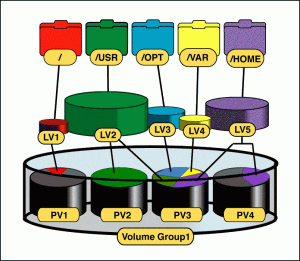
 LVM stands for logical volume manager, and it is a more dynamic way to manage storage on a linux system than the traditional partition managers. There are several terms that we will be mentioning in the article, they are: Physical Volume, Volume Group, Logical Volume.
Physical Volume: A Physical Volume is a partition or block device that will actually hold the 1’s and 0’s that you plan to write.
Volume Group: A Volume Group is a group of Physical Volumes that are grouped together to provide a pool of space.
Logical Volume: A Logical Volume is a bucket, or area of space from a volume group that is used in the linux operating system much like a traditional disk or partition is. This is the “device” that is formatted with a file system, and the part that is mounted.
So in LVM terms, we are going to grow our Physical Volume, then we will add that new space to our Logical Volume, and finally we will tell the EXT3 file system that it has just grew by 38GB for a total of 50GB. The best part is that we can do it all while the server (and volume) is online and working!
Steps to Expansion
Once you’re on the CLI we can start to do what we need to make the expansion happen, first lets start by making sure that Ubuntu sees the larger drive; to do that we can type “cfdisk /dev/sdb”. We should see 50GB on the right, and not 12GB.
After verifying that the volume is showing the larger size in the partition editor we can start the process, just make sure to exit cfdisk without changing anything.
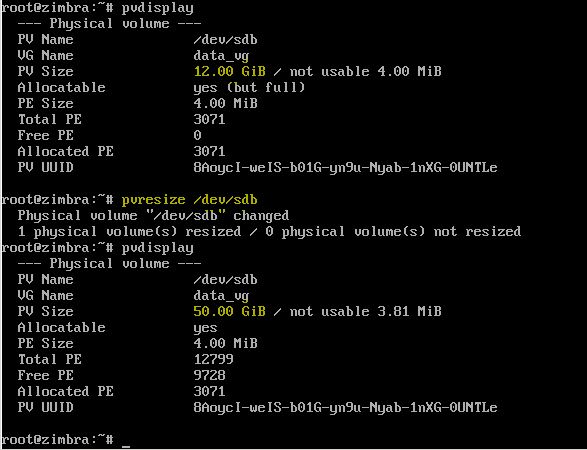
The first step is to expand our physical volume, to do that we need to run this command:
pvresize /dev/sdb
After running this command we can run “pvdisplay” and we will see the statistics about out physical volume /dev/sdb, and it will tell us that it is now seen as 50GB and that there are “Free PE”, see the screenshot blow.
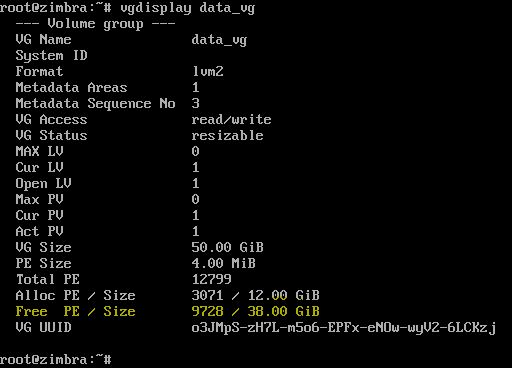
Step 2 is verify that the Volume Group sees the additional space, to check this run the following command:
vgdisplay data_vg
If all is well you should see 12GB in use and 38GB free.
Next we need to move that 38GB’s of free space into allocated space to our data_vg volume group.
The command to do that part is:
lvresize -L +38GB /dev/mapper/data_vg-zimbra
Finally the last step now that our new 38GB has been allocated to the data_vg volume group is to expand our ext3 file system. We can do that while the volume is in use by running this command:
resize2fs -p /dev/mapper/data_vg-zimbra
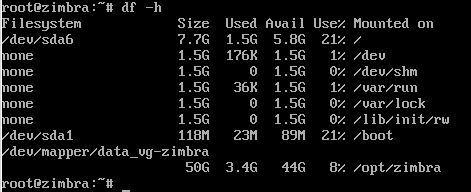
After that has completed we are finished! If you want to double check that all is well you can run df -h to verify the size of the logical volume mounted at /opt/zimbra.
![]()


I’m very new to this product and still a newbie in terms of Linux usage. I have the GA version of 8 and I added a virtual new disk (275GB) as the additional space and it did everything by itself. My /dev/mapper/data_vg-zimbra now shows 283G Size with 265G available and mounted on /opt/zimbra
awesome! i was using the beta version of 8 and had an already configured appliance before i added the extra space
This solution is perfect for resizing partitions.
I installed two 8 appliances without any problem
Hi Justin,
I am trying to extend logical volume from 60 Gigs to 75 Gigs, I increased size of the (virtual) drive from VMware, and I can see fdisk -l is showing new size now, but I am not seeing new size or Free space when running pvdisplay. I already ran pvresize /dev/sda5
Here is more information:
root@mta-2:~# fdisk -l
Disk /dev/sda: 75.2 GB, 75161927680 bytes
255 heads, 63 sectors/track, 9137 cylinders, total 146800640 sectors
Units = sectors of 1 * 512 = 512 bytes
Sector size (logical/physical): 512 bytes / 512 bytes
I/O size (minimum/optimal): 512 bytes / 512 bytes
Disk identifier: 0x000543e3
Device Boot Start End Blocks Id System
/dev/sda1 * 2048 499711 248832 83 Linux
/dev/sda2 501758 125827071 62662657 5 Extended
/dev/sda5 501760 125827071 62662656 8e Linux LVM
Disk /dev/mapper/mta–2-root: 63.1 GB, 63090720768 bytes
255 heads, 63 sectors/track, 7670 cylinders, total 123224064 sectors
Units = sectors of 1 * 512 = 512 bytes
Sector size (logical/physical): 512 bytes / 512 bytes
I/O size (minimum/optimal): 512 bytes / 512 bytes
Disk identifier: 0x00000000
Disk /dev/mapper/mta–2-root doesn’t contain a valid partition table
root@mta-2:~# pvdisplay
— Physical volume —
PV Name /dev/sda5
VG Name mta-2
PV Size 59.76 GiB / not usable 1.81 MiB
Allocatable yes (but full)
PE Size 4.00 MiB
Total PE 15298
Free PE 0
Allocated PE 15298
PV UUID rhr2wg-Rc4u-tuom-MM47-dTci-Q0GD-ACNyS0
root@mta-2:~#
root@mta-2:~# vgdisplay mta-2
— Volume group —
VG Name mta-2
System ID
Format lvm2
Metadata Areas 1
Metadata Sequence No 6
VG Access read/write
VG Status resizable
MAX LV 0
Cur LV 2
Open LV 2
Max PV 0
Cur PV 1
Act PV 1
VG Size 59.76 GiB
PE Size 4.00 MiB
Total PE 15298
Alloc PE / Size 15298 / 59.76 GiB
Free PE / Size 0 / 0
VG UUID V9bWUb-mokV-TXTL-0UkB-VFnk-qbKq-xCD4QG
root@mta-2:~#
Any help would be highly appreciated.
Thanks