In today’s digital world, precise timekeeping is more important than ever. From securing financial transactions to managing networks, accurate time synchronization ensures that all devices are on the same page. This is where the Network Time Protocol (NTP) comes into play. NTP is a protocol designed to synchronize the clocks of computers over a network, ensuring they maintain accurate time.
However, not all NTP servers are created equal. A Stratum 1 NTP server is considered the gold standard in time synchronization. Unlike lower stratum servers that rely on other NTP servers for time information, a Stratum 1 server directly connects to a primary time source, such as a GPS receiver or an atomic clock. This direct connection allows it to provide the most accurate time possible, making it crucial for applications where even a slight time discrepancy can have serious consequences.
The importance of precise timekeeping spans across various fields. In security, it ensures that logs are accurately timestamped, which is vital for forensic analysis and incident response. In financial transactions, where milliseconds can mean the difference between profit and loss, precise time synchronization is non-negotiable. And in network management, accurate timekeeping helps prevent issues related to time-sensitive operations, such as data replication and backups.
Why Use a Raspberry Pi?
When it comes to building a Stratum 1 NTP server, the Raspberry Pi stands out as an excellent choice. Here’s why:
- Cost-effectiveness: Raspberry Pi is one of the most affordable single-board computers on the market. For under $200, you can build a fully functional Stratum 1 NTP server, making it accessible to hobbyists, small businesses, and professionals alike.
- Accessibility: Raspberry Pi is widely available and supported by a large community. Whether you’re a beginner or an experienced developer, you’ll find plenty of resources to help you get started.
- Low Power Consumption: Unlike traditional computers or servers, the Raspberry Pi consumes very little power. This makes it not only cost-effective but also environmentally friendly. You can leave it running 24/7 without worrying about high electricity bills.
- Small Footprint: The compact size of the Raspberry Pi makes it ideal for dedicated tasks. It can easily fit into tight spaces, and with a suitable case, it can be neatly integrated into your existing setup.
Why Stratum 1 Matters
Understanding the Stratum hierarchy is key to grasping the value of a Stratum 1 NTP server. The NTP hierarchy is divided into different strata, each representing a different level of time accuracy and reliability:
- Stratum 0: This is the most accurate level, consisting of highly precise time sources like GPS receivers, atomic clocks, or radio clocks. These devices don’t participate in NTP directly but provide time to Stratum 1 servers.
- Stratum 1: Servers at this level are directly connected to Stratum 0 devices. They offer the most accurate time information because they receive it straight from the source. Stratum 1 servers act as the authoritative timekeepers for lower-stratum servers and other devices on the network.
- Stratum 2 and Lower: These servers receive time from Stratum 1 servers and, in turn, provide time to even lower-stratum servers or client devices. The further down the hierarchy you go, the more potential for slight time discrepancies, as each level introduces a small amount of delay.
Having a direct connection to a time source, as in a Stratum 1 server, is essential for operations where time accuracy is critical. For example, in financial services, where transactions must be timestamped accurately to ensure fairness and traceability, a Stratum 1 NTP server ensures that every transaction is recorded with precise timing. In network management, where synchronization between servers and devices is crucial, a Stratum 1 server helps prevent issues caused by time discrepancies, such as data corruption or loss.
By using a Raspberry Pi to build a Stratum 1 NTP server, you’re not only creating an affordable and efficient solution but also ensuring that your network has access to the most accurate time possible, safeguarding your operations across various critical applications.
Hardware Parts List
- Raspberry Pi 5 Board
- The Raspberry Pi 5 is the core of this project. It’s crazy powerful and is more than capable for this project. Older versions like the Pi 4 will work well too, but if you are buying a new Pi, you might as well get the latest and greatest.
- GPS HAT with PPS Interface
- This GPS HAT provides a direct connection to a GPS satellite, which is essential for obtaining highly accurate time data. The PPS (Pulse Per Second) interface ensures that your NTP server gets the precise timing needed for Stratum 1 accuracy. There are other HATs out there, but if it doesnt have a PPS interface it wont work for Stratum 1. (Here is another alternative I found in a seperate article while building mine: https://v3.airspy.us/product/upu-rpi-gps-rtc/ It is about the same price and both use the u-Blox MAX-M8 GPS chip.)
- U.FL to SMA Cable
- This cable is necessary for connecting the GPS HAT to an external GPS antenna. The U.FL connector attaches to the GPS HAT, while the SMA connector is compatible with the antenna, ensuring a strong and stable GPS signal. I use this adapter so that I can drill a hole in the metal case and mount it through the hole. This ensures there is no stress on the HAT.
- SMA GPS Antenna
- The external SMA GPS antenna enhances the reception of GPS signals, especially in areas with weak signals or indoor setups. It’s crucial for maintaining a reliable and accurate connection to the GPS satellites. This one has a 10ft cable.
- Raspberry Pi 5 Metal Case with Active Cooler
- This metal case not only protects your Raspberry Pi but also includes an active cooler to manage heat, ensuring your NTP server remains stable and operates efficiently even under continuous use. You could also use a plastic case if you wanted, but make sure it is vented well and supports HATs
- Raspberry Pi 5 Power Supply
- A reliable power supply is essential for keeping your Raspberry Pi running smoothly. This official power supply provides consistent and sufficient power, reducing the risk of unexpected shutdowns.
- 128GB Micro SD Card
- This microSD card serves as the storage medium for your Raspberry Pi. With 128GB, it offers ample space for the operating system, NTP software, and any necessary updates, ensuring your server remains responsive and up-to-date.
- CR1220 Battery
- This is optional but it does improve how quickly the board will find satellites after a reboot. (Or at least that is the rumor)
These components together form a robust Stratum 1 NTP server that is both affordable and effective. Each part is carefully selected to ensure precise timekeeping and long-term reliability.
Here is what the finished product will look like: (Tip you can click any of the pictures to get the full size version)

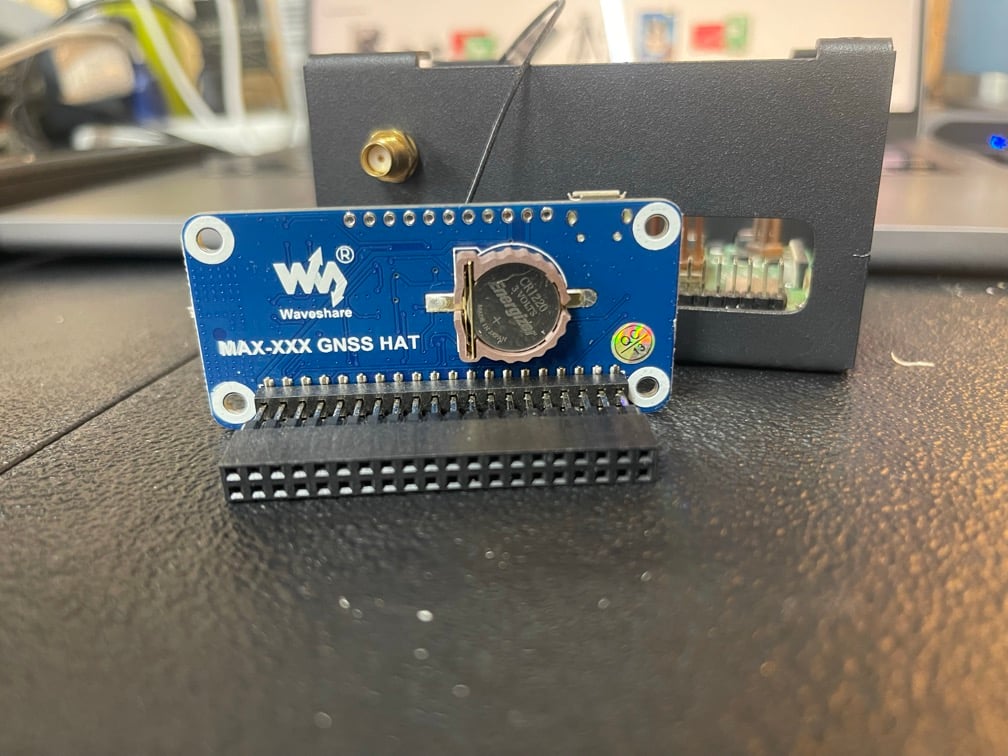
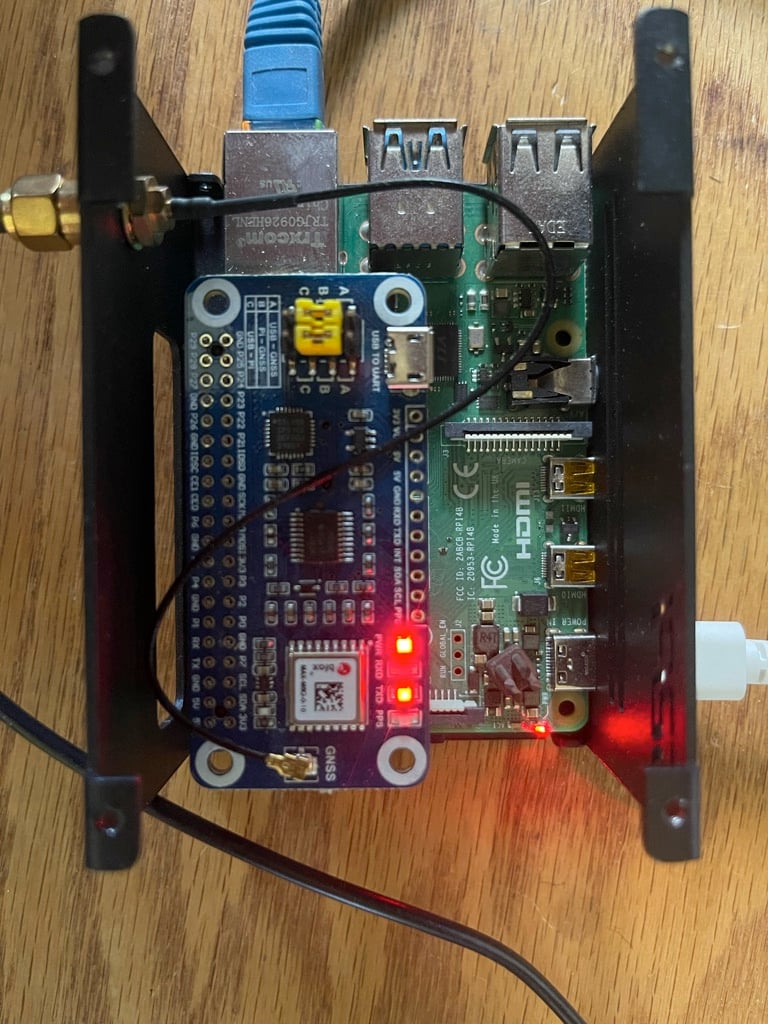
Software Parts List
On the software side of the BOM (bill of materials) things are fairly simple. Some awesome guy on GitHub has created a repo that has scripts that do most of the work for setting everything up. As of this blog post, it seems to be still maintained as well.
The repository her here: https://github.com/beta-tester/RPi-GPS-PPS-StratumOne
In order to get ready to run that code I did install some extra things first.
First, update the package manager, and upgrade all installed packages.
sudo apt update; sudo apt upgrade -yNext I wanted to install some GPS utilities so that I could make sure the GPS chip and PPS interface were working.
sudo apt install gpsd gpsd-tools gpsd-clients pps-tools chrony minicom setserial i2c-tools python3-smbus git -yNext up we can pull down the scripts from GitHub
git clone https://github.com/beta-tester/RPi-GPS-PPS-StratumOneThen change into the downloaded folder and make the installer exectable, and finally start the install.
cd RPi-GPS-PPS-StratumOne
chmod +x install-gps-pps.sh
./install-gps-pps.sh
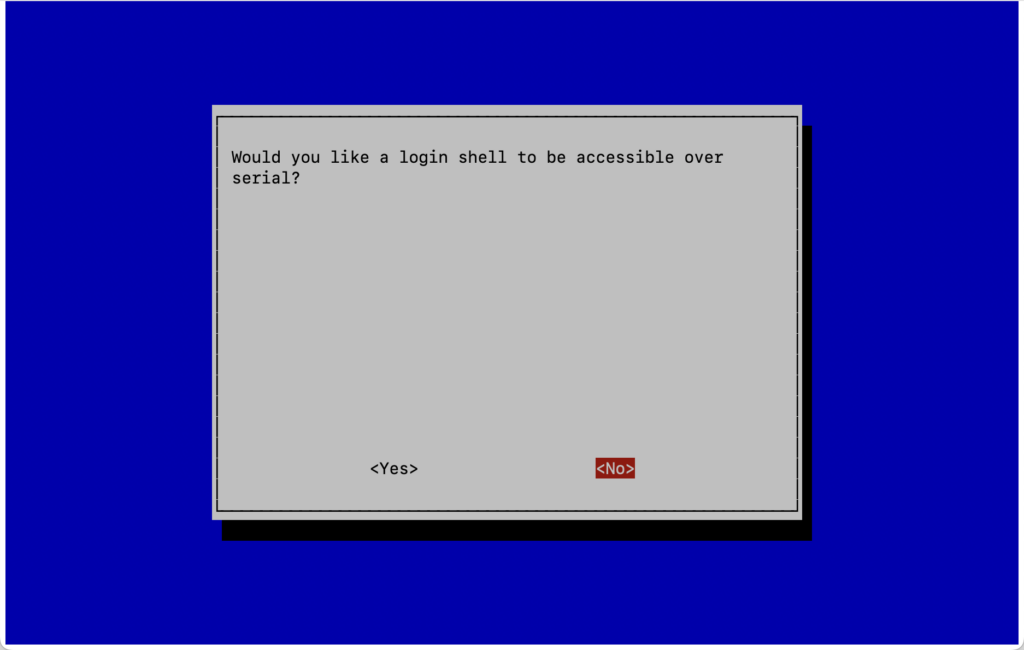
This script will take a while to run, as it will go out and grab the rest of the needed packages and install them. It will also ask you some questions about serial consoles. So when you see this screen, select “NO”.
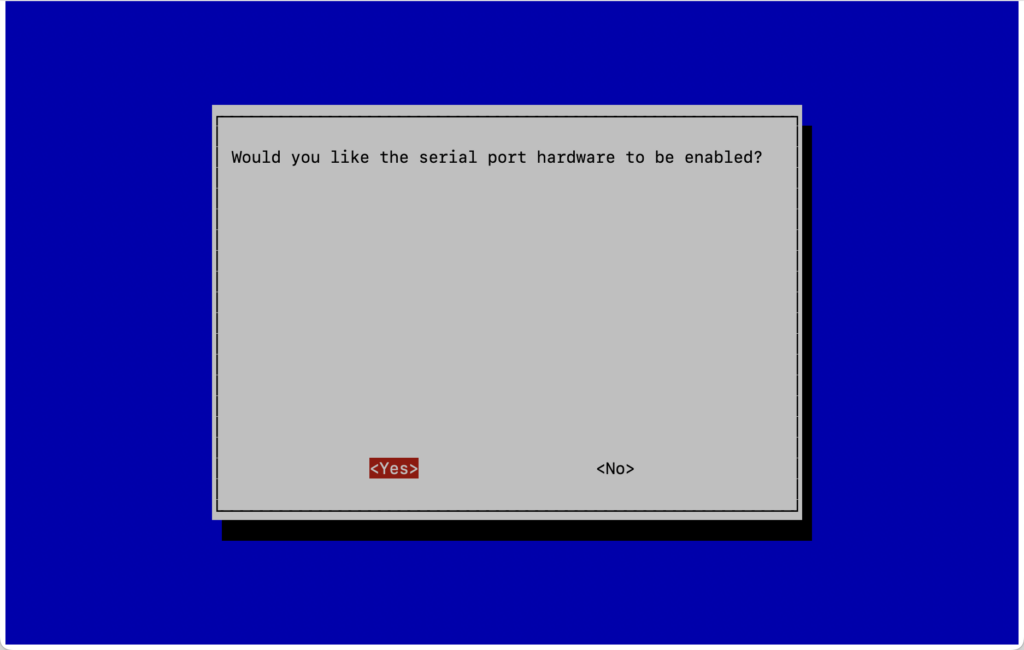
It will then ask you about a serial port. Here we want to say “Yes”.
After those two questions the installation script will carry on about its business until eventually everything is wrapped up. But, you will most likely (if you are using the same HAT as I am) see an error.
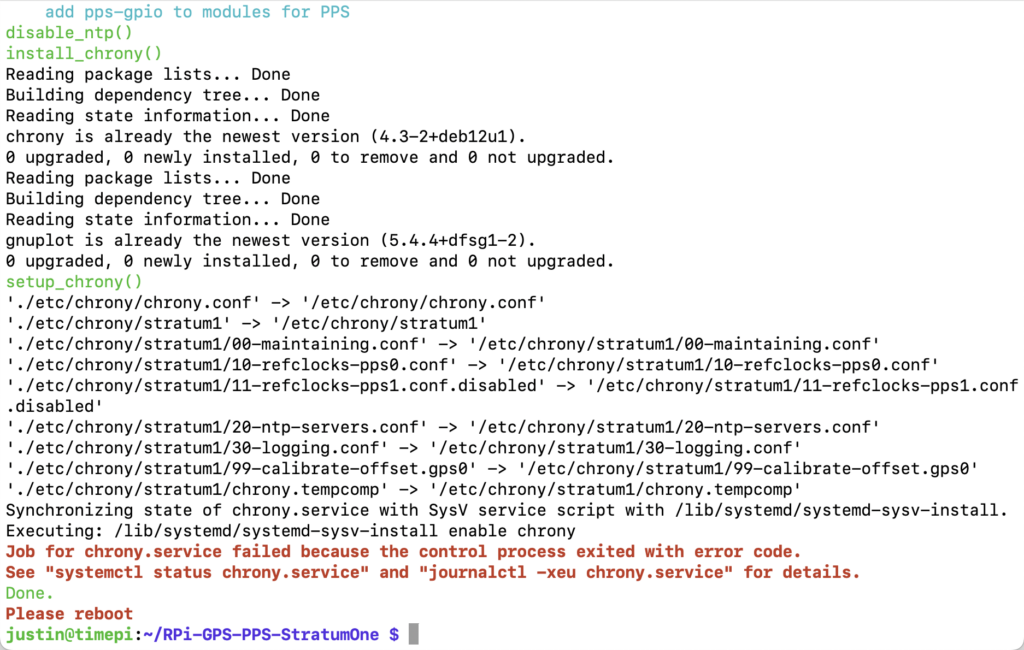
This is actually OK and will get cleared up after a reboot here in a minute, but first we have one more file to manually modify if you are using the HAT I linked to above.
sudo nano /boot/firmware/config.txt Once you are inside of the config.txt file, go all the way to the bottom, here you will find a line that tells the system what gpio pin the PPS interface is on. For the WaveShare HAT, this is not pin 4 but actually should be changed to pin 18.
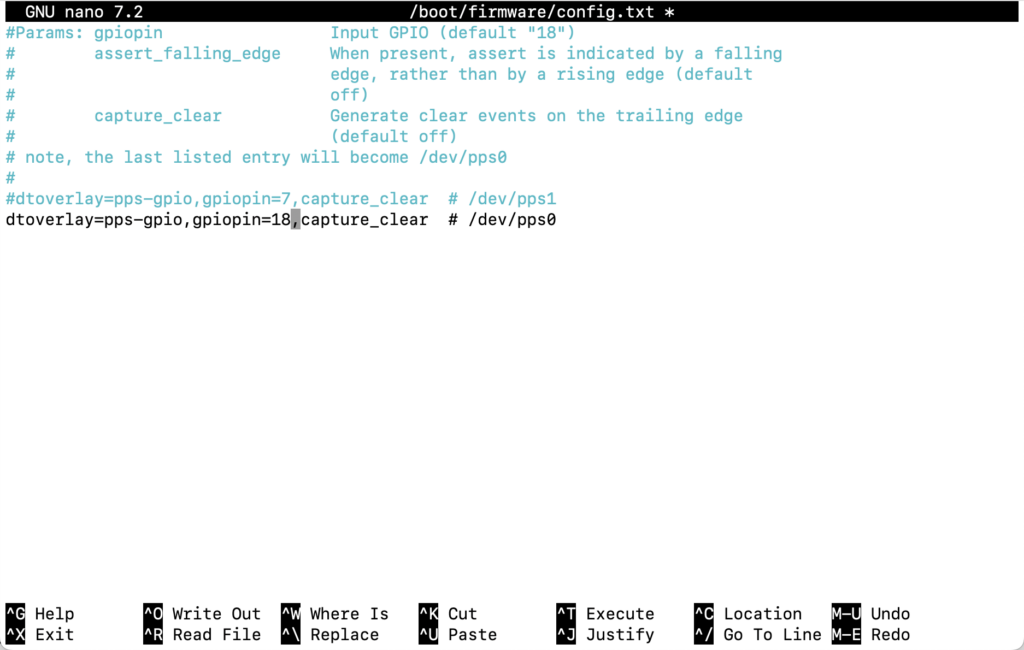
Once you have made the change press Ctrl+O to save, and then Ctrl+X to exit.
Next up do a reboot.
Once you are connected back to the Pi after the reboot you can first check the /dev file system to see if both the PPS and the GPS devices are there.
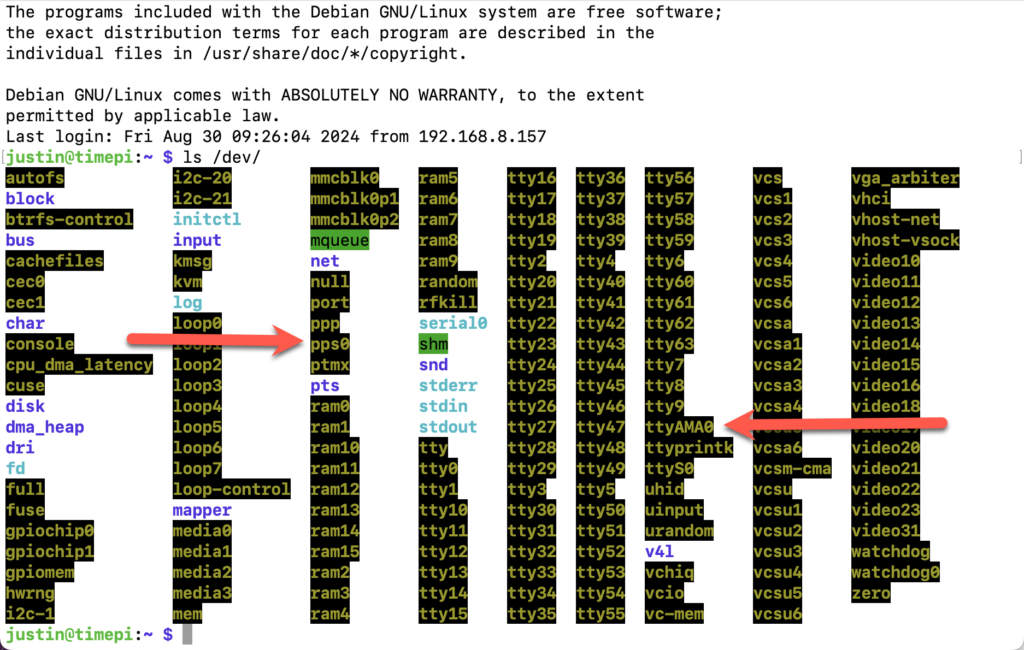
Once you have checked that, run the following command to see the current status of chrony.
watch chronyc tracking -cThe output should be something like this: (Notice on the second line “Stratum: 1” is listed!)
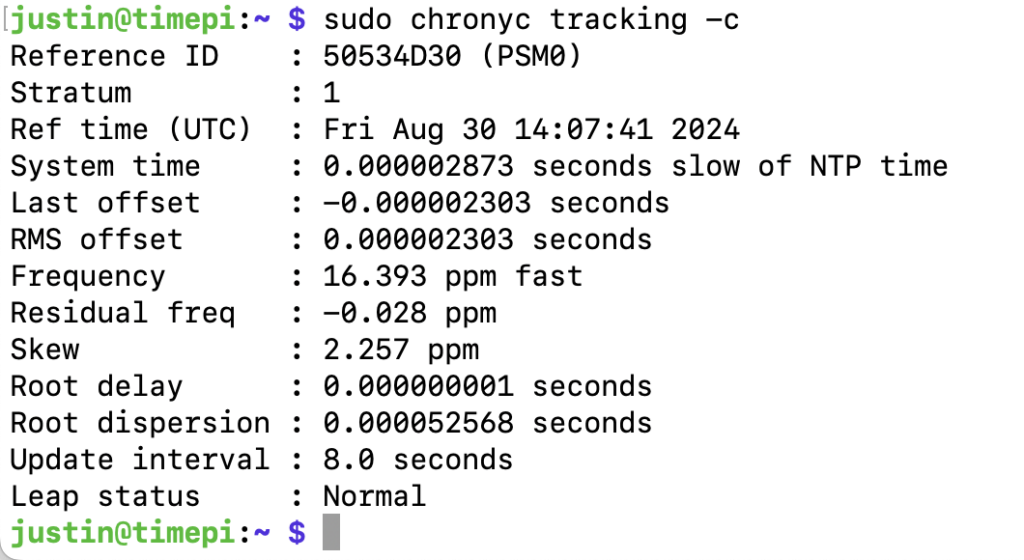
If you want to see all of the NTP sources, or if you need to troubleshoot another handy command is:
watch chronyc sources -v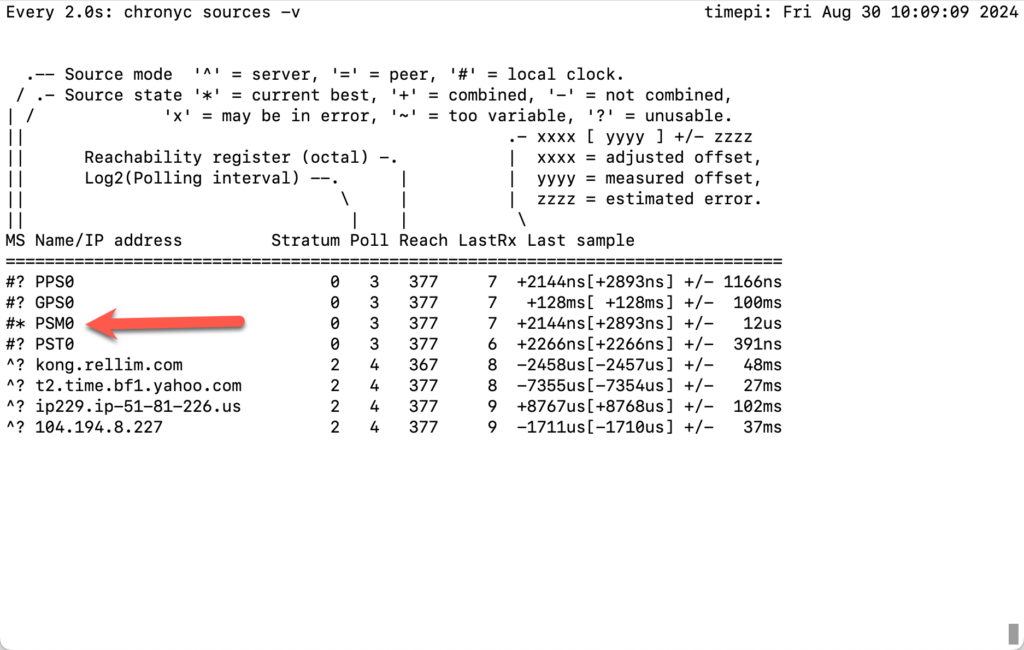
This command will list all of the normal NTP servers the box is talking to in addition to several GPS/PPS interfaces. As long as there is data like above, your GPS HAT is working and at some point (once enough satellites are found) it will become the preferred source.
Bonus addon!
I didnt want to login to the CLI all the time to run the chrony commands, So i wrote a pretty quck and dirty REST API that i can hit from a web browser. It also includes a “home page” that lists the time in several timezones.
Here are some screenshots:

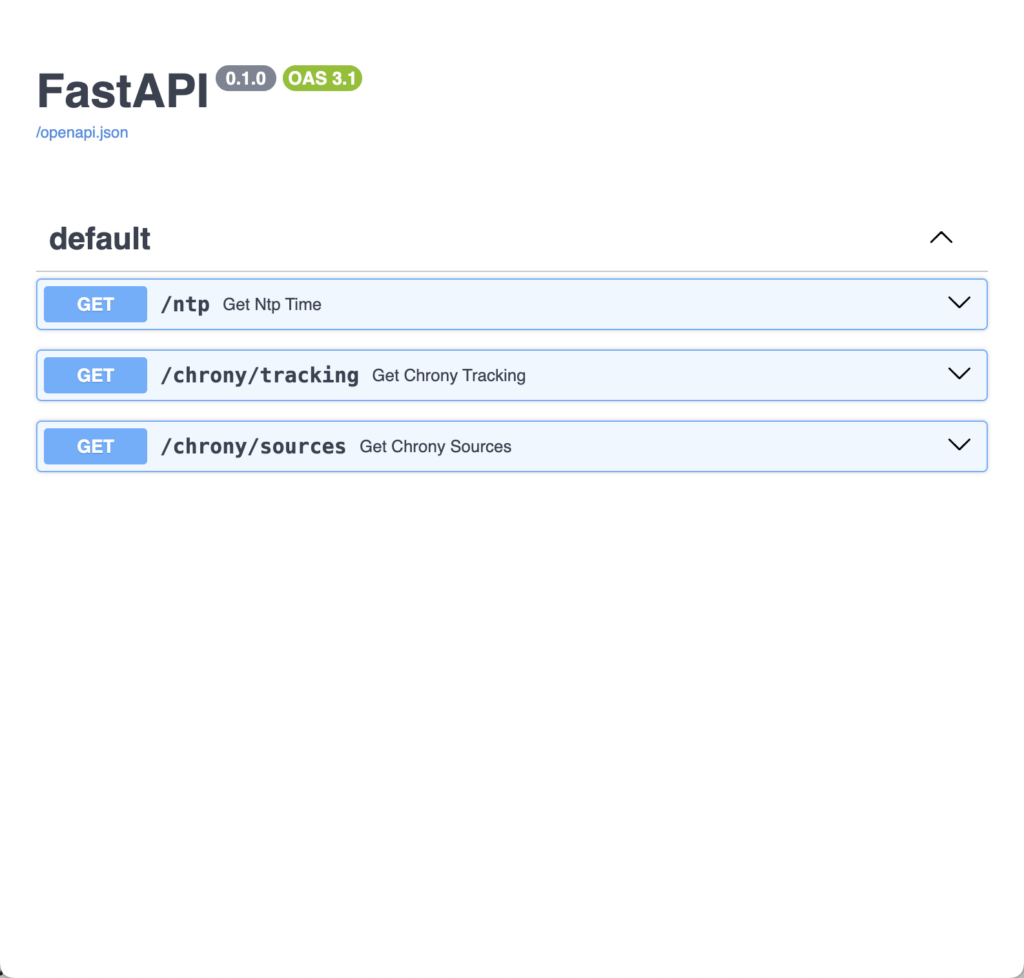
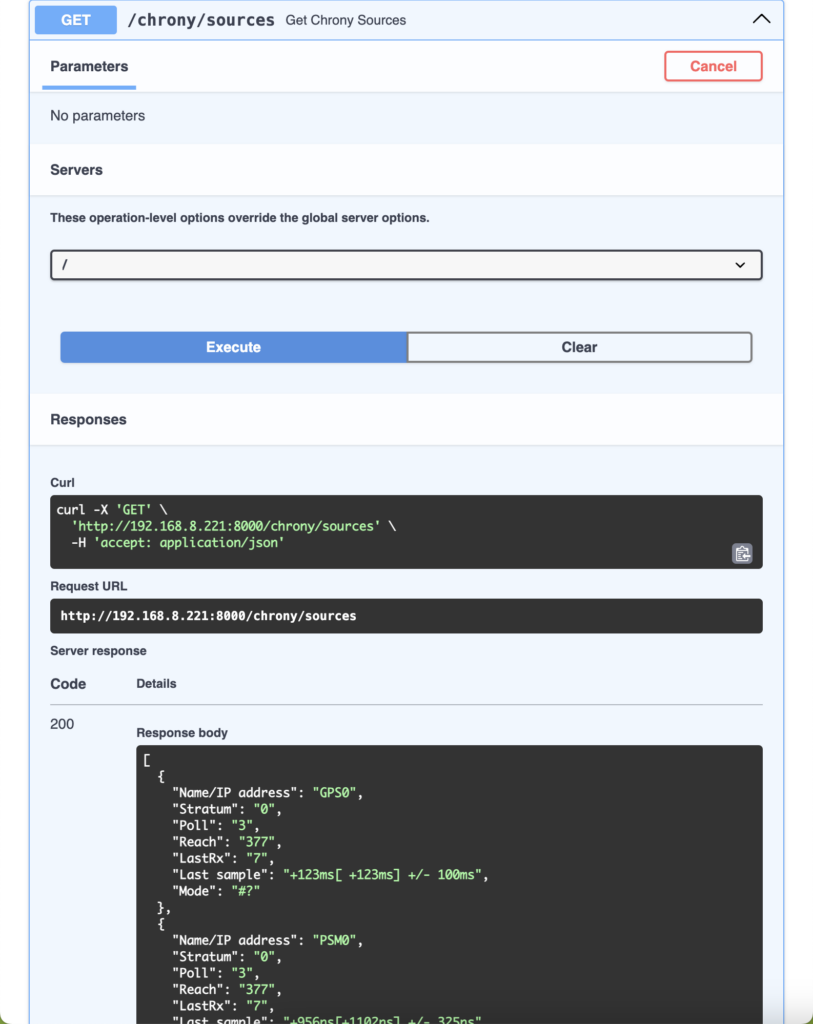
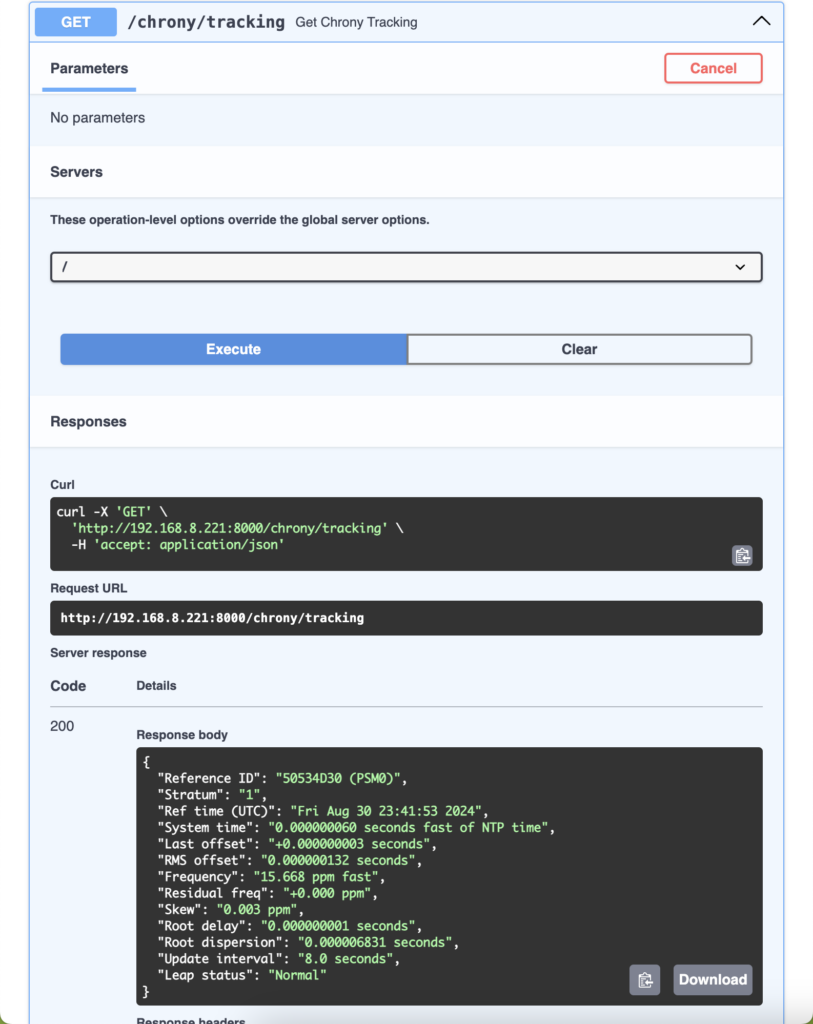
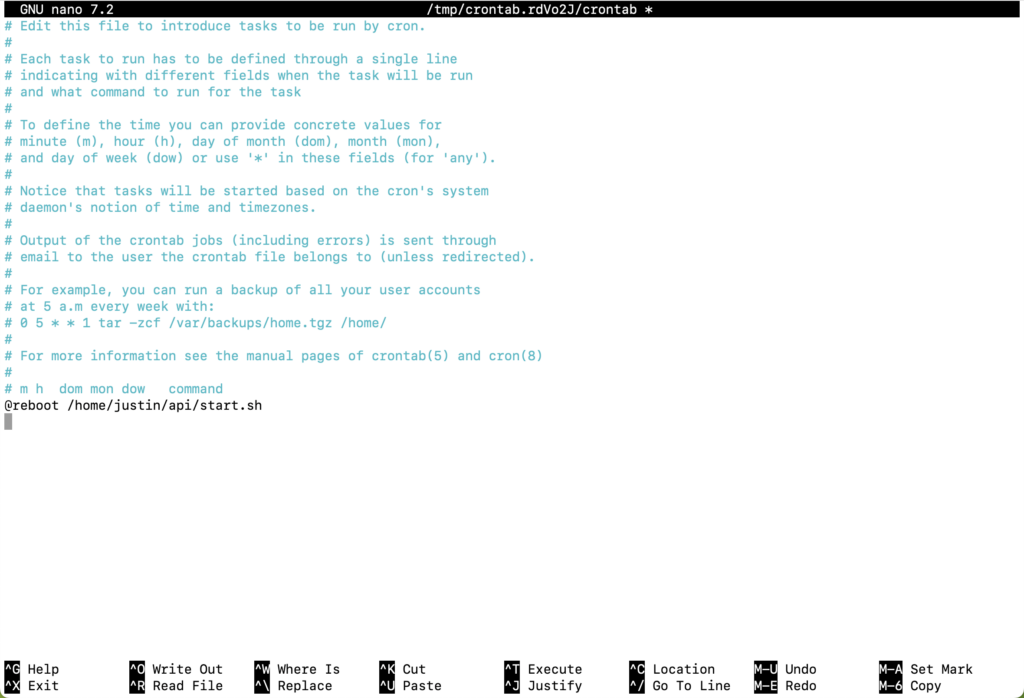
If you want to check this out the code is on Github here. To install this to run at boot time, I just added a simple @reboot line to my crontab.
Make sure to change the paths both in your crontab, as well as in the start.sh and stop.sh file if you arent justin 🙂
Wrap up
If you decide to give this project a go, drop a comment and let me know how things went.
If you are in the market for a more commercial Stratum 1 NTP device, stay tuned, I have a review coming up of the Time machines TM 2000B.
![]()


Pingback: Random Short Take #97 | PenguinPunk.net
Justin have you tried this using a POE+ hat or better yet a PCIe To M.2 Adapter With PoE Function For Raspberry Pi 5.
Waveshare sell these hats, this would be a really neat addition. I would been keen to it.
i have not. I have some POE switches, but ive never invested in a POE hat.
Hi Justin, I just had a go using a PCIe To M.2 Adapter With PoE hat along with the same GPS hat you used.
Good news is that I am seeing the same results as your.
Great write up and easy to follow instructions,
Thanks for putting this up.
Now i can finally retire my old raspberry pi 3 that i have been using as a GPS time server. 🙂
Hi Justin,
Great work with your write up. Its very easy and straight forward to follow.
I ended up adding a POE+ hat or better yet a PCIe To M.2 Adapter With PoE Function For Raspberry Pi 5 and it works like a charm.
Great work Justin
Hey Joe, Great feedback! do you have a link you could share for the PCIe to M.2 adapter with POE? sounds interesting!
Hi Justin
I just build two of these using a Pi model B, (the original Pi), and a 26 pin HAB GPS hat. Works perfectly. The HAB GPS also uses pin 18. These parts were left over from a previous attempt to do the same thing about 10 years ago, but that attempt failed.
Hi Justin, Sorry for the lateness of my reply.
The hat I used is the Waveshare PCIe To M.2 Adapter With PoE Function For Raspberry Pi 5 see here https://www.waveshare.com/poe-m.2-hat-plus.htm.
Also I tested your Stratum 1 NTP Server on a Raspberry pi zero 2 w with a Waveshare PoE Ethernet / USB HUB HAT see here https://www.waveshare.com/poe-eth-usb-hub-hat.htm
Both NTP servers have been running without any issues at all.
Once again thanks for such a great guide.
Hi Justin. This is awesome. I tried to do this a few years ago but it never quite worked. Seems like things have gotten better. However, I had to do this: “./install-gps-pps.sh” as root in order to get stratum 1 to show up. Otherwise it seems to be stuck at stratum 3. I’m using the same hat that you used. Everything else is the same. Oh, and I’m using a raspberry Pi 2 model B.