If you’ve ever built a Cisco CCNA lab or some other hardware lab that has serial console ports, there is a good chance you sat within a few feet of the gear with a serial cable to your computer while working on it. How fun was that?!?
Recently a friend started studying for the CCNA exam and I started thinking that there had to be a way to use a Raspberry Pi to put the console ports on the network. Sure you could log in to the pi, then run telnet from the pi, but what if I don’t want to login? Sure enough, there is a project called ser2net that does just that. So I ordered a multi-port serial adapter and dug out an old Pi2 B+ to make it happen!
The Hardware
You can probably use any Raspberry Pi model, so long as it has USB ports, I had a Raspberry Pi 2 B+ sitting around so that’s what I’m using. (D
You will also need a USB to serial adapter. I went with the UGREEN 4 port model that is pretty cheap. You could also do one or more single port adapters, but keep in mind the Pi’s limited USB power budget.
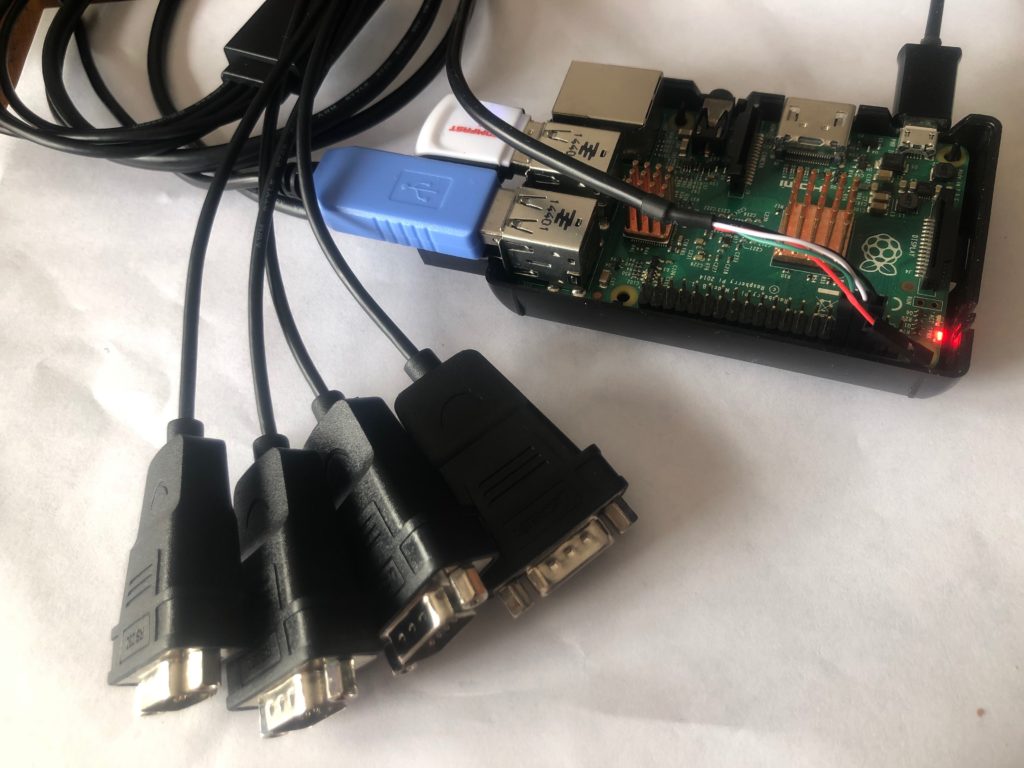
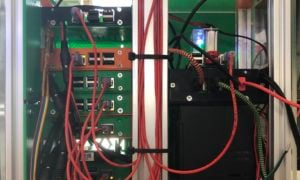
Lastly you will need Cisco Console cables, or EMC Serial Cables, or whatever cables are required for your device.
The Software
I’m using Raspbian, mostly right out of the box. In fact we only need to add one piece of software to make this project work.
To update your Pi and install ser2net use the commands below:
sudo apt update
sudo apt upgrade -y
sudo apt install ser2net -y
Serial Port discovery
Before we can configure ser2net we need to figure out where our serial adapters are listening. Normally serial ports are /dev/ttyS0 or ttyS1, but because we are using USB adapters the may show up as /dev/ttyUSB0 and ttyUSB1 etc.
Use this command to search for yours:
dmesg | grep ttyYou’ll see something like this:

As you can see I have my 4 port adapter plugged in, as well as my Adafruit USB to TTL Serial Cable too. With this
Configuration
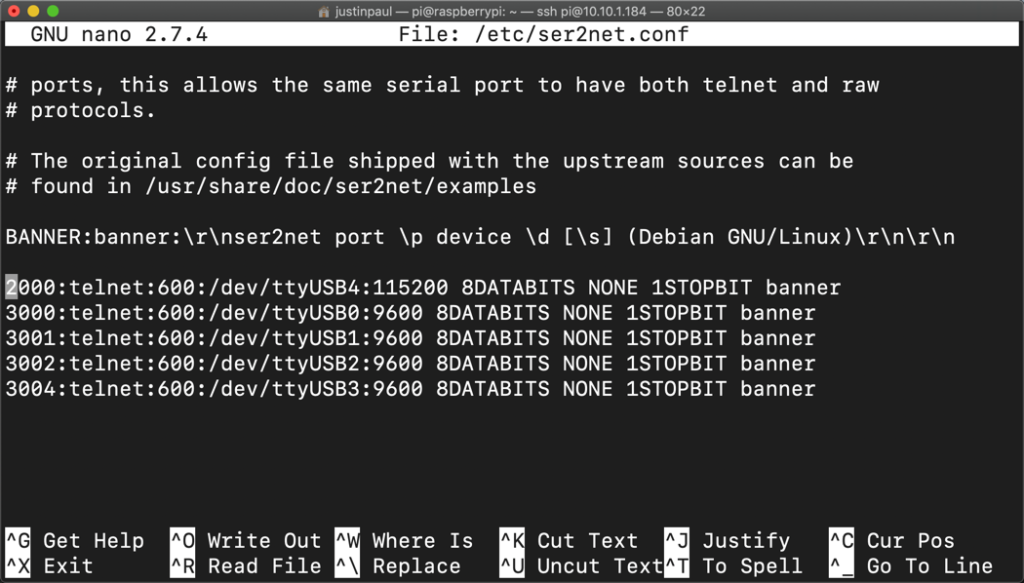
When you install ser2net via apt it puts the configuration file in /etc. To edit it you can use nano with is already on your Pi.
sudo nano /etc/ser2net.confInside you will find some default configuration lines at the bottom of the config file. We can easily edit these to meet our needs.
For my 4 port serial adapter, going to Cisco routers and switches (which use 9600 8N1 serial parameters), my file looks like this.
3000:telnet:600:/dev/ttyUSB0:9600 8DATABITS NONE 1STOPBIT banner
3001:telnet:600:/dev/ttyUSB1:9600 8DATABITS NONE 1STOPBIT banner
3002:telnet:600:/dev/ttyUSB2:9600 8DATABITS NONE 1STOPBIT banner
3004:telnet:600:/dev/ttyUSB3:9600 8DATABITS NONE 1STOPBIT banner
Here is a screenshot too (note that the ttyUSB4 is my adafruit adapter.
So this configuration will let us telnet to our raspberry pi on the ports specified. Those telnet sessions will be forwarded to our serial ports.
So on my mac I can type
telnet raspberrypi.local 3000It will connect me to whatever serial device is listening on /dev/ttyUSB0!
Conclusion
You can use this setup for anything that has a serial connection. IPMI servers, Routers, Switches, PLC’s, etc etc…
The only downside that I have seen, which isn’t a big deal in a lab, is that there is no authentication involved. So anyone who knows the connection parameters (telnet IPAddress Port) will have access to the serial device listening.
If security is a concern then I would just skip the ser2net program, and ssh into the pi, and run screen or cu directly to /dev/ttyUSB0 or something.
Happy Homelabing!
![]()

Hi Justin,
Awesome article and this is exactly what I need for my CCNP studies. (4x routers and 4x switches). I would like to attach 2x UGREEN 4 port mode to Raspberry 3 and basically screen or telnet to all 8 of them at the same time. You mentioned about Pi’s limit to USB power budget and do you think I would run into power limitation issues while connecting 8 devices?
regards.
Instead of telnet, can we do ssh version?
I need to use a program like SER2NET to deal with UDP protocol.; The latest version of Ser2Net that I can find for a Raspberry pi is 2.10.1, and it does not appear to contain that protocol. I was hoping that later versions would include include UDP. And I can’t get later versions to compile. My goal is – basically – to create a “virtual RS-232 cable”. Consider that if your computer has an RS-232 port. You can open that port and connect a cable to it – or not. If there is no cable, the data sent to that port goes nowhere, and nothing comes in to that port. But when the cable is connected to another device – data can flow. That is the kind of “connection” I need. tcp cannot provide that type of connection.
Hey Charles, so you are saying that SER2NET has UDP support, just not in the Pi version? Let me see if i can get it to compile.
As Shiki mentioned, I wonder if there is a way to do this with SSH in place of telnet? 🤔
This was very usefull, thank you. i make use of it for my smartmeter. only difference here is instead of 4001:telnet:600 it uses 4001:raw:600. downside is only one device can read the data, i have a second hass for backup and the wife still likes to use domoticz so this is also still running. still figuring out how to solve this issue. other than that, thanks for this post, i’m really satisfied so far.
Hi, what version of Ser2Net are you using , I understand there is the ability to,allow multiple connections which is great if you want to share a feed – do you know what version that is and how to upgrade to it ?
Is ser2net better than console pi?
Great project and write-up thanks for sharing. For variety, just wanted to mention that the same can achieved using Conserver with SSH connection (instead of ser2net). Conserver can also log output from serial ports so you can see what happened whilst you were not connected and watching. Just got a PI 4 B for Christmas. Will be migrating this to PI soon.
Hi. How do you get around the ser2net service starting before the USB devices are online? Your method works if you run at the command line, but on a reboot, ser2net starts first and does not open the ports (the USB devices are not mapped). You have to perform a service restart for it to work.
Hi Justin. Thanks for your Post
I configured my Rapsberry Pi 4. I followed all steps. When I try to connect via telnet, using Putty, or cmd , Raspberry refused the connection.
sudo nano /etc/ser2net.conf
2001:telnet:600:/dev/ttyUSB0:9600 8DATABITS NONE 1STOPBIT banner
2002:telnet:600:/dev/ttyUSB1:9600 8DATABITS NONE 1STOPBIT banner
2003:telnet:600:/dev/ttyUSB2:9600 8DATABITS NONE 1STOPBIT banner
2004:telnet:600:/dev/ttyUSB3:9600 8DATABITS NONE 1STOPBIT banner
I am getting the following error:
pi@raspberrypi:~ $ telnet reapberry.local 2001
Server lookup failure: reapberry.local:2001, Name or service not known
or using ZON (terminal emulator) or Putty:
Connecting to 192.168.50.187:2001 (press Esc to cancel)…
[TELNET] FAIL: 192.168.50.187 – No connection could be made because the target machine actively refused it.
Please Help!!!
Hi Chris,
Thanks for your help
Yes, I followed the steps from Keith Barker:
See below:
[Update/Install S/W]
sudo apt-get update
sudo apt-get upgrade -y
sudo apt-get install telnet -y
sudo apt-get install telnetd -y
sudo apt-get install ser2net -y
[Verify USB #]
lsusb
dmesg
dmesg | grep tty
[Edit Serial to Net Software to match USB#]
sudo nano /etc/ser2net.conf
2001:telnet:600:/dev/ttyUSB0:9600 8DATABITS NONE 1STOPBIT banner
2002:telnet:600:/dev/ttyUSB1:9600 8DATABITS NONE 1STOPBIT banner
2003:telnet:600:/dev/ttyUSB2:9600 8DATABITS NONE 1STOPBIT banner
2004:telnet:600:/dev/ttyUSB3:9600 8DATABITS NONE 1STOPBIT banner
[Enable ser2net each reboot]
sudo nano /etc/rc.local
/usr/sbin/ser2net -n
exit 0
sudo reboot
Set your terminal emulator (putty, SecureCRT, etc)
telnet 192.168.1.x 200x
When I try to connect via Telnet, I am having errors…
Thank you.
Hi , I am having issues when I am trying to connect via Telnet. See below:
Connecting to 192.168.50.187:2001 (press Esc to cancel)…
[TELNET] FAIL: 192.168.50.187 – No connection could be made because the target machine actively refused it.