Disclaimer: This is a pretty long article and explains the general overview of the network. I have not gotten into the technical setup of the radios in this article. I will save that for a future article.
Background
My family owns a few farms and other property in west-central Ohio. A place that is just starting to see reliable consumer broadband in rural areas. Growing up I was stuck with 56k dial-up for most of my childhood. It wasn’t until high school that I was able to get broadband quality internet, and even then it was 512kbps down 128kbps up. The next problem with it was that it was delivered via microwave signals that originated approximately 25 miles away. It was very unreliable during the weather that kept me inside.
Fast forward to today… I know much more about technology then I would have dreamed I would know when I was in high school. Which has enabled me to provide certain luxuries for my family (parents, grandparents, cousins, etc) that I wasn’t able to take advantage of. One of those luxuries is high-speed, low latency internet access. While working for my current employer one of my co-workers mentioned the Ubiquiti radios, so I looked into their features and started to plan out what could be accomplished with them and the tall silo…the main problem that plagued my idea however, was that DSL was still not available at any of our properties yet.
First Implementation
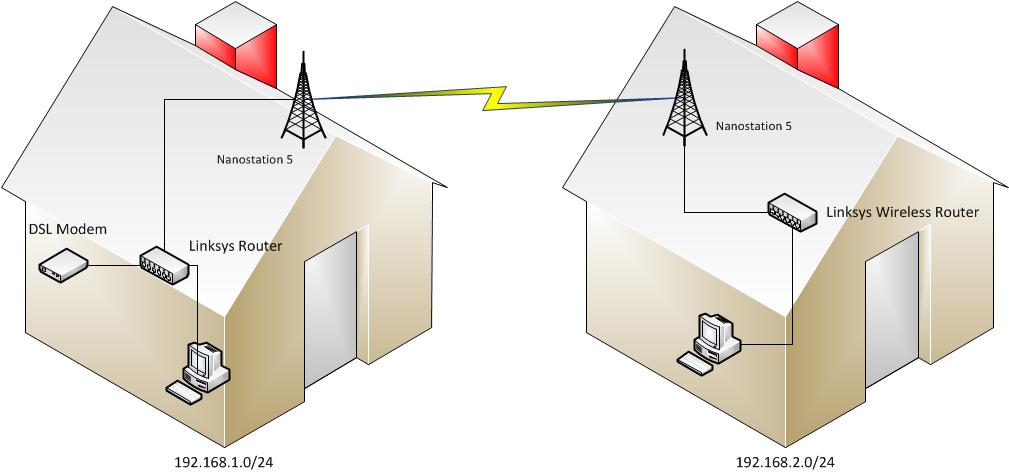
Just down the road one of my friends Mike had just built a new house but broadband was not available. During one of the many weekend beer drinking get togethers, I mentioned that since his parents house was less than 1/2 mile away we could probably use the Nanostation 5 radio in order to link his house to his parents. His wife overheard and gave us the go ahead on whatever it would take to make it happen.
Bill Of Materials:
2 – Nanostation 5 radios
2 – Window Mount NS5 Brackets
25ft – Outdoor CAT5 cable
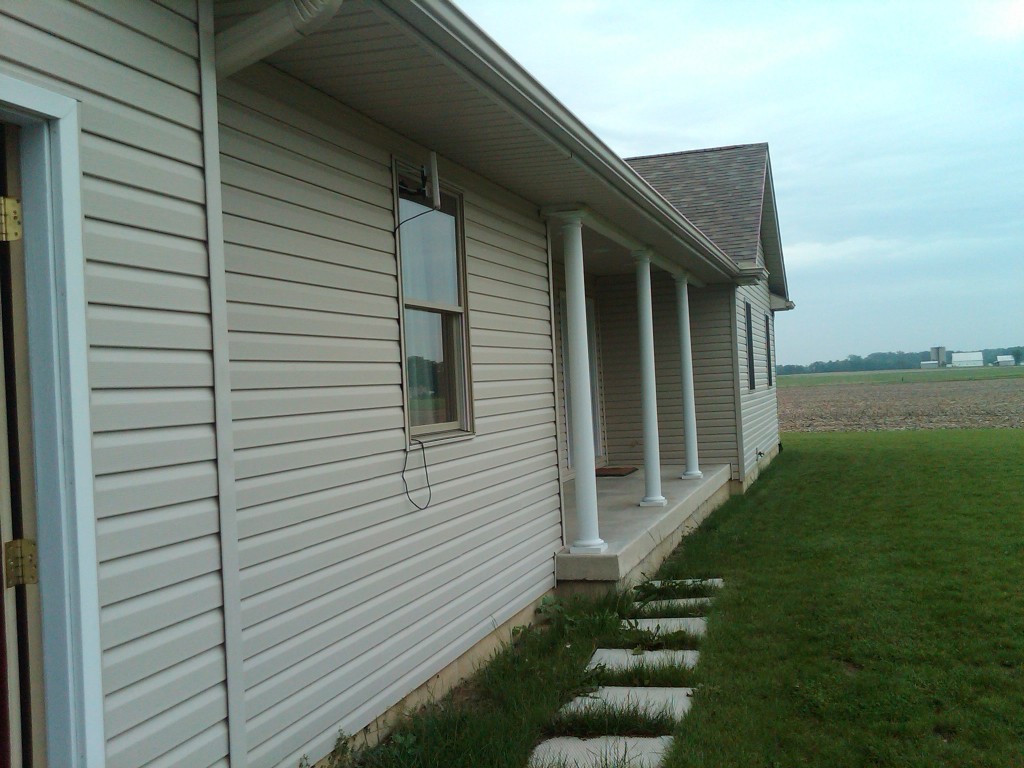
The NS5 radios are 802.11G radios capable of 54Mbps, much faster then the 5Mbps down connection at Mikes Parents. The pictures will show that there is a very clear line of site, my only concern was that during the late summer tall corn fields would really mess up the fresnel zone. After alignment we were getting around -60 dbm and could pass approximately 15-20Mbps. We implemented this as a simple layer 2 bridge from his parents network to his router…not the best design as his house is behind a double NAT, but non the less it works for the simple browsing that they use it for.
Second Implementation:
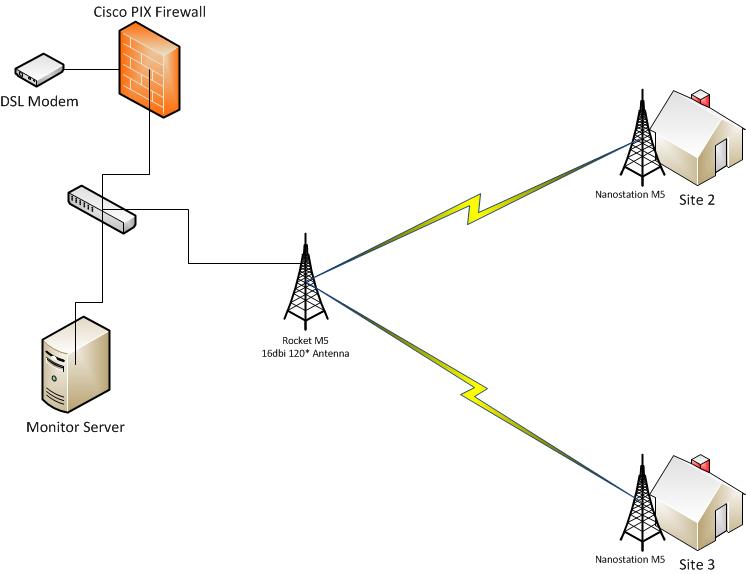
Finally, last fall Verizon DSL became available at my uncle’s house, soon I had convinced everyone that with a little investment in new devices we would save them monthly fees and pay for those devices within a few months. The design was to be a little different this time however, as there are three houses that would need to be connected together. Site 1, my uncles house, would be the gateway to the internet. It also houses all network equipment for monitoring and maintaining the network remotely (as I live 45 minutes away).
Bill Of Materials:
1 – Ubiquiti Rockt M5 Radio
1 – Ubiquiti 16dbi 120* antenna
2 – Nanostation M5 Radios
150ft – Outdoor Network Cable
(various other supporting network devices)
Network Overview:

This implementation was setup much differently for many reasons, mostly for scalability and isolation. After the neighbors caught wind that we would be covering a 120 degree area to the northeast I had people asking me if it was going to be possible to get internet access from me… they figured they might as well because I already come fix their PC when it breaks.
The radios used in this design are MIMO and are capable of much higher speeds than the ones used at Mike’s house. They can also be setup so that each device at a “customer” location is isolated from the other customers. Between these technologies the traffic from one remote site though the network is secure enough for the users on it.
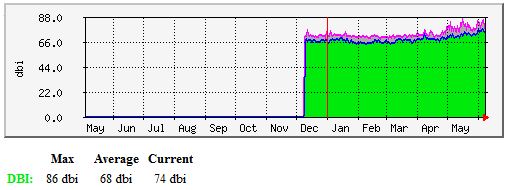
So far the only users on my little wireless experiment are those who are related to me, they are acting as a Proof of Concept and as guinea pigs to make sure the technology is reliable and sounds before I offer it to anyone else. And I must say that so far its working great, but because of the longer distances (approximately 1/2 – 3/4 of a mile) between sites, and only partially clear line of site I have seen some major shifts in signal strength during the transition from winter to summer.

(all signals are – dbi so the higher the blue line the worse the signal)
What I’ve learned:
Although I still consider myself a greenhorn in the wireless networking field, I would say that I have learned some important lessons along the way on these projects.
- Windows – while clear – will destroy Wi-fi signals, as bad if not worse than walls
- Signals will go through trees in the winter and spring, but when the leaves come out you WILL drop the link at least occasionally
- Advertised speeds are rarely achieved. The box advertised 150Mbps, however I will not see more than 50-60Mbps at the head end if I’m sending and receiving to both remote sites.
- Always whiteboard our your ideas and run them by as many of your peers as you can get to listen… it never hurts to have another set of eyes.
Future Plans:
Right now the wireless infrastructure is used only for internet sharing, but in the future I have plans to install a DVD server at the head site and implement some sort of IPTV. Most likely something like the Patriot Box Office, or Netgear Entertainer Live. So that we can also share movies and music between homes. The other idea that has crossed my mind is to use Trixbox CE and implement a VoIP setup at all of the homes so that everyone has the ability to call each other and has cheap long distance calling. (Voip.ms is about 1.5cents/minute)
Cost:
At first the costs for putting something like this in seems pretty expensive for the normal non-commercial use. The wireless equipment for this project was slightly under $400, but this doesn’t account for all of the other equipment that was already in place like TV towers, switches, etc. However, once you get in to what it would cost to have an internet connection at each house (approximately $39-$69/ month depending on package) its easy to see how quickly this pays for itself. Currently we get 3Mbps down and 768Kbps up from Verizon for $29.99. This is half the cost and double the speed of the competitors offering. Even if the radios need replaced every 36 months this is still a great ROI.
![]()


I just needed to say that I found your blog via Goolge and I am glad I did. Keep up the good work and I will make sure to bookmark you for when I have more free time away from the books. Thanks again!
Hello, just browsing for information for my Ohio 4g site. Truly more information that you can imagine on the web. Looking for something else, but great site. Cya later.
Thank you Justin for this article. Am considering a similar project and you made it look real and possible.
Justin,
This is a great article. Do you still have the Ubiquiti wireless setup?
Josh actually did this post but he still has it setup as far as i know.