Protecting vSphere with Veeam Hands on Lab
Lab Duration: Approximately 1 hour
Lab Skill level: Intermediate
Overview
In this lab you take the role of an administrator at a small company that has just deployed VMware vSphere.
However due to a growing backup window and expensive software renewal costs, a decision was made to deploy Veeam Backup and Replication in your test environment as a pilot.
The goal of this lab is for you to configure a newly installed Veeam server to protect a test virtual machine. In addition, you will also need to do a test restore of a word document from a windows vm.
Prerequisites
It is recommended that lab users have some familiarity with VMware vCloud Director, therefore Lab 0 – Intro to vCloud Director is recommended before taking any other labs.
Tasks Include:
- Creating a Veeam Backup Job
- Monitoring a Backup Job
- Restoring a Virtual Machine
- Restoring a File
- Replicating a Virtual Machine to a DR ESXi Host
- Failover from our production host to our DR host
For the best experience use a device with two monitors. Ideally you would use one screen for displaying this lab manual, and the other for the VMware View Desktop/vCloud Lab environment. If two monitors are not available, other suggestions include using an iPad or other tablet for the lab manual or working with another person and using their device for one thing and yours for the other. Printed lab manuals may be available if none of the above are possible.
Step 1 – Login and Lab Deployment
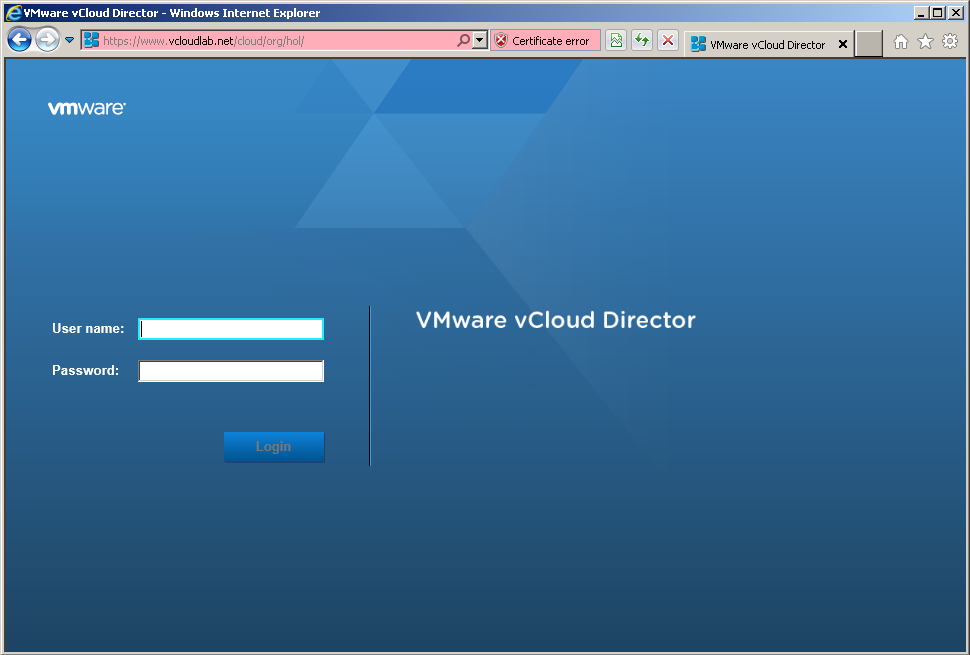
This lab will leverage VMware vCloud, in order to access the lab you will need to navigate to this URL:
https://www.vcloudlab.net/cloud/org/<username>/
(your username and password was in your welcome email)
Login with the username and password assigned to you or your group.
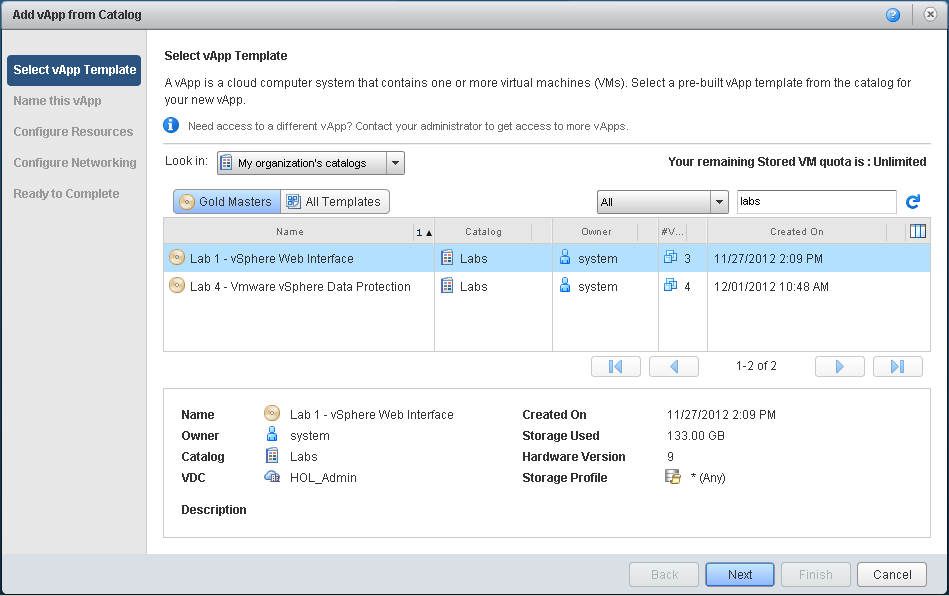
Once logged in you will need to deploy the “Lab 2 – Protecting vSphere with Veeam” vApp, to do this click on the “Add vApp from Catalog” button. Next Select “Public Catalogs” from the “Look in:” drop down menu. You should now see a list of the available labs, Select the “Lab 2 – Protecting vSphere with Veeam” lab and click “Next”. You can now name the vApp if you would like or leave it at the default. The lease settings can be left alone. Click “Finish” to deploy your lab.
vCloud Director will now deploy all of the virtual machines and networking components necessary for your lab. This process should not take more than 10 seconds.
Please proceed to the next step.
Step 2 – Power Up your Lab
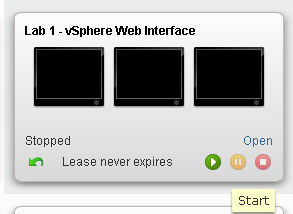
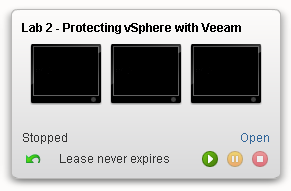
Once the lab has been provisioned it will be in a “Stopped” state, to power it up simply click the green play button on the vApp.
Because vCenter has many services to start, it will take about five minutes to fully boot up. We can review some lab info while we wait.
Step 3 – Lab Information and Setup
This lab is built on top of VMware vCloud Director. vCloud Director leverages VMware vSphere and adds a layer of abstraction so that resources can be offered to consumers through a self service interface, and without them needing knowledge of how those resources are configured on the backend.
This technology is the same thing you would get from a vCloud Powered VMware Service Provider, and can be leveraged for anything from test/dev environments to mission critical business applications.
This lab consists of several pieces:
1.) A Veeam Server – 192.168.2.10 – Credentials: administrator / vmware1
2.) 2 ESXi 5.1 Servers – 192.168.2.20 & 192.168.2.25 – Credentials: root / vmware1
3.) A test VM — this is a virtual machine running inside of one of the ESXi hosts
How the lab works
At this point your lab should be getting close to finishing its boot process, before we start let’s take a minute and explain how you will interact with your lab.
The ‘VeeamServer’ virtual machine will be where we spend all of our time in this lab. Because the lab is 100% isolated, the only way to access anything in your lab is through the VeeamServer console.
Vmware vCloud Director can be accessed from a VMware View desktop, or directly from your personal machine, as the www.vcloudlab.net URL is publicly accessible. However for best video performance, using the VMware View Desktop is preferred. Check your welcome email for more information on how to access the View Desktops.
Step 4 – Opening the VeeamServer’s Console
Let’s first open up the vApp so that we can see our individual virtual machines. Click open on the vApp.
Next, click once on the VeeamServer VM, then click again on the console thumbnail. This will open the console of the VM. Click continue or accept on any SSL warnings. You may also need to allow popups in the browser.
NOTE: You will need to click “Allow” on the Remote Console plugin the first time that you open a console. It will appear at the bottom of the Internet explorer window at the same time that a popup box telling you to install it appears. YOU DO NOT need to install it, just click allow at the bottom as seen in the following screenshot.
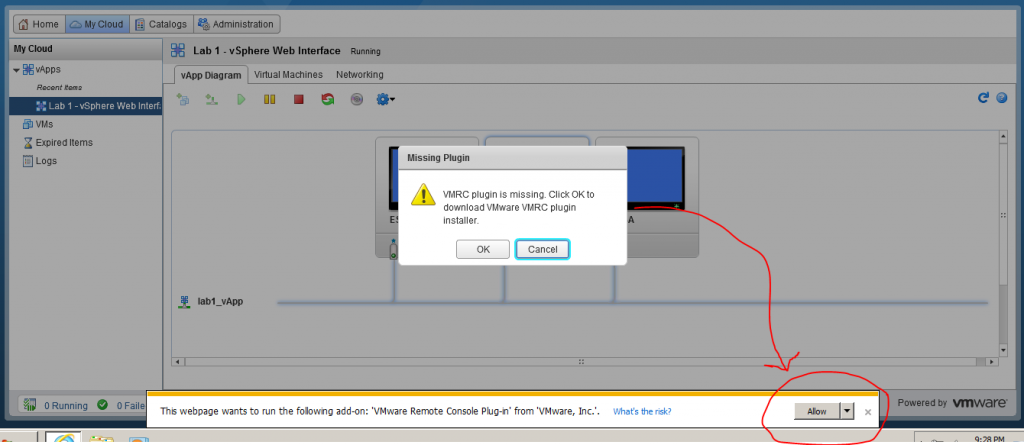
Note: it can takes 3 attempts before the console will open due to popups and allowing the “Add on” to run, this will largely depend on if you are using a view desktop or if you are using your local machine.
Step 5 – Login to the Veeam Server
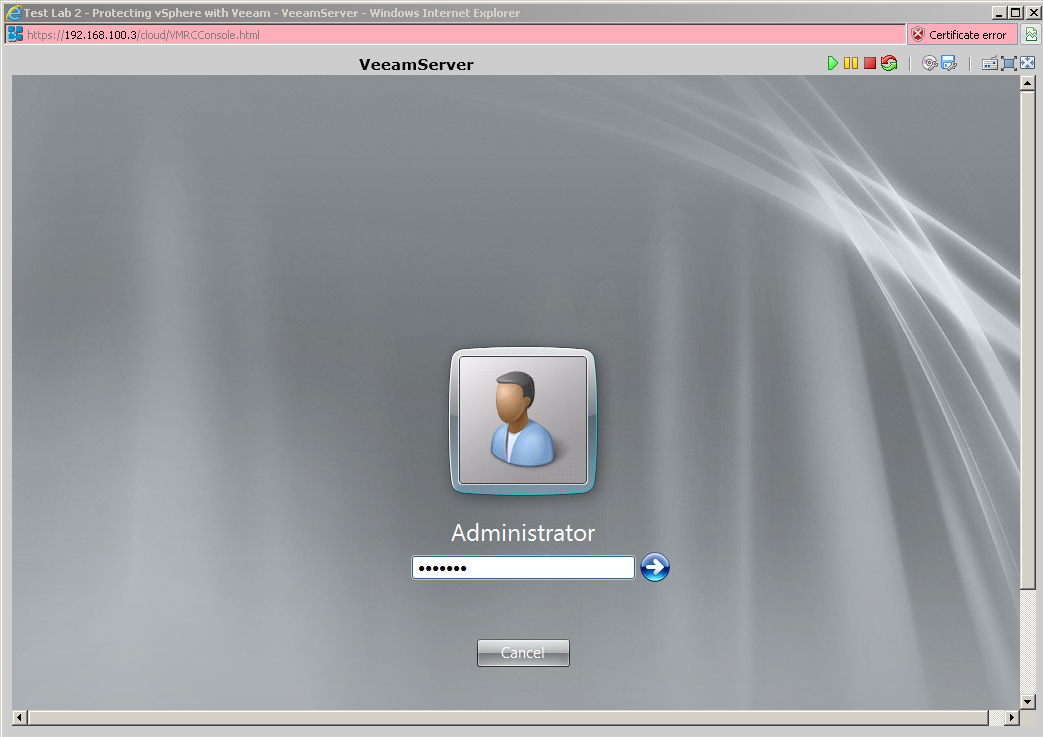
At this point you have the VeeamServer console open and probably see the Windows 2008 R2 “Press CTRL ALT Delete to login” screen. The best way to do that is to use the CTRL+ALT+DEL button in the top right corner of the console window. Find and use that button and then use administrator / vmware1 to login.
Step 6 – Launch Veeam Backup and Replication
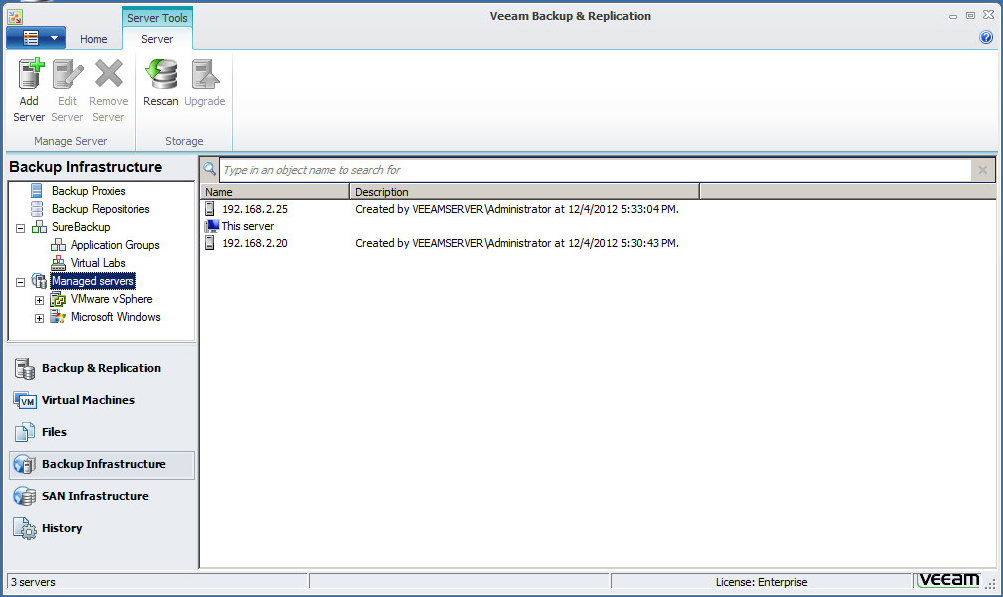
On the desktop you will find a Veeam icon double-click on the Veeam Icon and let the interface load. Now find the “Infrastructure” section in the left menu. Click on it, and look in main body to the right. You will see that both ESXi servers have been added to Veeam. 192.168.2.20 will serve as our main server, and 192.168.2.25 will serve as our DR server that we will replicate to.
The default “c:backups” backup repository is what we will use for backups. Normally you would need to create a backup repository before doing a backup. For Lab purposes we don’t need to.
Step 7 – Create a Backup Job
Click on the “Backup & Replication” section in the left menu. Right now you will see nothing in the right box because we have not created any jobs yet.
Click the “Backup Job” icon at the top of the Veeam Interface.
The job wizard will appear. On the first page name your job “File Server Backup”, then click next.
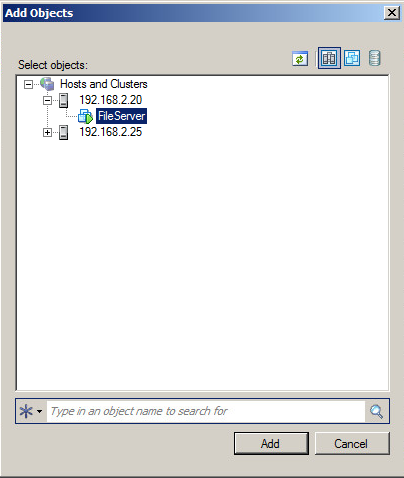
On page two we need to select which VM’s we want to backup. Click the “Add” button on the right side of the wizard. Now click the + beside of 192.168.2.20, this will take some time before it expands. Once it does expand select the “FileServer” VM. Click Add and then next.
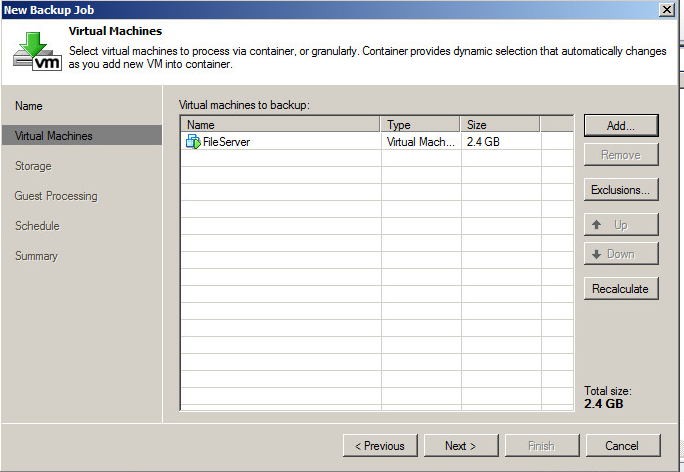
After you click on the FilseServer VM, click ok and then you should see it added to the list, like below.
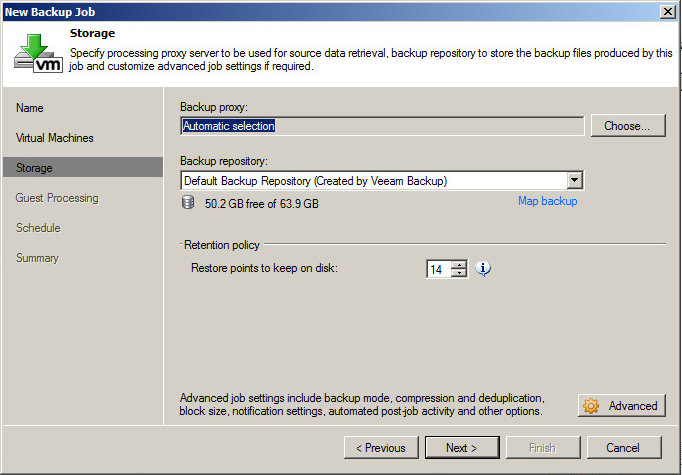
On the “Storage” page of the wizard we can select which backup repository the data will go to along with how long to retain a restore point. There are also advanced settings that we will not cover in this lab that can be adjusted here. You can leave all of the settings at their default and just click Next to proceed.
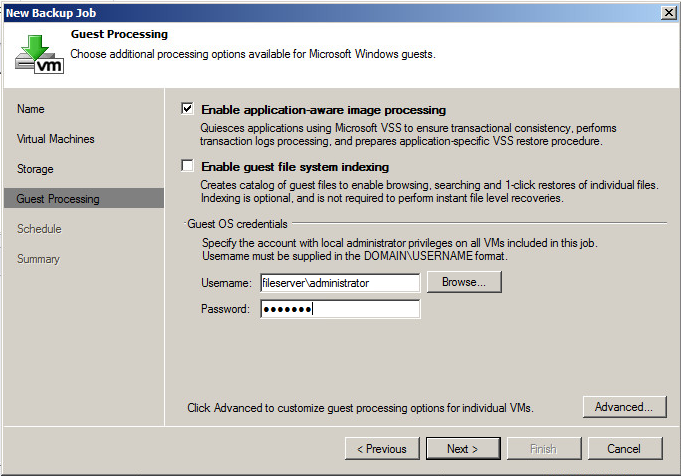
The Guest Processing screen has options that need to be setup if we are backing up a VM that has Microsoft VSS capabilities. Check the box next to “Enable application-aware image processing” and then fill in the Username and Password below with administrator / vmware1
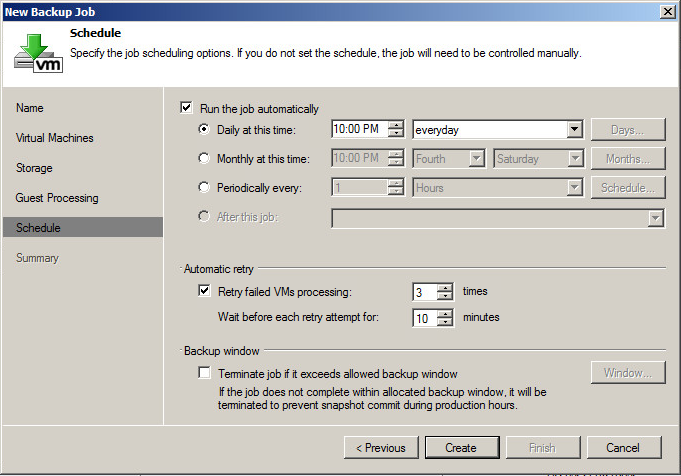
Next we need to setup our backup schedule. Check the “Run this job automatically” option and then review the different types of schedules. For Lab purposes we can just leave these settings at the defaults.
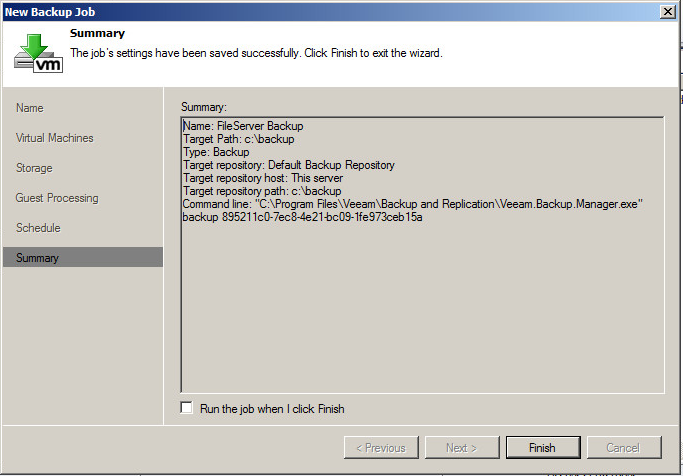
On this final screen we can select the “Run the job when I click Finish” option and then select Finish. Veeam will now create your backup job and do the first backup. Now that you are back in the main window you will see your new job and see that it’s status will start with 0% complete….
Step 8 – Monitoring a job
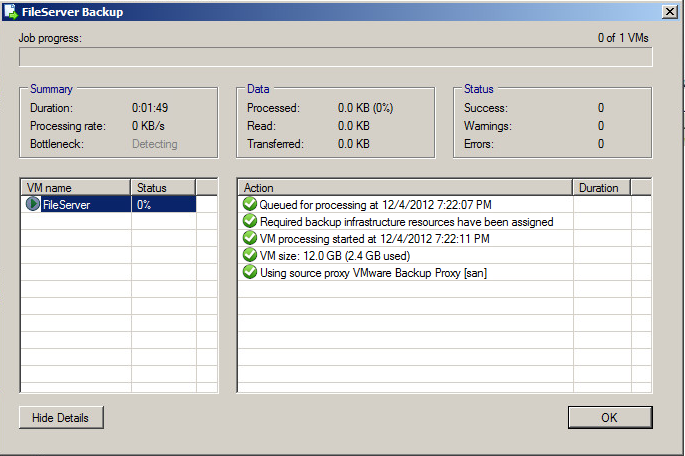
Right Click on the job and select the “Statistics” option. Next click the “Show Details” button.
This screen will show you the overall details of the job, if you wish to see more details about a specific VM in that job click on it in the left pane. If you click on the “FileServer” VM you will see which part of the job is currently processing and how fast.
The job will take about 10 minutes to complete (this is very dependant on the number of lab users and may take longer if the lab load is heavy), exit the status window and proceed to the next slide.
Step 9 – Creating a Replication Job
While our backup job is running we can go ahead and create our replication job. The goal is to replicate the FileServer VM from Prod-ESXi1 to DR-ESXi. Click on the “Home” tab at the top of the Veeam interface, and then select ” Replication Job”.
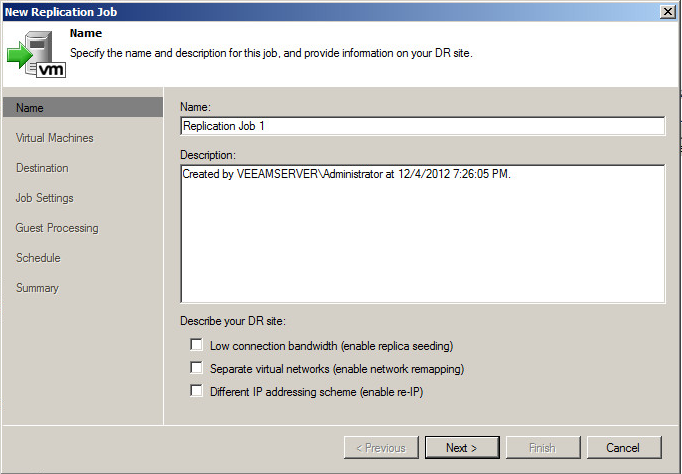
On the first page of the wizard we can name the replication job. I used “Replication Job 1” but you can use whatever you want. The check boxes at the bottom are more advanced settings and will not be used in this lab. Proceed to the next step of the wizard.
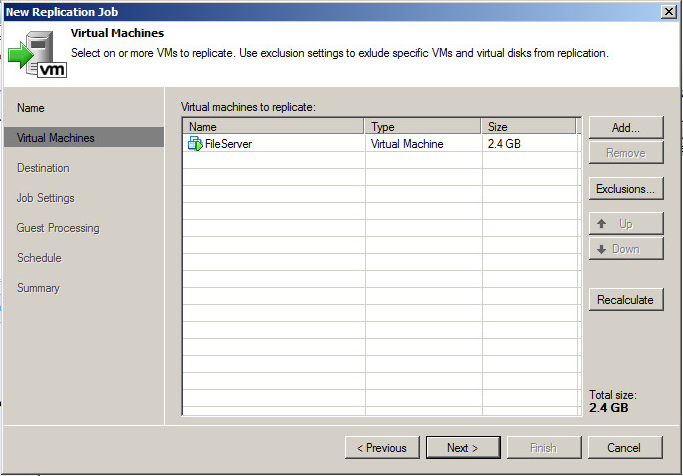
The next step is to add a virtual machine to the replication job. This is the same process as adding a VM to a backup job. Click add, then select the FileServer VM. Then click Next.
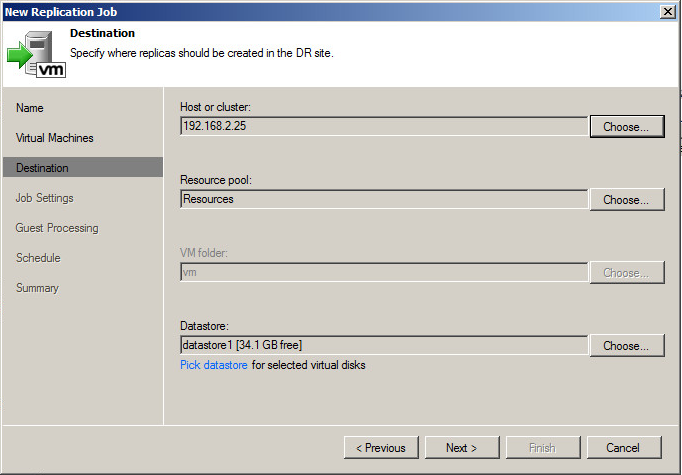
The next step is much different from a backup job. Here we select the destination host, instead of a destination backup repository. Click “Choose” on the “Host or Cluster” box and select the 192.168.2.25 ESXi host. All of the other options will auto populate. Then click Next.
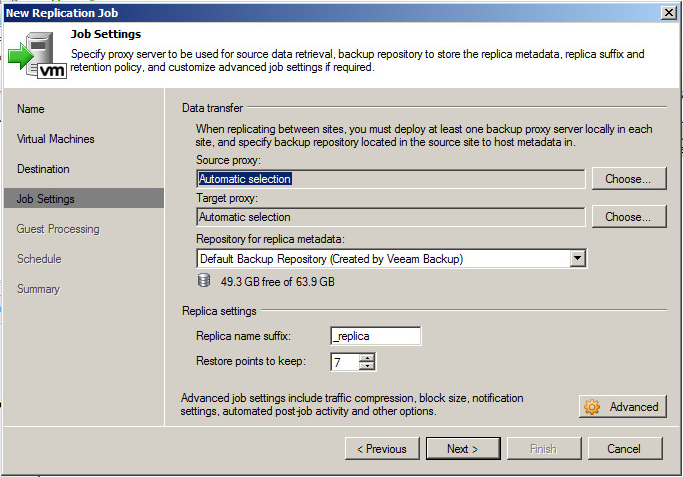
The job settings section would normally be where you change your local and remote Veeam Proxy servers, but for lab purposes we can leave everything at its default settings. Click Next to continue.
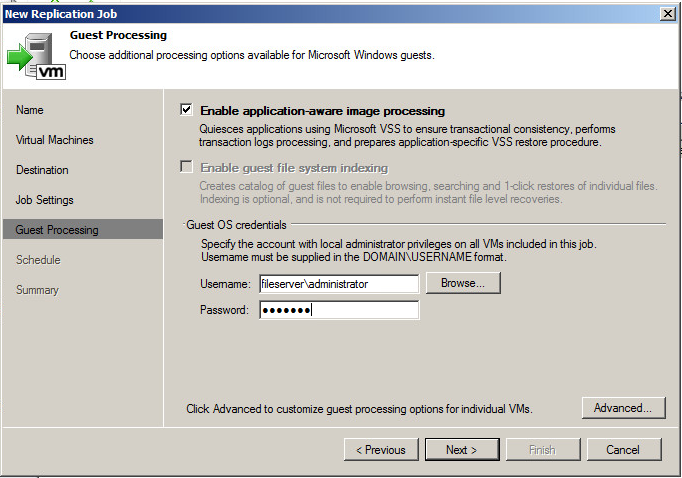
You should now be on the Guest Processing page, here you should click “Enable application-aware image processing” and enter administrator / vmware1 as the credentials. Then go to click next to set the schedule.
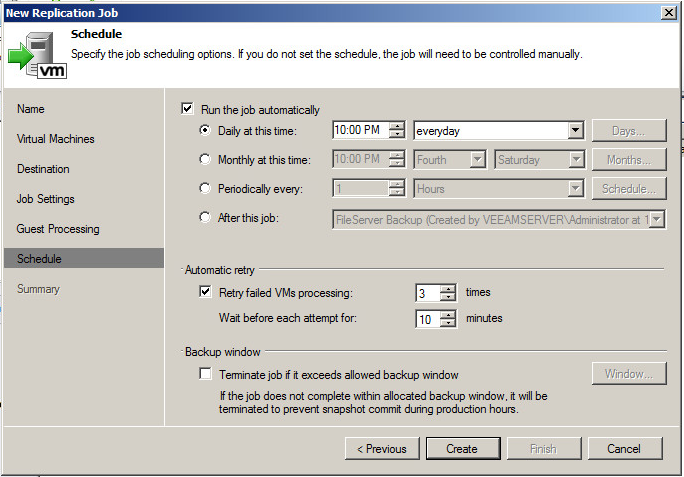
Here on the schedule screen we can setup a replication schedule just like we can do for a backup job. I selected daily at 10pm, but for lab purposes it really doesn’t matter.
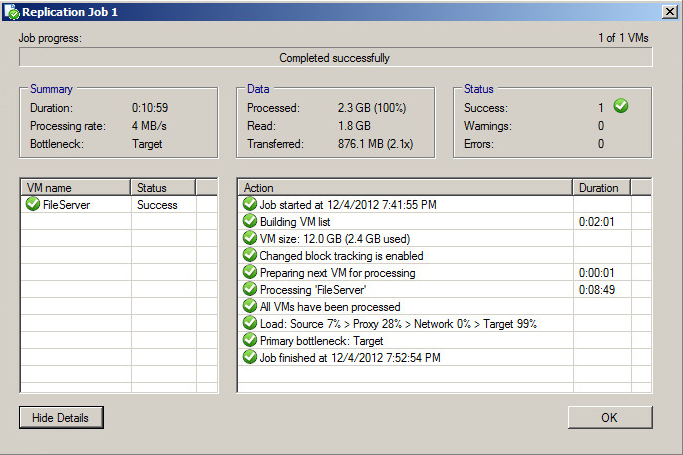
After setting the replication schedule you will be on the summary page of the wizard. Click Finish so that Veeam creates the job. You should then be back at the jobs page and be able to see the backup and the replication job. If the backup job has completed, right click on the replication job and select “Run Now”. If the backup job is not done yet wait until it is before proceeding.
Step 10 – Delete a Known File
Open up Windows Explorer by clicking the “folder” icon in the task bar to the right of the start menu. In the address bar type \192.168.2.30files If asked to login use administrator vmware1
You should see one file called “RestoreMe” open that file and verify that it has text in it, then close it.
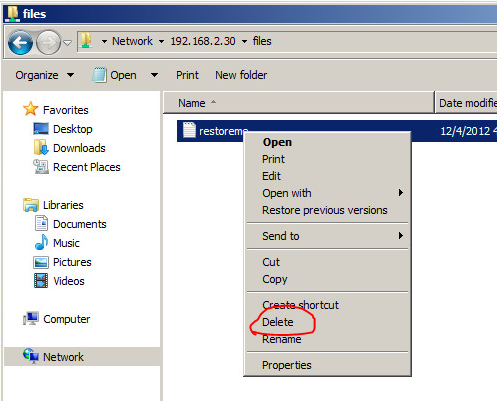
Right click on that file and select delete, the folder should now be empty.
Step 11 – Restore the File
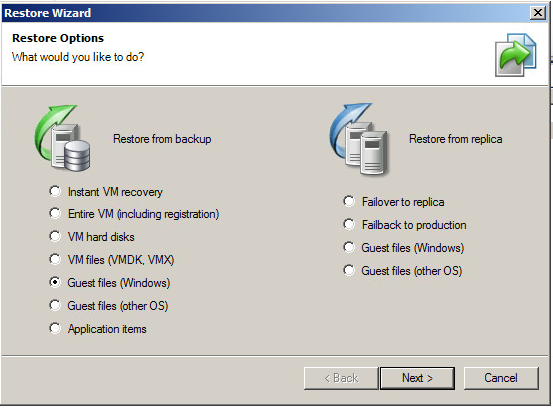
Head back over to the Veeam interface. In the top icon bar you should see one called “Restore”, click that icon. We will be restoring the file from the local backup, but notice that we can even restore files from the replica’s on our DR server. Click “Guest files (Windows)” in the left menu then click next.
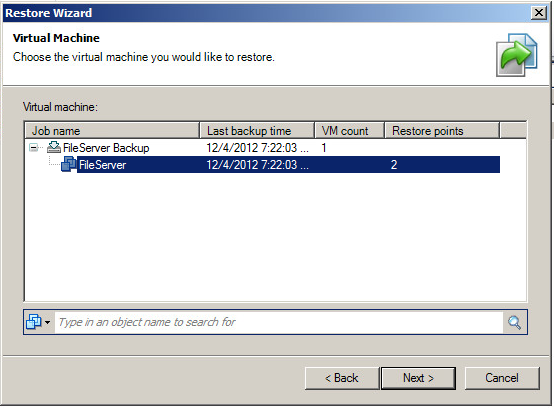
Next expand out the “FileServer” backup job and select the “FileServer” VM so Veeam knows which VM we ant to restore files for. Then click next.
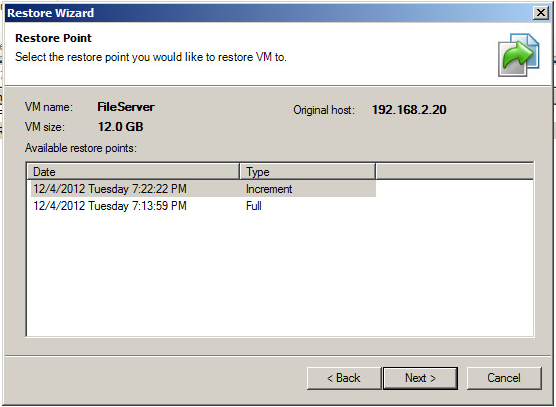
If you had multiple restore points this next screen would allow you to drill down into exactly which one you wanted to use. Click next.
The next screen allows you to enter a reason for the restore. This is not required and is strictly for logging/documentation purposes if you ever needed to know why a restore was done. Click Next.
After clicking next you will be on the “Completing the Restore Wizard” page. Don’t worry we are not restoring the entire VM. After clicking “Finish” Veeam does work behind the scenes and will then present an explorer-like interface for us to find the files we want to restore, Click finish.
Selecting your files from the Backup
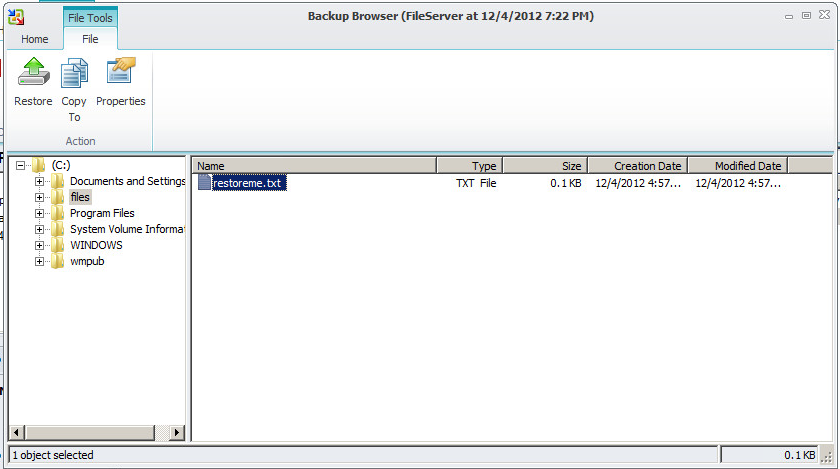
Once the explorer interface opens, navigate to the “C” drive on the left and then click the “files” folder. Inside you should see the “RestoreMe” file, click on it and you will see the buttons change in the ribbon at the top. Click the “Restore” icon, which will restore the file back to its original location.
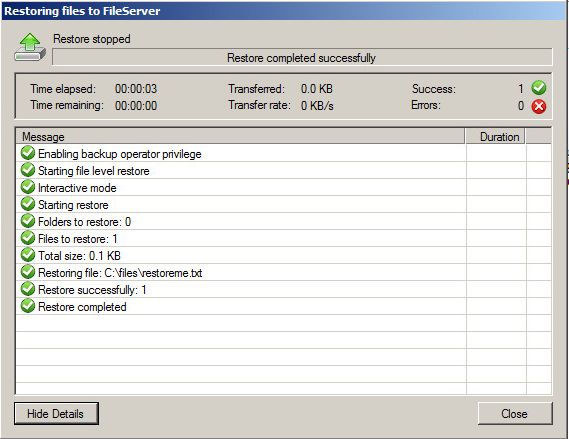
The file will be restored to its original location and you will see a status window popup.
Step 12 – Check the restored file
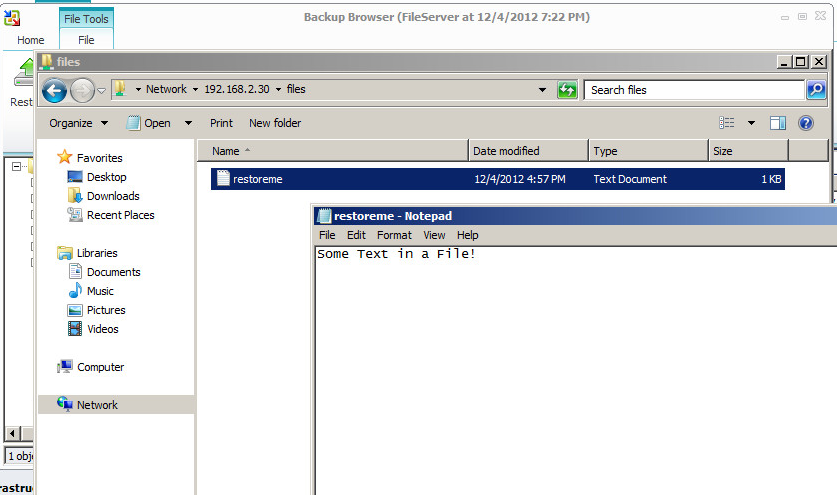
Let’s now check to make sure the file has been restored and that the data is in place. Open up Windows Explorer and in the address bar type in: \192.168.2.30files
You should see the RestoreMe file is back, open it and see if it has the same data inside of it. If it does then your restore worked successfully.
Step 13 – Failing over to your DR Server
In the next few steps we are going to leverage the Veeam Replication job that you created to start up the FileServer VM on the DR-ESXi host. Before we can do that make sure that Veeam has completed the replication job that we created, and that its status is success. Once it has completed we can proceed.
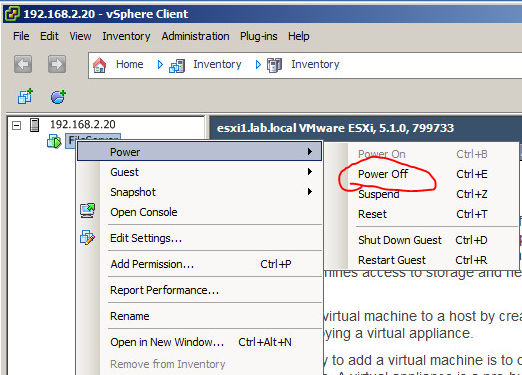
Before we can initiate a failover to our DR site server we need to power off “FileServer” from the ESXi1 host.
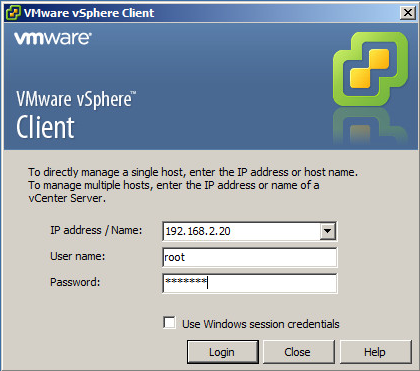
Use the vSphere client on the desktop to login to: 192.168.2.20
Credentials: root / vmware1
Then right click on FileServer and select
“Power->Power Off”.
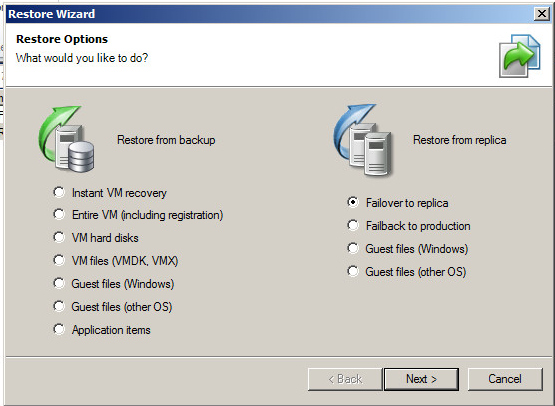
In the top icon bar click “Restore” again, just like we did before.
This time select “Failover to replica” on the right side and then click next.
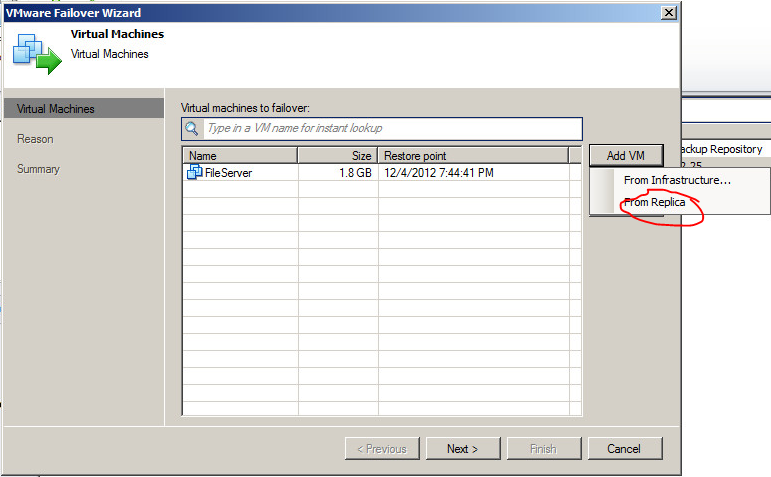
On the next screen press the “Add VM” button on the right. Then select “From Replica”, a box will then popup where we can select “FileServer” after expanding the replication job we created.
Click OK after selecting “FileServer”
On the next screen we can again fill in a reason of why we are failing over. This is not required, Click Next.
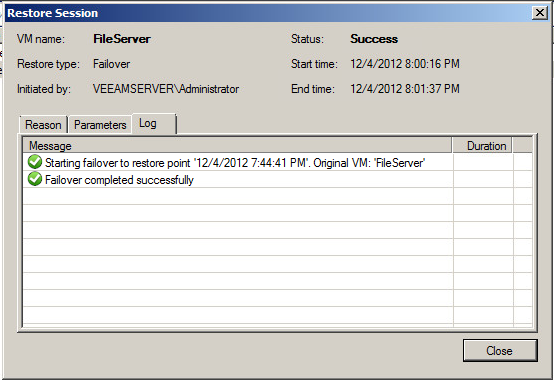
And then click finish. You will now see a progress box appear with the process status. If you leave this box open you will eventually see “Failover completed Successfully”. You can now close the box.
Step 14 – Verify Failover
At this point we can login to both of our ESXi servers and see that FileServer is now powered off on the 192.168.2.20 host and “FileServer_replica” is now powered on at the DR host 192.168.2.25
A Second way to verify is to go back to
\192.168.2.30data
and look at the time stamp of the RestoreMe file.
Congratulations! You have completed Lab 2
If you still have time remaining feel free to explore the lab environment and vCloud Director.
More highlights about Veeam include:
- Ability to failback from DR
- Ability to do an instant VM recovery
- Multiple backup proxies for parallel job execution
- SureBackup can test your backups after every backup
Housekeeping / Lab Cleanup
When you are done with the lab, you can delete it from the HOL Cloud. To do this click on “Home” in the top left area of the vCloud interface. Next find your Lab vApp and press the Red Stop Button, after the vApp has stopped you can right click on it and select “Delete”.
Please note that your HOL Cloud account can only provision a small number of VM’s at the same time, so you will need to delete one lab before staring another or provisioning will fail.
Questions and Feedback
Once you have finished the lab please complete the HoL Survey by clicking this link:
Any questions can be sent to [email protected] or submitted via the survey.
![]()

