Disclaimer: As with all howto posts here, I do not take any responsibility if you lose your data. I have done research to make sure that all information provided here is as accurate as possible, but there are always variables. Make sure that the information below is relevant your environment and make sure to always have a complete backup before trying this at home (or the office) 🙂
I have two Iomega IX2-200 NAS devices, they do a great job of storing my media as well as providing some iSCSI and NFS storage for my VMware lab. Unfortunately because they only have two drives in them they have always been fairly slow, but in an effort to squeeze as much performance out of them as possible I decided to see if the main XFS file system could be defragmented. Much to my surprise, the utilities to do so were already installed and ready to run on one of my two IX2-200’s.
Note for IX2’s that are not the “Cloud” version
I should make a note that even though my IX2-200’s are both the non-cloud versions, I did have a friend upgrade one of them to the cloud version’s firmware. The cloud IX2 is the one that includes the XFS defrag utilities, however I found that all i needed to do was use SFTP to copy the utility over to the non cloud IX2 and it ran fine there as well. Since you may not have a cloud IX2 available to you I have tar’ed the file that is missing and you can download it HERE. After downloading it use something like WinSCP to transfer it to the root directory of your IX2 and when needed, you can run it by typing ./xfs_fsr …. Please note if you dont already have SSH enabled you will need to do the next part before trying to upload the xfs_fsr utility to your IX2.
Enabling SSH
In order to get to the linux shell we need to enable SSH on the IX2, this is a fairly simple task that is done from the web interface. Here are the steps:
- First login to the IX2-200 via the normal admin page.
- Next browse to https://The_NAS_IP/support.html
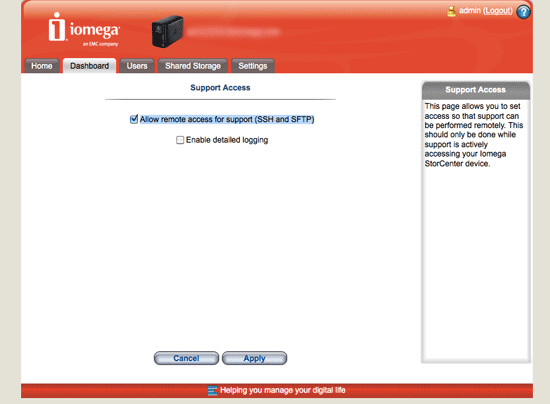
- Click “Support Access”
- Check the box next to “Allow remote access for support (SSH and SFTP)”
Here is a screenshot of the non-cloud version of the IX2
Now that you have SSH enabled we can login using Putty or other SSH utilities. The username is root and the password is a combination of your web interface password and “soho”. For example if your password is “jpaul” then your root password is “sohojpaul”.
Do you need to defragment ?
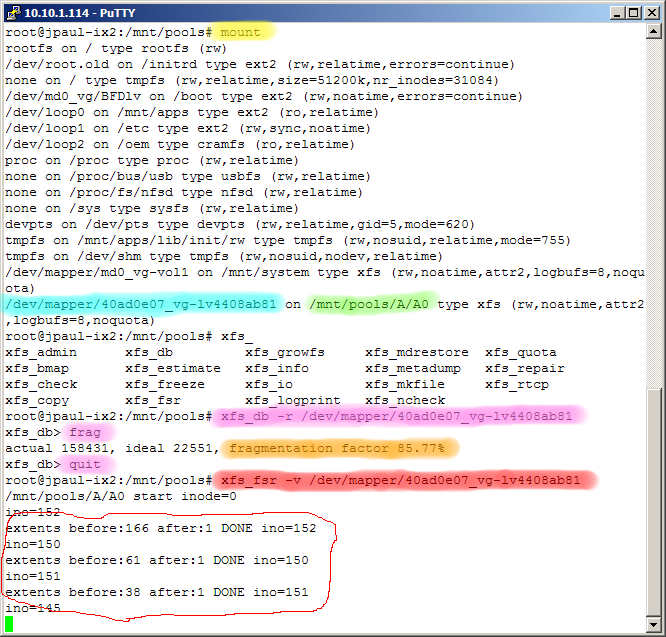
After we have enabled SSH and uploaded the xfs_fsr utility we can now check to see if we really need to defrag our NAS. To help make things easier I have one screenshot which multiple highlighted areas, each with different colors. As I explain the process I will reference the same screenshot and note which color I am referring to.
The first thing to do after getting logged into the IX2 is to type the mount command (highlighted in yellow). This will list the mounted file systems on the NAS, we are looking for the last line in the out put which normally contains “/mnt/pools/A/A0” (If you have a non-cloud version it will say “/mnt/soho_storage”. After you find that look over to the left and copy that information (highlighted in blue) to notepad or something. That is the RAID1 mirror that we will be defragmenting.
Next we need to run the ‘xfs_db’ command (highlighted in purple), this command is the debug command that will help us find out how badly fragmented the file system is. first type ‘xfs_db -r’ then paste in the information you copied (highlighted in blue). This will bring you to a debug shell for XFS. Type ‘frag’, and you will see a % fragmented for your NAS… mine is 85.77% (highlighted in orange). Type ‘quit’ to drop back to the linux shell.
The next command is the actual defragmentation process, and will take several hours to complete. It is highlighted in red. Type ‘xfs_fsr -v’ then paste in the information you copied earlier. PLEASE NOTE: if you have a non-cloud edition IX2 then you will need to type ‘./xfs_fsr -v’ after making sure you are in the directory where you extracted the xfs_fsr utility.
You should start to see something like “extends before:XXX after:1 DONE” this lets you know that the process is running, also if you are close by the NAS you will notice the hard drive light is on almost solid.
Video: HDD light during defrag
Future Prevention
After your defrag completes you are probably thinking that you dont want to wait that long again, nor do you want performance to get degraded if you forget to run it on a regular basis. For this purpose I will explain how to add a scheduled task so that it runs this process automatically each week.
To implement this we will create a cronjob that will execute at midnight on Sunday night (or Monday morning).
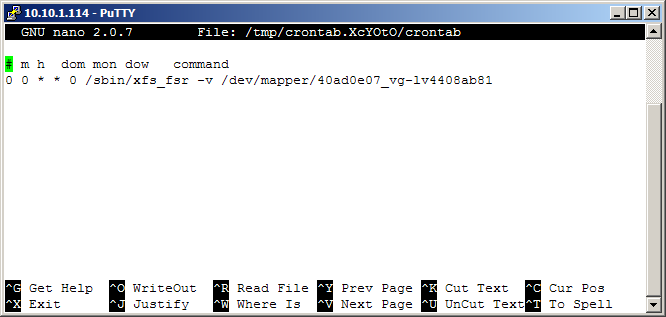
Type ‘crontab -e’ as root and you will be brought into a text editor where we can paste the last command that we used before. The only difference is that we need to add the required numbers so the command runs when required.
For my system here is what I needed to paste in:
0 0 * * 0 /sbin/xfs_fsr -v /dev/mapper/40ad0e07_vg-lv4408ab81
For your system you will need to change the “/dev/mapper/40ad0e07_vg-lv4408ab81” to whatever you copied earlier which was in blue.
If you have a non-cloud version of the IX2 then your command will look like this:
0 0 * * 0 /xfs_fsr -v /dev/mapper/40ad0e07_vg-lv4408ab81
If you did not extract the xfs_fsr utility to root ( / ) then modify the command as needed, you will also need to change the /dev/mapper/… to whatever is specific to your system, you copied it down earlier 😉
Ok you should be all set at this point, you should have a NAS with a defraged file system as well as a weekly maintenance task that will run the defrag command each week to keep things working nicely. If you do need to change the time when the command runs please reference this site: http://www.adminschoice.com/crontab-quick-reference as it has a great overview on how crontab works.
Update / Results:
I wrote this post just after starting the defrags on both NAS systems, this morning (the next day) I ran the ‘xfs_db -r’ command again to check to see how much fragmentation was left now that both devices had completed their run.
NAS1 before was 85.77%, Now after the defrag it is only 1.54% fragmented!
NAS2 before was in the neighborhood of 65% (apparently I didn’t record that info), but now it is only .27%!
Hopefully this will make a little difference in my day to day use of the systems.
![]()





Nice, but now reboot your IX2 and check your crontab again.
You’ll find out that the crontab settings are gone as an empty copy has been loaded from the standard image. 🙂
So the auto-defrag works great until you end up rebooting the device.
hmm thanks for the tip, I will have to get the steps together to remount that FS RW and then make the changes so they are saved.
I was actually looking into that part myself when I bumped into your post as I had just set a crontab and rebooted the device to find out my settings had disappeared.
These posts might help you:
http://www.chrispont.co.uk/2010/10/allow-startup-daemons-on-storcenter-ix2-200-nas/
and:
http://techmonks.net/installing-transmission-and-dnsmasq-on-a-nas/
Note that I’ve not perused it yet myself as I got a bit time constrained and it all seems a bit convoluted to do a simple change. With the device itself being pretty remote (europe vs. Asia) I’d like to wait until I’m at least at the same continent or until I’ve got more time to look into it and see if there isn’t a more simple solution (like you say, mount rw and change the default script)
Hope this helps
Thanks for this very useful tutorial. By the way, I am wondering which ESX version you are using at your vmware lab?
I know the ix2-200 works under ESX 4.1 but I need to know whether it will cease to work once i upgrade to 5.0.
Thanks
zeke
they both run fine under ESXi 5.0 and 5.1.
I have used both iSCSI and NFS shares to VMware
Thanks for the great information. I am on Firmware version 3.2.6.21659. I had to set my browser to:
http://ip_address/diagnostics.html
to set up SSH and SFTP.
Interesting you mention this device works fine with ESXi 5.1. I upgraded this morning and could no longer access iSCSI. However, ESXi 5.0, 5.0 U1 had worked fine.
I rolled back to 5.0 U1 and again no trouble.
I only use NFS with the IX2 and ESXi5.1 … i havent used iSCSI on it for a long time. Since there aren’t multiple storage processors or ports, and we know that the two disks in the IX2 will always be the bottleneck NFS is probably a better protocol for this little guy.
Hi great article. I tried it on my non-cloud ix2 and was able to get as far as obtaining the figure for existing fragmentation which is 19% but when I type “./xfs_fsr -v …..” I get “Permission denied”. I have recently updated to the very latest non-cloud firmware. Would you kindly let me know what I am doing wrong, I am a total newby to Linux, but it reminds me of Novell NetWare in 1994 ! Many thanks.
Nice post.
For non-cloud ix2 devices you can copy the xfs_fsr file into /opt/bin
Then ensure it’s owned by root:root and chmod to 754
Then it’s in your path. Preferable to me than copying executables into the root of the filesystem.
To make cron work after reboots, create files in /etc/cron.d, rather than editing crontab.
My only issue with this is the cron daemon doesn’t start on reboot – I start it manually. Haven’t taken the time to figure out why.
Update
copying /etc/rc5.d/S89cron to /etc/rc2.d
starts the cron daemon on reboot.
thanks for the information, is there also a way to run a check disk?
Hi there, I stumbled onto your blog while trying to solve an unrelated problem but it seems to me you know what you are doing with these boxes. I know its a lot to ask to help a complete stranger so i completely understand if you ignore my issue. My ix2 died with no data access and obviously I have no backup (zzz). While it’s not the end of my digital life there are some family videos and files I would like to recover off the unit. I am a strong wintel user but totally crap with ‘nix systems. Anyways the GUI indicated a drive failure so I opened the unit up and sure enough one drive was toast. I spoke to the tech support guys at Iomega who advised me to simply put a new 1TB drive in as a replacement and it would automatically rebuild. They said it would take a day or so. I waited for two and then decided to roll up my sleeves and start digging as I noticed there was no drive light (blue) activity at all. I found sites that pointed me to http://ip-of-nas/diagnostics.html where I enabled shell access and found the possibility to repair/rebuild the unit. I tried the rebuild option and the drive light flickered away for a few days but not much else happened. I tried the repair option and that too cause intermittent drive-light activity but again 3 days later zip…
So I rolled my sleeves up further, pulled the original working drive and plugged it into a docking station connected to my PC. I ran a passive recovery utility that showed me three partitions on the drive a 4GB, a 20GB and the big 979GB data partition. a laborius scan yielded thousands of nameless files. I recovered a few to the PC and sure enough they were valid video files (I just renamed one to “example.avi”). The idea of sifting through these thousands of files and painstakingly renaming them brought me back to that shell interface. I figured if I put the drive back in the native OS of the ix2 should see them for what they are. Days of playing with various new and exciting commands brought me to your website.
The command parted -l /dev/sda yielded:
Model: Seagate ST31000520AS (scsi)
Disk /dev/sda: 1000GB
Sector size (logical/physical): 512B/512B
Partition Table: gpt
Number Start End Size File system Name Flags
1 36.9kB 21.5GB 21.5GB primary
2 21.5GB 1000GB 979GB primary
The command pvs yields:
root@Iomega2TB:/# pvs
PV VG Fmt Attr PSize PFree
/dev/md0 md0_vg lvm2 a- 20.01G 0
root@Iomega2TB:/# lvdisplay /dev/md0_vg
— Logical volume —
LV Name /dev/md0_vg/BFDlv
VG Name md0_vg
LV UUID cFO2PY-g1Hk-Wauh-4AGn-hrI0-Cka6-UKz1Ih
LV Write Access read/write
LV Status available
# open 1
LV Size 4.00 GB
Current LE 1024
Segments 1
Allocation inherit
Read ahead sectors auto
– currently set to 256
Block device 253:0
— Logical volume —
LV Name /dev/md0_vg/vol1
VG Name md0_vg
LV UUID svZ31M-IYIV-FtYc-a0vt-45P5-1KqZ-Iu5VEB
LV Write Access read/write
LV Status available
# open 1
LV Size 16.01 GB
Current LE 4098
Segments 1
Allocation inherit
Read ahead sectors auto
– currently set to 256
Block device 253:1
So I figured I need to find a way to mount the second partition. I use “parted” but it fails to read any partitions…for example “check 1” or “check 2” returns:
Error: Could not detect file system
SO I have kind of run out of steam and am looking for any advice on the way forward. If all this is to much just go ahead and delete the post.
Many thanks, Wayne
Oh I forgot, the command “mount” used in your example above yields this, which tells me the data volume is not mounting:
root@Iomega2TB:/# mount
rootfs on / type rootfs (rw)
/dev/root.old on /initrd type ext2 (rw,relatime,errors=continue)
none on / type tmpfs (rw,relatime,size=51200k,nr_inodes=31083)
/dev/md0_vg/BFDlv on /boot type ext2 (rw,noatime,errors=continue)
/dev/loop0 on /mnt/apps type ext2 (ro,relatime)
/dev/loop1 on /etc type ext2 (rw,sync,noatime)
/dev/loop2 on /oem type cramfs (ro,relatime)
proc on /proc type proc (rw,relatime)
none on /proc/bus/usb type usbfs (rw,relatime)
none on /proc/fs/nfsd type nfsd (rw,relatime)
none on /sys type sysfs (rw,relatime)
devpts on /dev/pts type devpts (rw,relatime,gid=5,mode=620)
tmpfs on /mnt/apps/lib/init/rw type tmpfs (rw,nosuid,relatime,mode=755)
tmpfs on /dev/shm type tmpfs (rw,nosuid,nodev,relatime)
/dev/mapper/md0_vg-vol1 on /mnt/system type xfs (rw,noatime,attr2,logbufs=8,noquota)
Hey Justin – I have posted my issue over at the nas-central.org website where I guess it should have been posted in the first place! Sorry for messing with your blog!
Rgds, Wayne
Wayne,
Its really no problem at all.
the first thing we need to do is find out where your system is at.
the commands that you ran show us the logical info, but we are interested in the physical info.
run ‘mdadm –detail /dev/md0’
it should return something like this if the system is back in a healthy state:
root@celerra:/# mdadm –detail /dev/md0
/dev/md0:
Version : 00.90
Creation Time : Wed Nov 4 17:10:14 2009
Raid Level : raid1
Array Size : 2040128 (1992.65 MiB 2089.09 MB)
Used Dev Size : 2040128 (1992.65 MiB 2089.09 MB)
Raid Devices : 2
Total Devices : 2
Preferred Minor : 0
Persistence : Superblock is persistent
Update Time : Mon Feb 18 18:00:41 2013
State : clean
Active Devices : 2
Working Devices : 2
Failed Devices : 0
Spare Devices : 0
UUID : dc314742:a4201151:a7ce65fb:1e54bed0
Events : 0.5898
Number Major Minor RaidDevice State
0 8 1 0 active sync /dev/sda1
1 8 17 1 active sync /dev/sdb1
And it will return something like this if it has a dead drive:
root@jpaul-ix2:/# mdadm –detail /dev/md0
/dev/md0:
Version : 00.90
Creation Time : Mon Sep 19 11:31:11 2011
Raid Level : raid1
Array Size : 20980800 (20.01 GiB 21.48 GB)
Used Dev Size : 20980800 (20.01 GiB 21.48 GB)
Raid Devices : 2
Total Devices : 1
Preferred Minor : 0
Persistence : Superblock is persistent
Update Time : Mon Feb 18 17:52:35 2013
State : clean, degraded
Active Devices : 1
Working Devices : 1
Failed Devices : 0
Spare Devices : 0
UUID : d6708d36:f6abfd0f:2411d0e8:7e87c09e
Events : 0.901141
Number Major Minor RaidDevice State
0 0 0 0 removed
1 8 1 1 active sync /dev/sda1
Notice the “Removed” state in this second one… that is because one of the drives in my one system has failed.
Post your info here, or send me an email with it [email protected]
BTW: if everything with md0 looks O.K. then move on to md1 … md0 is the system partition and md1 is where your data is…. you will want both in an “active sync” state
Hi,
I had a similar experience in December when I found this blog. I removed one drive at a time and powered on. Need to leave it 30 minutes to boot up. With one of the drives no lights at all. The other drive, after a while drive light activity, then after a while no more activity and still no file access from the LAN. I later found from the admin log that one drive had died 6 months before and the second drive had run out of space and crashed the file system. I am struggling to remember how I did it but I booted up the unit with just the drive in it that gave some activity, left it till it went quiet, then accessed the drive from the admin interface and deleted a few large files then rebooted an waited another 30 mins, there was then access from the LAN. I then ran a file by file backup using Xcopy which took 8 hours! But my data was back. Before I reached that stage I had tried numerous other things, such as removing the drive, connecting it to a PC and using data recovery utilities for Linux. They could see partitions but could not find a valid file system, this seems similar to your experience. Once I had backed up the data I flashed the firmware of the Seagate drives and the firmware of the IOMEGA box, then replaced both drives with the recommended model. The unit that I worked on was long out of warranty, so I paid for support from IOMEGA, they were brilliant and as I had no experience of the product before a friend came to me in tears, I was extremely glad to have their help. All ended well, as I hope that it does for you.
Thanks for the reply gents. I issued mdadm –detail /dev/md0 and get this, the same as your second example:
root@Iomega2TB:/# mdadm –detail /dev/md0
/dev/md0:
Version : 00.90
Creation Time : Tue May 24 15:38:26 2011
Raid Level : raid1
Array Size : 20980800 (20.01 GiB 21.48 GB)
Used Dev Size : 20980800 (20.01 GiB 21.48 GB)
Raid Devices : 2
Total Devices : 1
Preferred Minor : 0
Persistence : Superblock is persistent
Update Time : Tue Feb 19 02:06:33 2013
State : clean, degraded
Active Devices : 1
Working Devices : 1
Failed Devices : 0
Spare Devices : 0
UUID : 348028ec:da33eaca:4b707827:b21ca2df
Events : 0.313740
Number Major Minor RaidDevice State
0 8 1 0 active sync /dev/sda1
1 0 0 1 removed
Then for MD1 it gives:
root@Iomega2TB:/# mdadm –detail /dev/md1
mdadm: md device /dev/md1 does not appear to be active.
which I guess is bad news…
I got this advice over at the Nas Forums which yields:
root@Iomega2TB:/# mdadm –assemble /dev/md1 /dev/md1 /dev/sda2 –run
mdadm: no recogniseable superblock on /dev/md1
mdadm: /dev/md1 has no superblock – assembly aborted
Not looking good
yeah, i would say your probably going to loss data.
Wayne, at one time you were able to search the disk and find many files without filenames. What operating system were you running on your PC at that time and what recovery utilities were you using? It seems that all your data is still sitting where it always has been as zeros and 1’s. However the file system has fallen over. It may well be possible to recover data with the disk outside of the IOMEGA unit. Even if you can’t find a utility to do the job, no doubt the professional data recover centres have the code to do it. Those centres used to cost thousands and give no certainty. A lot has changed in recent years and usually for £200 evaluation fee you know exactly what can be done and if there is no hardware fault the £200 usually covers recovery. Good luck.
I use “Active@ File Recovery Enterprise” on Windows 7. I took an image of the data partition which then allows me to scan it rapidly offline (safely) without touching the original disk. I recovered over 1,300 files with this which are all fine….just bad names like “Found_1508306096_12329.docx” so yes Paul you are right, the data is all there just muddled names. Will not waste any more time trying to recover the ix2, better spent going through and renaming what I have. A lesson learned! Many thanks to you both for your encouragement and assistance.
Although it isn’t on defragmentation, I think this question is relevant to the topic at hand. I have two ix2-200 running the latest Cloud edition firmware. The HDs (pair of 3TB drives) are in a RAID1 configuration.
I have enabled “periodic consistency check” under “Drive Management”. This runs the raid utility checkarray (/usr/share/mdadm/checkarray) on the first Sunday of every month (at 00:57) via a cron job. This process takes about 12 hours during which time the drives are basically unusable over the network.
Two questions:
a) Is it necessary to run checkarray every month?
b) Anyway to make it faster? I am going to find out if defragging the drives helps (they’re 92% and 75% fragmented right now).
Thanks!
Good question Dan, unfortunately both of my IX2’s have bad drives in them right now so i have had them powered off until I can find a sweet deal on some 3TB drives to upgrade them with.
Definitely let us know what you find out though.
I was wrong in my time estimates. It takes about 24 hours for checkarray to complete on the 3TB drives. Drive access over the network is definitely faster after defragmentation. However, the time it takes for check array to run remains the same. Here’s the output of “cat /proc/mdstat” after checkarray has just started:
Personalities : [linear] [raid0] [raid1] [raid6] [raid5] [raid4]
md1 : active raid1 sda2[0] sdb2[1]
2909285488 blocks super 1.0 [2/2] [UU]
[>………………..] check = 0.3% (9552640/2909285488) finish=1528.8min speed=31609K/sec
md0 : active raid1 sda1[0] sdb1[1]
20980800 blocks [2/2] [UU]
Yeah, my guess is that at 30MB/s you are probably pegging the little ARM cpu. That is one nice thing about the synology box… a lot nicer hardware inside… higher price point to match of course though too.
The CPU is certainly limiting. I’ve changed the crontab so that the resync is done every three months, and defragmentation every month.
I’m using ix2 Firmware Version: 4.0.4.14600
Some changes i discovered are:
1) the support link is at
http://ip_add/manage/diagnostics.html
2) File system now is not xfs but ext4 so command to check defrag is needed or not is
e4defrag -c /dev/mapper/46626c42_vg-lv651b92df
Since I have ix2-200 non cloud edition, I have downloaded fxs_fsr file publish in this site, gunziped it on my file server, changed permitions and ownership, but I get the following error, I can’t get over it:
-sh: ./xfs_fsr: cannot execute binary file
I’m logged as root, so why is that and how should I solve this issue? I’m quite a begginer in Linux, so any help will be apreciated.
The article is very useful. I have a query here. Can I log into iomega ix2-dl using passwordless ssh login like other unix systems? I have tried authorized_keys method but it is still asking for password. Can you give me solution?
Thanks.
E
i have not tried to do that, id say check the sshd config to make sure it will allow key based login though
Hi Justin, thanks for this guide. I was looking for this since months.
I followed instructions, find software easily but I don’t know how the extract xfs_fsr from .tar.gz file in linux. I just remember some commands from my studies.
Could some one help me on this specific topic ?
Thanks.
unfortunately I dont have an IX anymore. I gave my last one to a friend a while ago.
Good man, thanks for posting this
Thanks for the guide! Found this in 2020 and it saved my device