Disclaimer
PRIVATE ENDPOINTS REQUIRE GPV2 STORAGE ACCOUNTS. ZERTO IS A HIGH IO REPLICATION ENGINE AND GPV2 STORAGE ACCOUNTS HAVE AN EXPONENTIALLY HIGHER IO COST. (GPV1 = $.0004 per 10,000 READ OR WRITE IO, GPV2 = $.004 per 10,000 READ IO and $.05 per 10,000 WRITE IO). REPLICATING TO A GPV2 STORAGE ACCOUNT WITH ZERTO WILL HAVE A SUBSTANTIAL IMPACT ON YOUR MONTHLY AZURE BILL.
For example $1 in GPv1 Write IO will cost $125 on a GPv2 account. I DO NOT recommend you use Zerto with GPv2 Storage. Stick with GPv1 for Zerto.
Overview
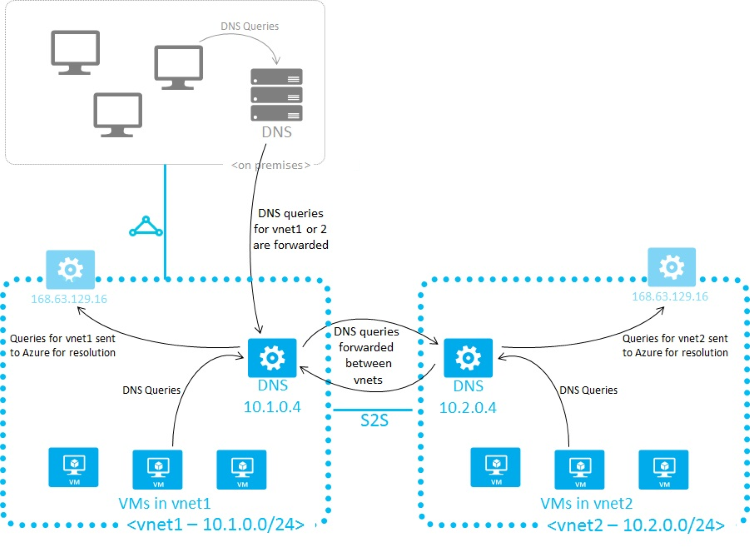
Zerto leverages several Microsoft Azure services. These services include the Azure ARM APIs and Azure Blob Storage service, among others. To get to these services, Zerto will query DNS and then follow whatever routes have been configured to get to the IP that DNS proves.
These services are resolvable via public DNS servers and will resolve to public endpoints, by default. However, if Azure Private Link, or private endpoints, are used, Azure will add custom DNS endpoints to the internal Azure DNS server.
This is a good thing because your traffic doesn’t leave your VNET to get to Azure endpoints. (It’s basically 1 hop instead of several, so lower latency and more security.)
Most customers will be migrating machines from on-premises, and most of them will be Active Directory Domain joined. For connectivity between on-premises and Azure IaaS Active Directory you will need to move from Azure’s standard VNET DNS servers to custom DNS servers (ie your AD integrated DNS services)
BUT!
If you change your VNET away from using the internal Azure DNS servers your virtual machines will not be able to resolve private endpoints to their private VNET IP addresses. This is because your custom DNS servers are not forwarding DNS queries to Azure, they are forwarding to public internet DNS servers, which will still resolve to the public endpoint IP addresses.
This scenario forces you to use an in Azure IaaS VM as a DNS server, and then change your Azure VNET DNS server to this custom DNS server. The custom DNS server is paired with your on-premises DNS servers, and also must be configured to forward DNS queries to the Azure Internal DNS server. This will allow resolution of both Domain resources as well as private Azure DNS services.
At a high level this is what you will need to configure:
Azure has many documentation articles on configuring this setup. A great first stop is here:
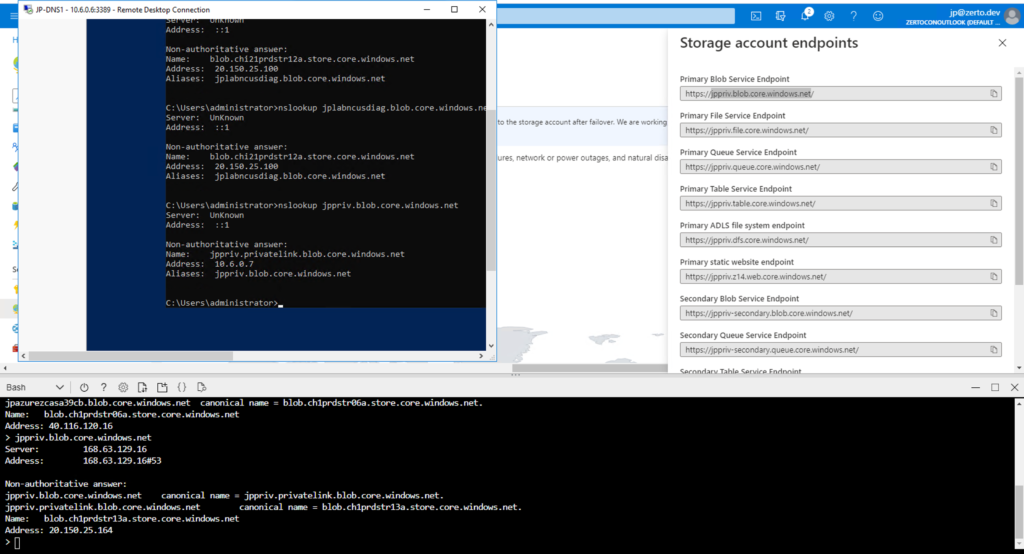
Once setup properly you will be able to see the difference in DNS resolution between a machine in your VNET (JP-DNS1) and one not in your VNET (CloudShell)
Implementation
It will be assumed that you already have a working, on-premises, Active Directory environment. It also assumes that VPN or Express Route configuration has already been configured back to on-premises.
This guide will show you what you will need to add to enable AD integrated DNS for Azure Custom DNS.
In the Azure VNET that will get custom DNS, change the DNS servers to your on-premises DNS servers. This will allow the new DNS server IaaS VM to join Active Directory.
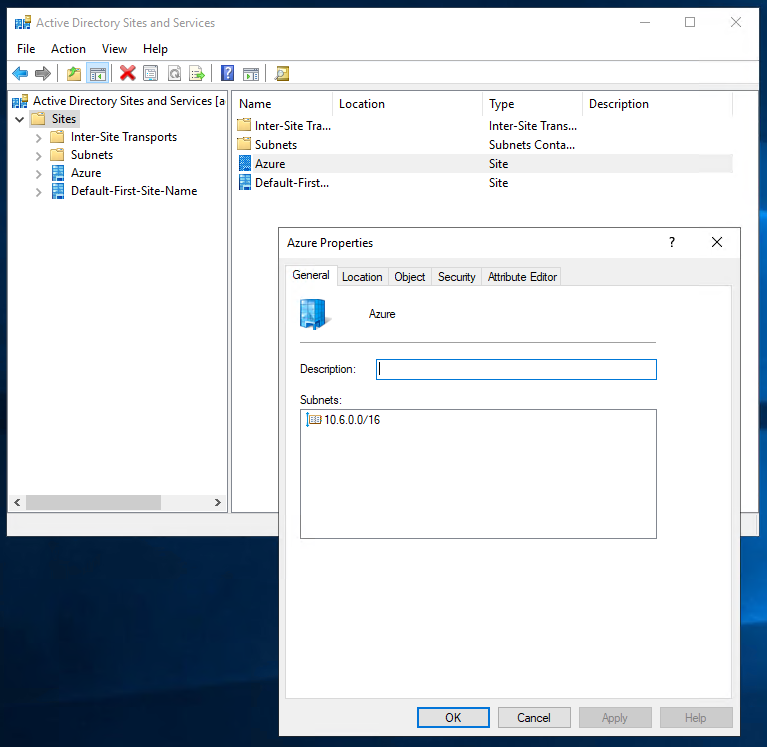
Next, on an existing on-premises DNS server add a site for your Azure environment in Active Directory Sites and Services.
This will allow Active Directory to understand that the new DNS server is physically at a different site.
Once you have added the site, spin up a new Azure IaaS VM in the VNET that you want to add custom DNS to. It is advisable to create the VM with a statically assigned IP address on its network interface.
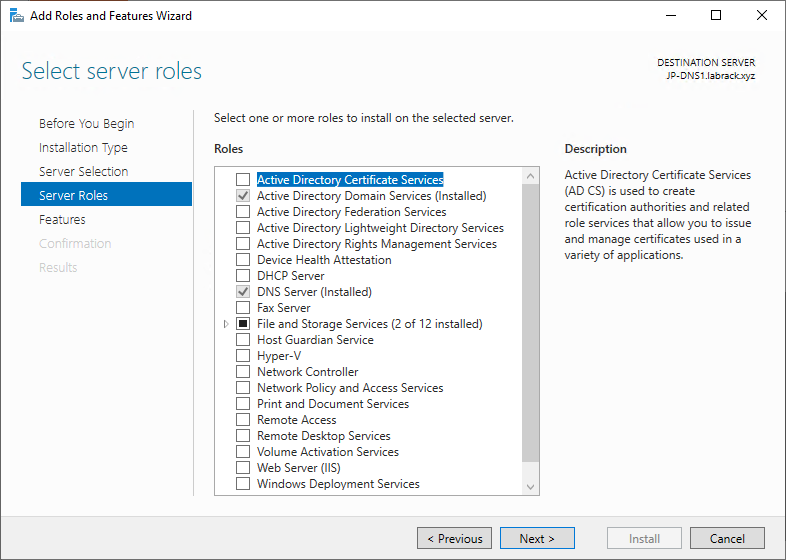
Once the machine is online log in to the machine and configure it as a new domain controller as you would any other AD controller. Make sure to add the DNS service in addition to Active Directory Domains Services
Once the machine has added the roles, run the AD configuration wizard and add the new AD server to the “Azure” Site.
Verify that the AD server has synced with the on-prem servers and that no replication issues have occurred.
Next open the DNS Manager on the new DNS server (the Azure IaaS VM). In DNS manager, right click on your DNS server and click Properties.
Find the “Forwarders” tab and click edit.
Remove all of the DNS servers that are already there. Then add “168.63.129.16” as a new forwarder. This is the Azure Internal DNS server IP.
Forwarding all queries that this DNS server doesn’t handle to this IP will allow us to resolve Azure integrated DNS entries to our private endpoints.

Next go back to the Azure VNET DNS settings and change it from your on-premises DNS servers to your new IaaS VM’s IP address.
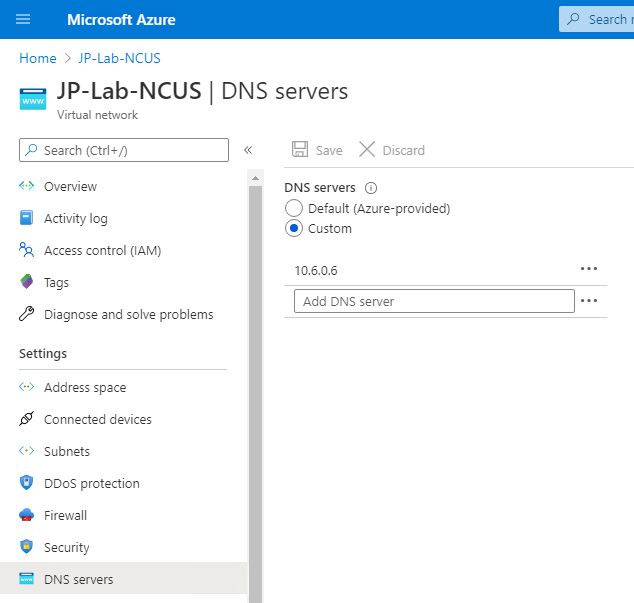
Note: Microsoft recommends that you repeat this process to add a second in VNET DNS server so that you have redundancy.
Once you have saved this configuration, give DNS about 15 minutes to settle, then try resolving your private endpoint both internally and externally.
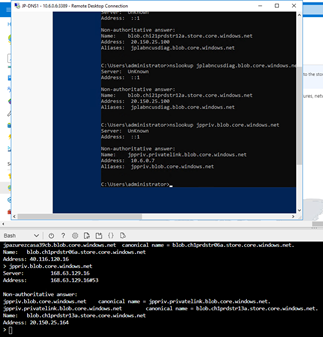
Internal DNS endpoint in the top box resolves to 10.6.0.7
External DNS endpoint in the bottom box resolves to 20.150.25.164
Note: I didn’t go over actually creating a private endpoint in this post. This post was focused on how to establish custom DNS resolution for your hybrid environment. If you are looking for information on how to configure a Storage Private Endpoint, this doc has the steps: https://docs.microsoft.com/en-us/azure/private-link/create-private-endpoint-storage-portal#create-your-private-endpoint
![]()