What is a Zerto Commit Policy?
If you are a Zerto customer, you have probably seen this phrase when doing Moves and Live Failovers. But, unless you are the manual reading type, you probably have no idea what it means. I used Zerto for a year or so before Sean Masters (www.seanmmaster.com) was like “you idiot, do you not know what a commit policy is?” (I would venture to say that is verbatim how he said it too.) So don’t feel bad if you don’t know. Plus I’m going to explain it to you. 🙂
A Zerto commit policy allows you to either automatically commit or delay committing to a particular point in time when going to a recovery site copy of your data. This is a major differentiator for Zerto because it means that you aren’t stuck with a bad copy of the data after you failover. If the point in time (or checkpoint in Zerto speak) isn’t what you want, then you can get out of that copy and move to a different checkpoint quickly and easily.
[stextbox id=’info’]Update: Zerto 6.0 now sets a 60 minute wait time before committing failovers or moves by default![/stextbox]
Real world example
If your file server gets hit with a cryptovirus and all of you data is encrypted, you are probably going to want to fail over to your DR copy. But do you know EXACTLY when the virus started? Zerto gives you incredible granularity with its checkpoints, so if you know exactly when it started, you can recover with minimal data loss. (If you don’t you can always roll back farther, but the idea is to minimize data loss.)
We will assume that the virus hit at 10 AM; therefore our first checkpoint selection might be from 9:59:35 in the journal. Next, we tell Zerto to do a live failover, and the VM boots up. After logging in, we realize that the virus is still there and files are already encrypted. I guess that checkpoint isn’t going to work. So how to we go to a different point in time? EASY!
We tell Zerto to rollback instead of commit. Then we are essentially right where we started; we can again go through and pick a new checkpoint, say 9:55:00, and fire up that copy. If it looks right, we will “commit” to this copy of the data. Why do we have to commit? Well, we want Zerto to know that this checkpoint is good and that we are ready to start reverse replication back to the other site. Committing to a checkpoint will allow that process to start.
Zerto Commit Options
There are three options that you can pick from for commit policy.

None
None is the easy one to explain. Commits do not happen automatically when you select “None”. You must manually come back to Zerto after checking the failed over virtual machines and tell Zerto to Commit or Rollback. The “None” commit policy is what I illustrated in the example above.
The downside to the “none” commit policy is that if you leave a VM in a not-committed state for too long, it can run out of scratch disk space. This will cause the VM to lock up. The “none” policy also does not consolidate the journal and base disk automatically, so it will cause your VMs to use more datastore space than needed after a while.
Auto-Commit
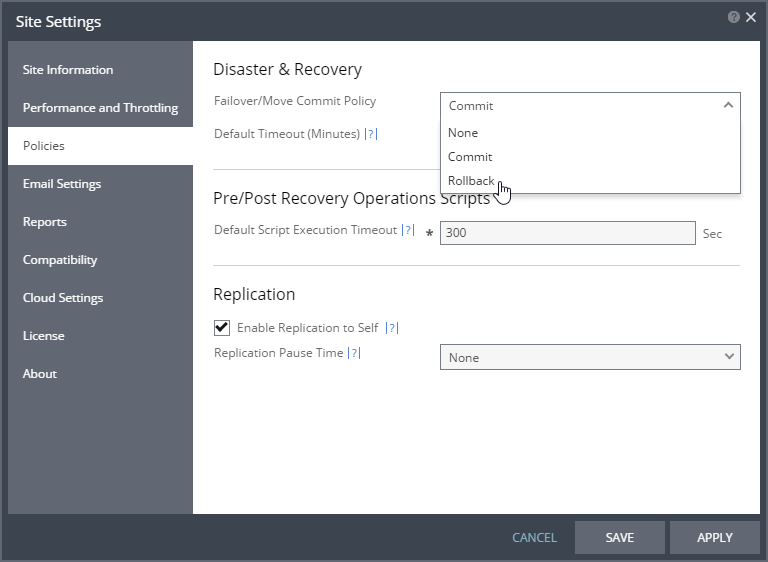
Auto-Commit means that after a predetermined amount of time, Zerto will assume that everything is OK with the virtual machines it has failed over and automatically commit those VM’s. Reverse replication can then start if it was supposed to. By default, Zerto waits for zero (0) minutes before auto-commit happens. In other words, if you haven’t modified your commit policy either manually during VPG failover or move, or globally, Zerto will automatically commit you to whatever checkpoint you picked without asking you to confirm.
Why is that a bad thing? Well, when you commit to a checkpoint, all other checkpoints in the journal are consolidated and removed to save disk space. So by committing, you are essentially saying “I no longer need my journal history, this is the point in time that I want.” Sounds like a that could be risky if you don’t know what you’re doing, doesn’t it? (Mainly because once the journal is consolidated Zerto can’t magically go back to any other point in time… hence why we call it “commit.”)
However, in a situation where your goal is to failover to a DR site after a disaster, this option is the “easiest.” After clicking failover you literally have nothing else to do, everything is automated to bring VMs online at the DR site. Which is super awesome, if that is your goal. But again, it can be a problem if you are trying to recover from data corruption and you aren’t sure exactly what checkpoint to use. Bottom line, if you are unsure of the checkpoint you want to use, change the time before auto-commit from zerto to something else (10-60 are good options).
Auto-Rollback
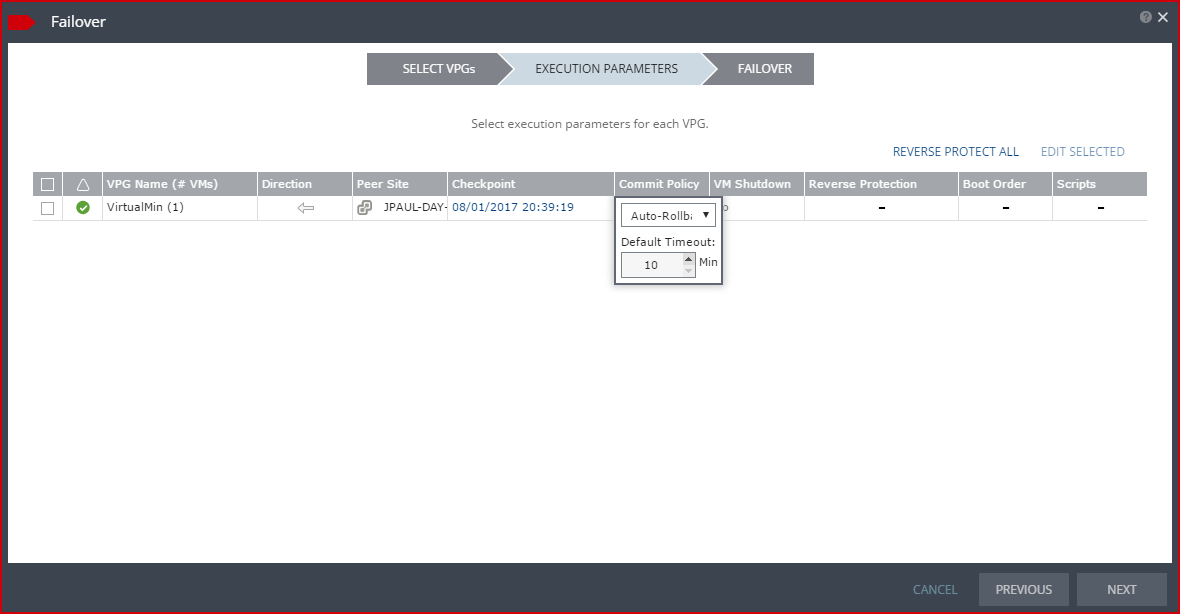
Auto-Rollback is the opposite of Auto-Commit. However, because Auto-Rollback is not the default option, you will have to specify the number of minutes to wait before the rollback happens. The process then looks something like:
- Failover the VMs
- wait for “X” minutes
- if the user doesn’t manually commit to the failed over VMs
- power off failover VMs
- assume it didn’t work and allow the admin to start over
- if the user does manually commit consolidate the journal
- turn the failed over VMs into “regular” VMs
- Start reverse replication if desired
I like to think of auto-rollback as the “dead man’s switch,” meaning that if you go grab a pizza after starting a failover, Zerto will take control of things after the number of minutes specified have passed. Its goal is to put things back to the way they were before you clicked failover. So essentially, “tell me everything is good to go, or I’ll reverse everything we have failed over.”
The only real downside to this option is the lack of automation. If you have someone who isn’t familiar with Zerto at the controls during an actual disaster, and you walk them through the failover process, you will also have to walk them through the Commit process as well.
So what is the best option?
Good question, but I’m not going to give you an answer. This is one of those questions where there is no right or wrong answer, it just depends on what is best for you and your situation. I’m sure there has been an internal debate at Zerto about what to make the default option. Each option has pro’s and con’s, so it’s not always an easy decision, but hopefully this article has helped you understand what each of the options will do and situations in which you would want them.
Personally, I think that once you are educated on what the options are and how to use them, that you should change the global policy to something other than Auto-Commit after zero minutes. (at least increase it to 5-10 minutes) As this locks you into whatever your first choice is. Why do I think this? More than likely, you will have disasters consisting of virus’s or data corruption many more times then you run into an actual natural disaster.
Also keep in mind that after making a choice for the default policy, you can always change it on a per failover/move basis on the execution parameters tab of the failover wizard.

Thanks for reading, and let me know if you have any questions!
![]()


