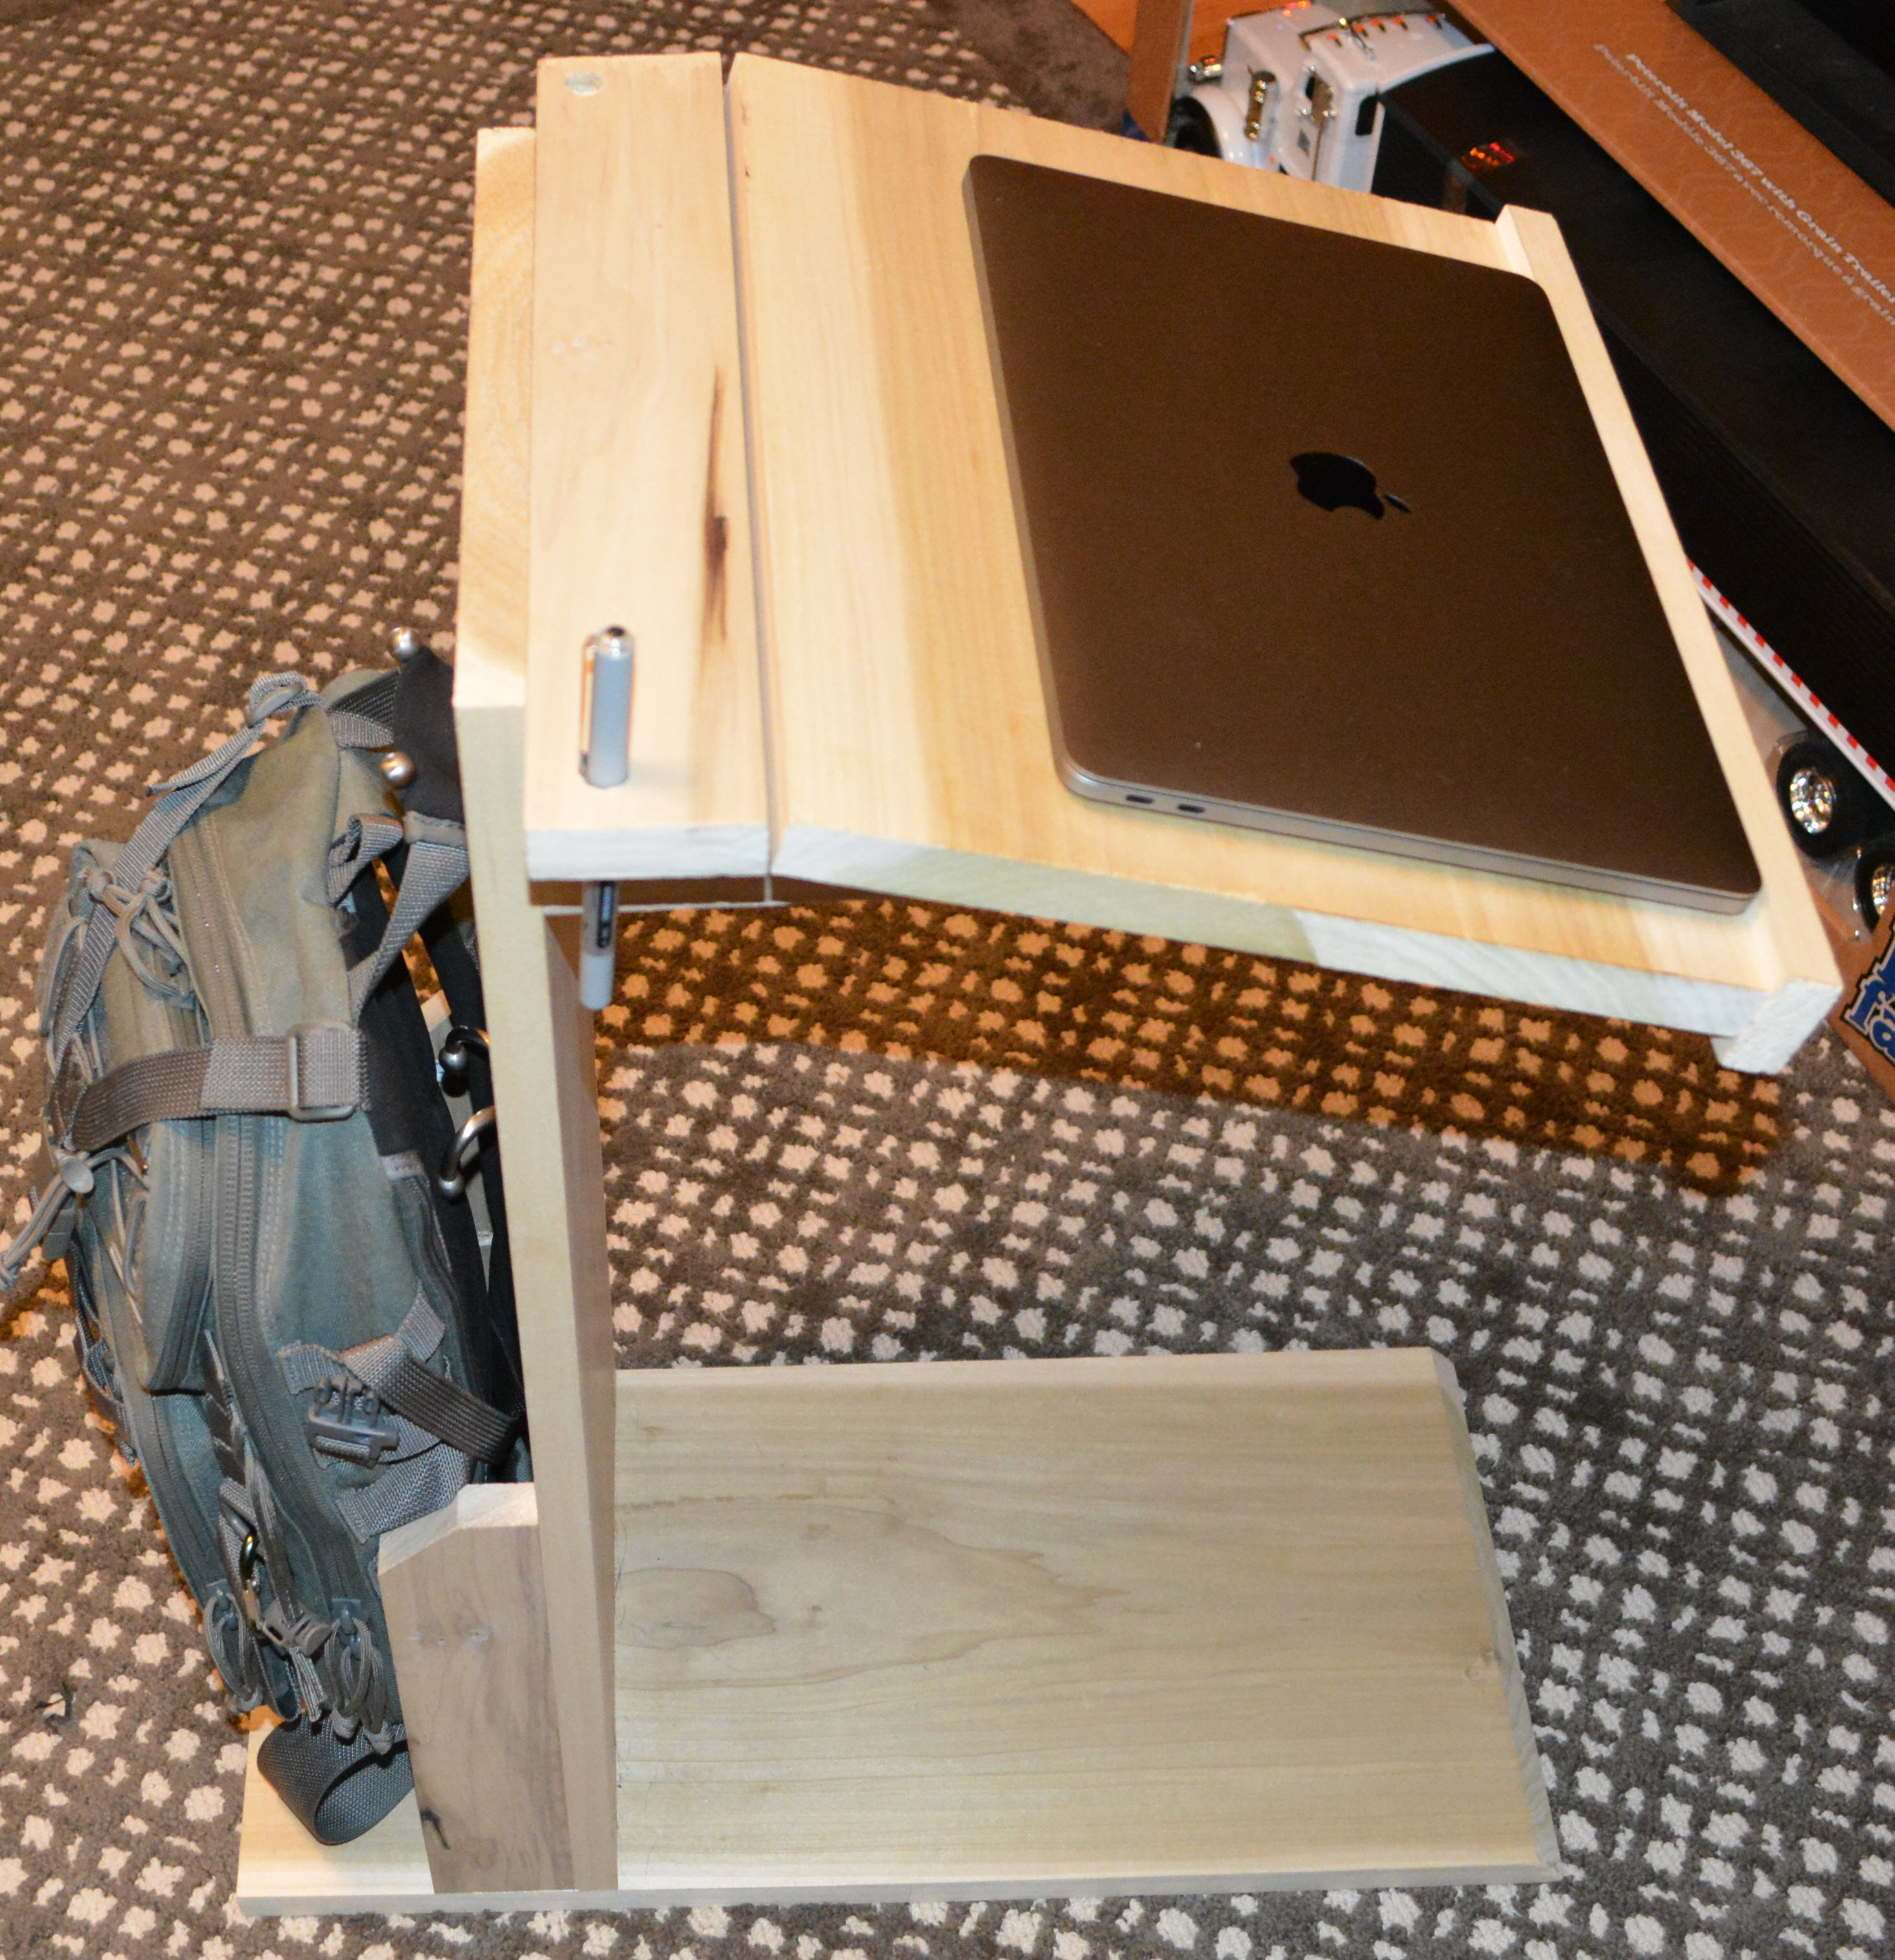
If you follow my personal facebook page then you might have seen pictures of this DIY laptop stand before. However, this post will have a shopping list, a cut list, and some instructions on how to make one of these for yourself.
If you aren’t a maker, or you just want something fast, Amazon does have some laptop stands. The reason I didn’t go with one is because most have wheels on them and they won’t slide under a chair or couch if it is low to the floor.
I assume that you have power tools for this project, it is probably doable with hand tools but you will have better results with power tools. At a minimum, you will need a compound miter box saw and a handheld drill.
Shopping List
For this stand, I recommend some type of hardwood. Hardwood will make the stand more sturdy than if you go with pine. I used poplar for mine, but you could also use oak, both are around the same cost. I will provide links and pricing for poplar boards from Lowes, but again, use whatever is easy for you to obtain. (Note – I get no kickback from Lowes, I simply live closer to them than their competitors, which is why I use them)
Also if you aren’t a woodworker, please note that I am using the “common” sizes, the actual size of these boards will be smaller… don’t freak out that is normal. For example, a 1″ board is actually .75″, and a 2″ wide board is actually 1.5″, etc etc.
- Qty 1 – 1in x 12in x 6ft Board – $33 – For Base, Upright, and Laptop Base
- Qty 1 – 1in x 3in x 8ft Board – $9 – For Upright Supports, Hinge board, Laptop Base Supports
- Qty 1 – 1in x 2in x 2ft Board – $6 – (you could also trim some scraps from the other boards) this is the laptop base edge piece that keeps the laptop from sliding off)
- Qty 1 – 12in continuous hinge – $6 – This is only needed if you want to laptop base to hinge
- Qty 1 box – 1.25in Kreg Screws – $5 -You only need these if you are using the Kreg Pocket Joint Kit (which makes this much easier)
Total we are at about $60 for poplar. If you go with pine you would be looking at about $27 total.
If you want to stain and seal or paint the stand you will need to add that cost on to the above.
Pocket Joint Tools
If you don’t already own a pocket joint tool, this is the perfect project to get one for. After you have it you will be surprised at how many times you end up using it. I have two different sizes and they both have been worth the money. You don’t have to use pocket joints for this project, but expect to drill pilot holes with countersinks in order to hide the screw heads and to prevent the wood from splitting. I also tend to think pocket points are stronger than a normal butt joint.
I have one that is for larger projects, like the loft bed I made for my daughters or the kitchen table I made for my mother-in-law, or any other project that involves 2x4s. The second one I have is much smaller and is designed for things that involve 3/4″ wood… like my desk, our master bedroom closet organizer, the shoe and coat locker I built a while ago, or even this project.
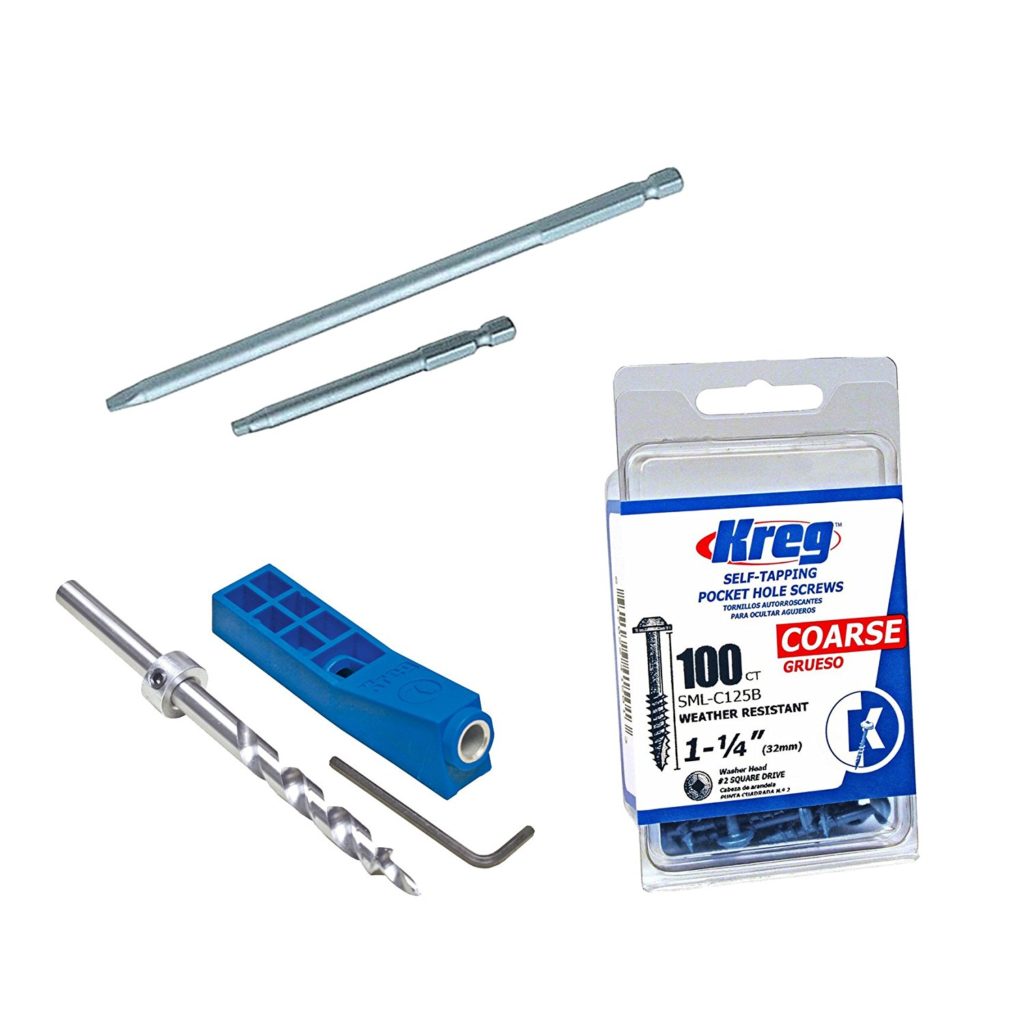
What you will want to get are the following tools:
- Kreg Mini Kreg Jig Pocket Hole Kit – Lowes $21 – Amazon Prime $19
- Kreg 2.75-in Clamp – Lowes $22 – Amazon Prime $18
- Kreg 6-in Metric Square Nut Driver Set – Lowes $4 – Amazon Add-On Item $4
If you are going to buy from Amazon, I also found a kit that has everything in it along with a box of course screw for $36. Here is the link to the Kreg Kit. For this project, I would use fine screws but course screws would get you by too.
Total is about $47 at Lowes or $36 for the kit on Amazon. If you don’t want to make the investment I would see if anyone you know has one you can borrow.
Cut list
Once you have all your boards and tools it is time to start doing some cutting. I like to cut all my boards first because I have a limited sized workspace, and I tend to put away the saw to make room for assembly.
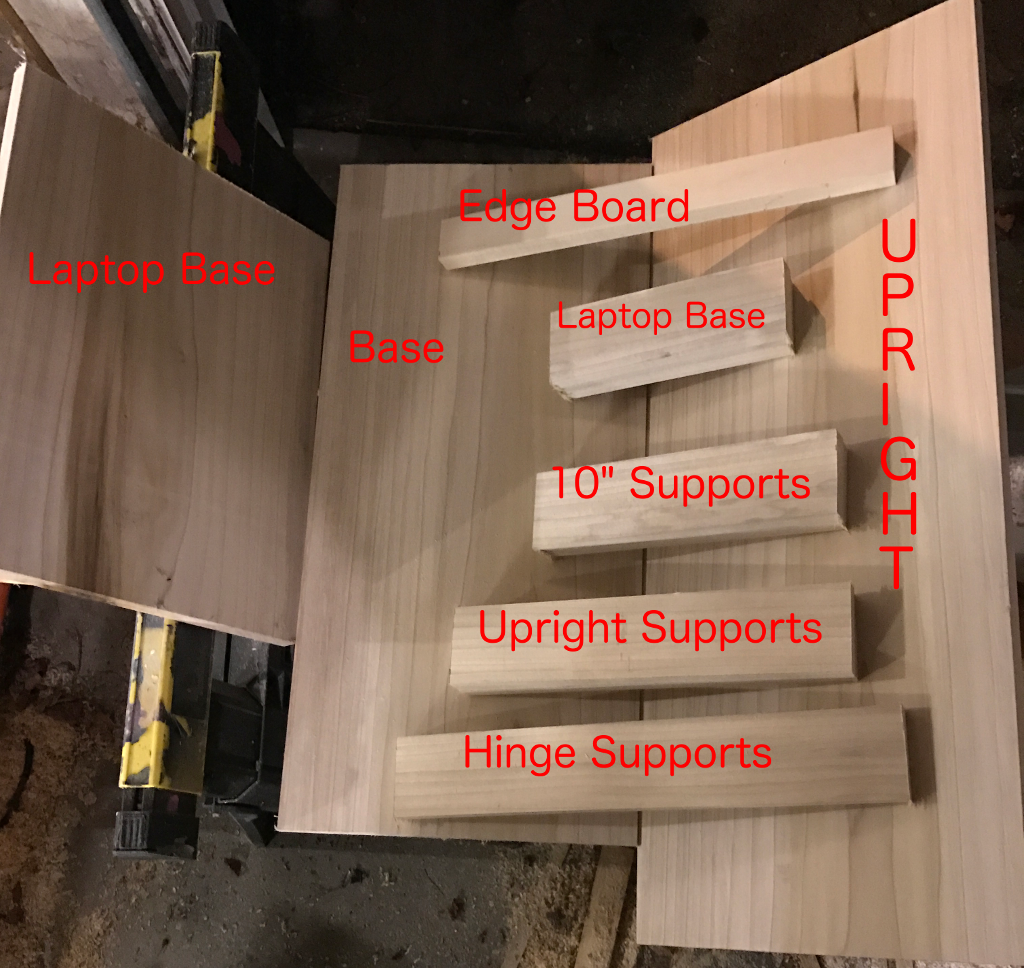
12in wide board
You will cut three pieces of the stand from this board; the base, the upright, and the laptop base.
- Base – actual size 24in long x 11.25in wide x .75in thick (I put a bevel on the one end of this base so that when it slides under the couch or chair it doesn’t rip any fabric)
- Upright – actual size 28in long x 11.25in wide x .75in thick
- Laptop Base – actual size 15in long x 11.25in wide x .75in thick (note that we will use this board long ways, so if your laptop is wider than 15″ you will want to increase the LENGTH of this cut)
If you started with a 6ft board you will only have about 4-5 inches left over.
3in wide board
This board has a bunch of pieces to cut.
- Upright Supports – QTY 2 – actual size 12in long x 2.5in wide x .75in thick – also you may want to cut an angle off one corner so there isn’t a point sticking out. I cut mine at a 45 degree.
- Laptop Base Hinge – actual size 15in long x 2.5in wide x .75in thick
- Laptop Base Supports – QTY 2 – actual size 7.75in long x 2.5in wide x .75in thick – these boards will get an angle cut into them later on
- Cross brace – QTY 2 – actual size 10in long x 2.5in wide x .75in thick (we will trim these to the exact length later)
You will need 73 inches total for all of these cuts, plus the 1/8th inch you lose to the cut each time… probably around 74inches when all said and done. So that would leave you with about 22 inches left.
2in wide board
We only need one board cut from this size board. For mine, it was a 15inch long piece, but if you increase the length of the laptop base to accommodate a larger laptop you will want to increase this board as well.
- Laptop Base Edge – actual size 15in long x 1.5in wide x .75in thick – again if your “Laptop Base” from above is longer than 15in, make this longer too.
That does it for the cut list. In total, you should have 11 pieces when you are finished. If you have eleven then pack-up the saw and break out the Kreg tool.
Assembly
Kreg Tool to the rescue!
OK, so this is the part where you get to put $50 worth of Kreg tools to work. I like to drill the pocket joints as I’m assembling the project, this is mainly so that I can visualize where the screw holes will be best placed.
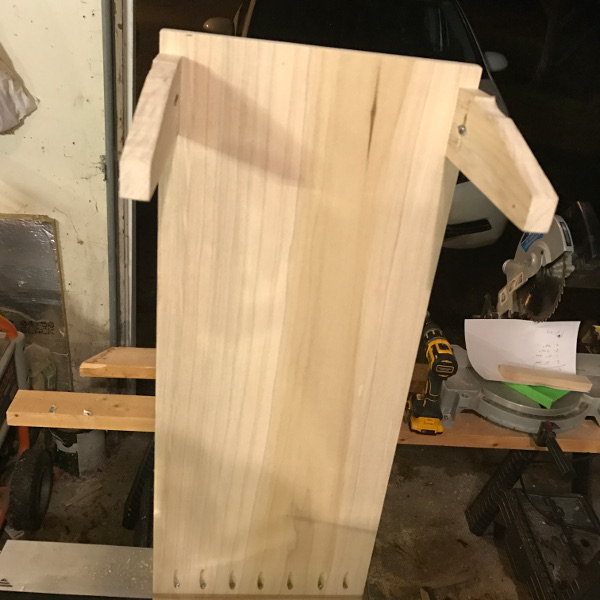
Base and Upright
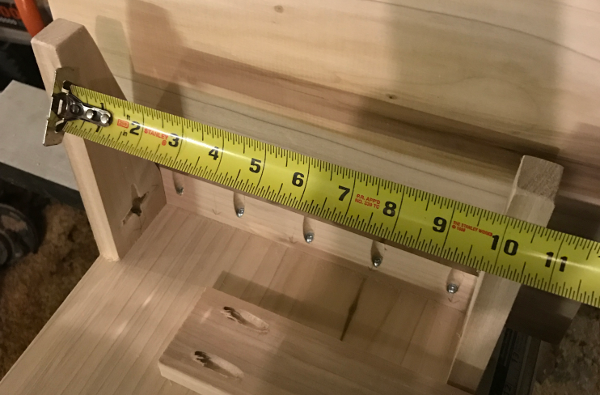
The first thing to start with is the base and the upright. These are the two large boards but are the easiest to put together. Using a tape measure, put a mark about every 1.5in across the bottom of the upright board. Then using the Kreg jig and clamp, drill pocket joints on the vertical board. I had seven total pocket holes when I was done.
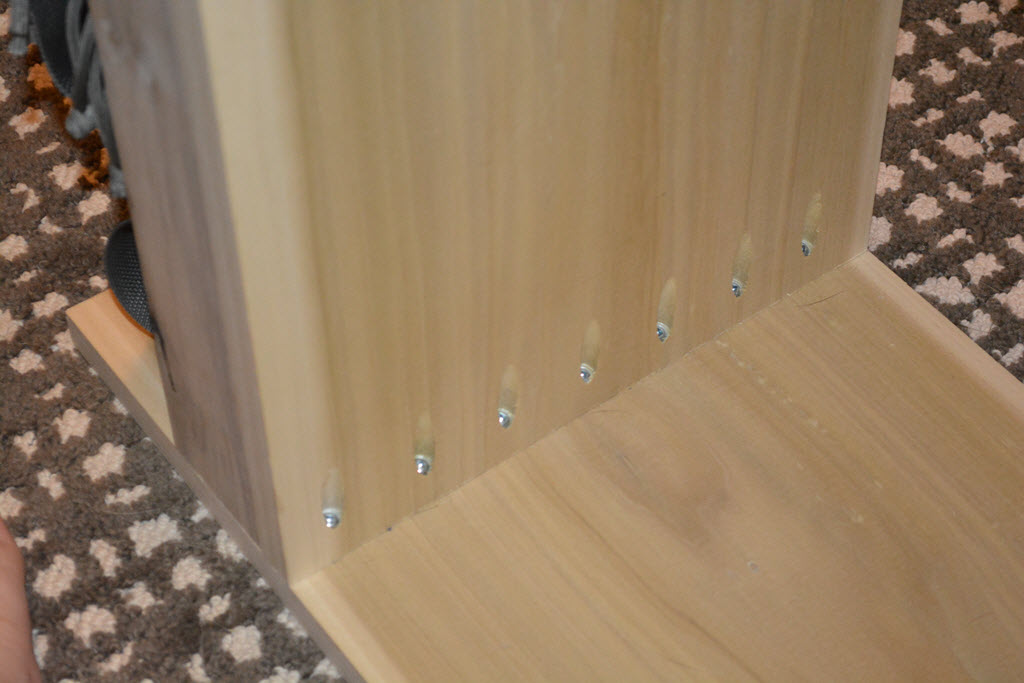
After you have all of the pocket holes drilled, you can join the vertical board to the base. I measured from the back of the base, 6 inches and drew a line. Then I started driving in the pocket screws, make sure to keep the upright on the line you drew so that it is square with the base.
Next, you can attach the upright supports.
Upright Supports
These are the two 12in x 3in boards that we also cut a 45″ angle. Use the Kreg jig to drill one hole in the bottom side and three in the long side of each of the support pieces. Make sure to drill the pocket holes on the inside of the board so that it looks nicer too.

These guys will keep the vertical support from breaking off the base even if you lean on the laptop stand a bit. I wouldn’t put 200 lbs on it, but from what I can tell it will hold quite a bit.
Laptop base assembly
Next, we will assemble the laptop base; this is where the laptop will sit. Then after assembling that we will attach it to the upright, and then finally we will install the support boards for the laptop base.
You will need three boards that you cut as well as the 12″ hinge.
First, install the hinge between the “laptop base hinge” and the “laptop base” pieces you cut earlier. It should be obvious, but make sure to put the hinge on the side of the boards that is 15 inches long ;).
Then use your Kreg tool to install four pocket holes in the laptop base, on the same side as the hinge.
Now attach the “laptop base edge” to the “laptop base.” I have mine so that only about 3/8 of an inch is above the laptop base. This is because the MacBook is only about that thick. It might make sense to have all 3/4 of an inch above the base if your laptop is thicker.
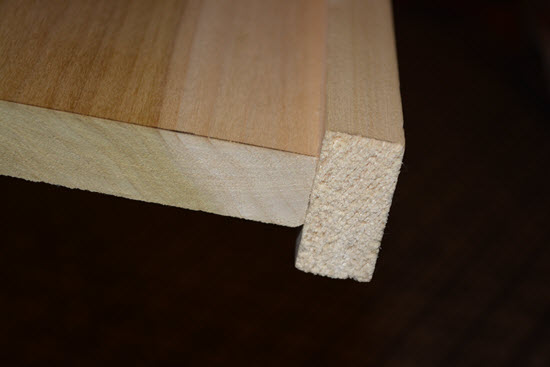
What I would do is measure how thing your laptop is and see what makes sense.
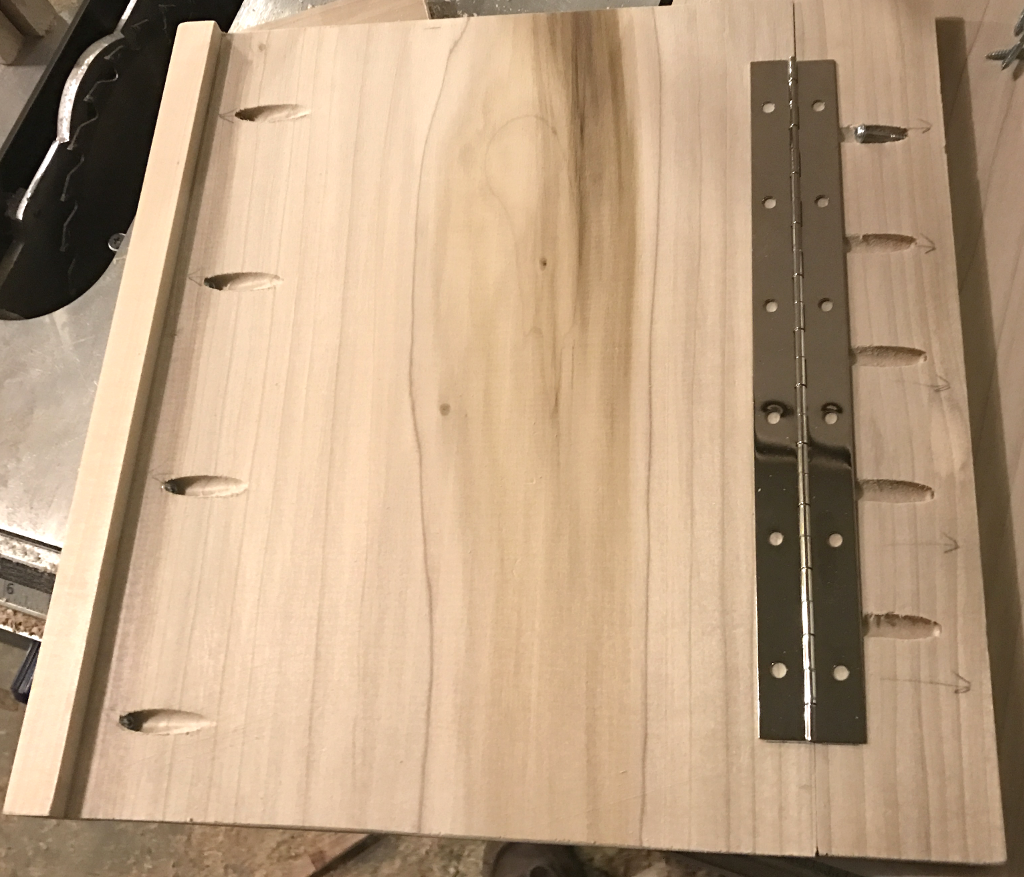
While we have the Kreg jig out, put some pocket holes on the “laptop base hinge” board. These pocket screws will anchor the laptop base to the upright. Here is what the laptop hinge board looks like once you have the pocket holes and the hinge laid on it.
Now join the laptop base hinge board to the upright board using the pocket holes you drilled.
At this point, you should have what looks like a stand with the laptop base swinging downward as there is nothing to support it. Next, we will attach the laptop base supports so that we have some rigidity.
Laptop Base Supports
OK, I lied. We are going to need your saw again. Personally, I used a jigsaw for this part as the pieces are pretty small and I didn’t want to lose a finger in the box saw.
What we want to do is cut an angle on the support pieces as well as a groove for the hinge to sit in. Otherwise, the hinge will prevent the laptop base from sitting on the support boards. After we do the cutting, then we can drill some pocket joint holes as well as a regular hole so our adjustable top brace can move.
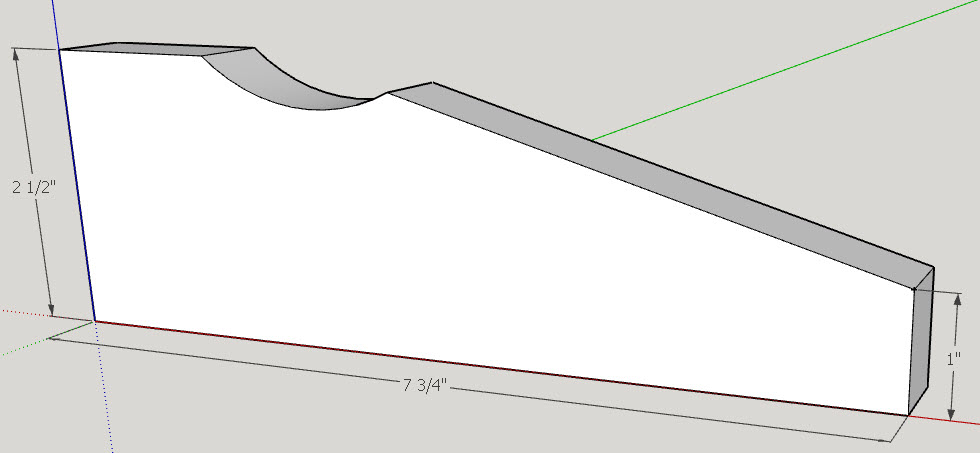
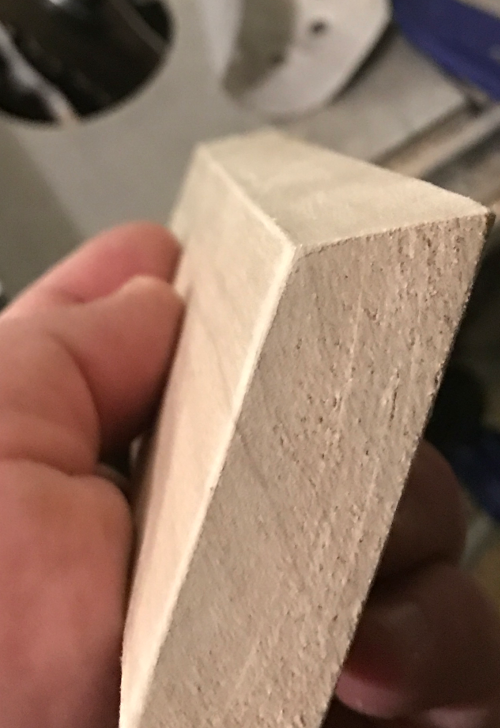
Step 1 – Cut the Angle
This is what we are shooting for in step one.
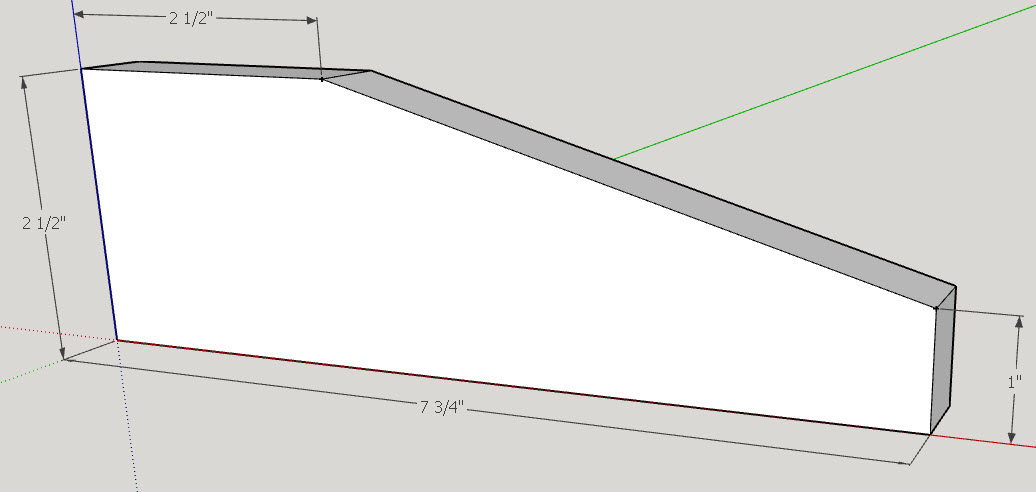
On one end measure up 1in and put a mark. Then on the top of the other end, measure over 2.5in and put a mark. Then draw a line from one mark to the other, that is what you want to cut off. When finished, you will have the shape above.
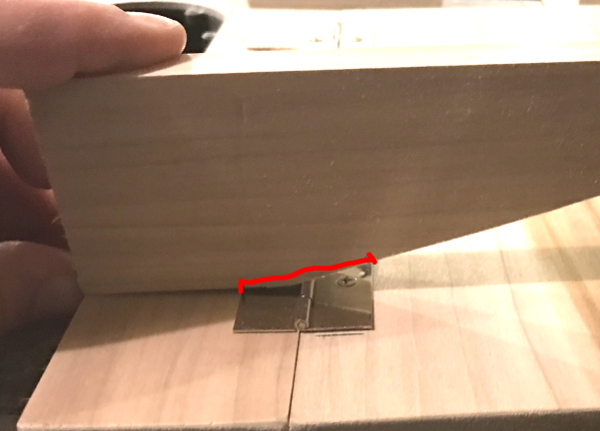
Step 2 – Cut the Groove
Because our 12in hinge is under the two top boards, we need to have some place for it to sit.
You can eyeball this part… make it just big enough for the hinge to sit while allowing the other two boards to sit nicely on top.
Here is how I got an idea of how much material I would need to remove.
Once assembled with the top it will look like this:
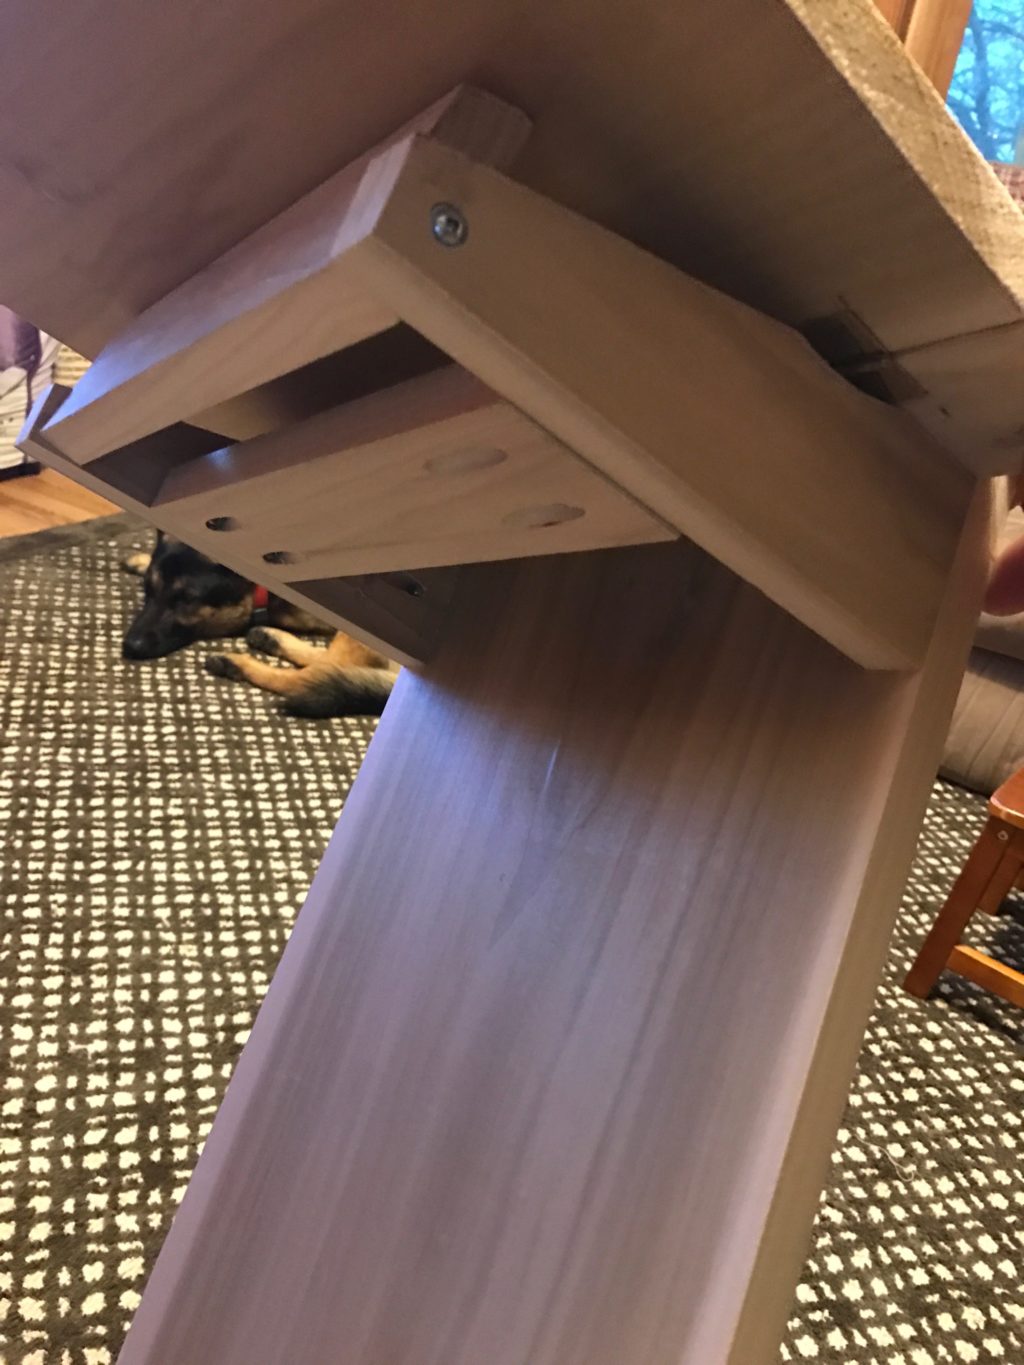
Note that the top is locked in the “up” position by the brace board. But if it were allowed to travel down it would sit on the angled brace.
Step 3 – Pocket join holes
We will need to drill three pocket joint holes in each of the support boards. Make sure to do them on the “inside” part of each board so that once assembled the screws won’t show.
I ended up going with just two pocket holes instead of three; either way, will work.
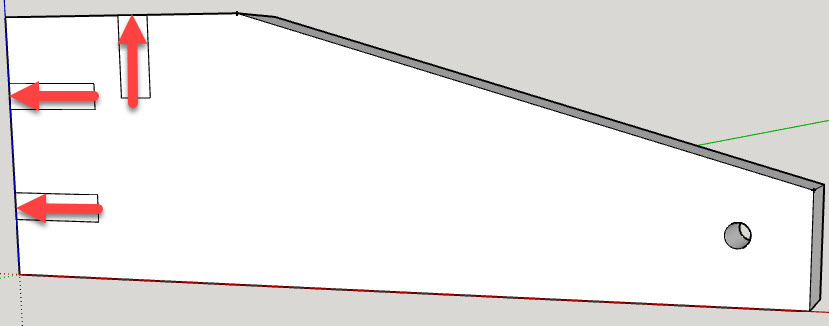
Step 4 – Hole for brace
The last thing we need to do to the braces is drill a small hole down at the small end. (See picture above).
This hole needs to be about 1/8 of an inch; it only needs to be big enough so that a screw can go through it into a brace board we will install later.
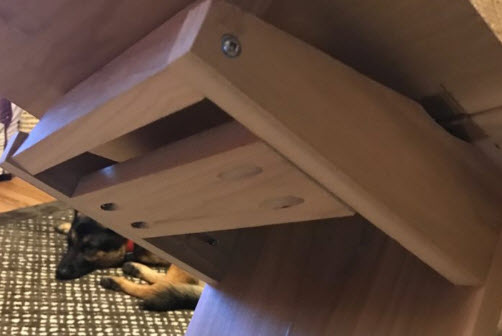
Step 5 – Install supports on the upright
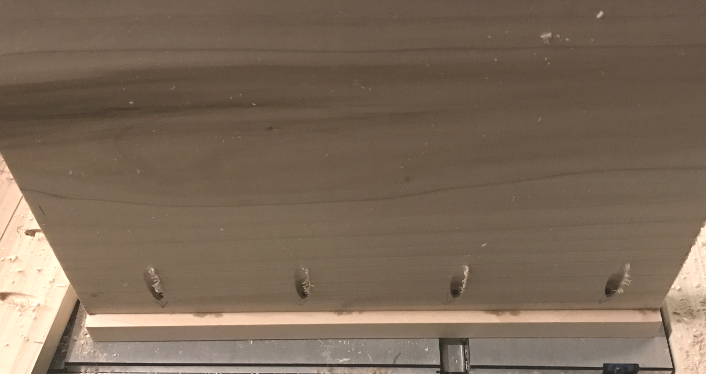
The last step is to install these braces on the upright. Two screws will go into the upright, and one screw will go into the hinge board. Make sure to keep this board as tight as possible to those two boards. You may need to flip the laptop stand on its back or upside down to install these properly.
When you are finished, it should look like this. Note that the laptop base has been removed in this picture to show how the supports get mounted.
Cross Brace Support
As you can probably tell these braces are pretty wobbly on their own. So next we will install a brace between them which will stiffen them up.
There are two boards that you cut to 10in x 2.5in x .75in; one is for this support, and the other is for the adjustable support. But before we can install them you will want to trim them to the right length. Mine were 9-7/8″ in the end.
After cutting to length put four pocket joints in it and then screw it into place. Mine is about in the middle of the two outward braces. You want it just far enough to allow the next brace to rotate all the way down, but not too far back that it is ineffective.
Adjustable Brace installation
The last step…
This board is what will lock the laptop base into the upright position. (sounds a lot like an airplane manual doesn’t it). Basically what we need to do is run a screw through each of the holes that you drilled int he support boards and then screw them into the ends of this support board. You can reference the picture above for what it will look like.
If you have a table saw you might want to bevel the one edge which will make the board rotate a little easier once installed.
You want these screws tight enough that the board is slightly tight and takes some effort to turn, but not so tight that you can’t turn the board.
Finishing
You could leave your laptop stand unfinished, but at some point the wood will get stained and start looking dirty. Your best bet is to either stain it then put some polyurethane on it, or paint it.
Personally, I will be staining mine, and I’ve heard that poplar can be a pain in the butt to stain. To reduce the chance of blotches and color inconsistency, I would recommend using a pre-stain first, then use a stain of your choice, and then finish it up with a wipe on polyurethane.
I have always had good luck with Minwax, but have used other brands as well.
|
|
|
|


Hope you enjoyed the how to, and let me know if you build one!
![]()


Wow! this is brilliant but certainly isn’t cost effective though 🙂 Is there a ways to convert this to a cooling pad?