If minimizing WAN bandwidth is important to you then you will certainly want to know how to use Zerto’s Swap Disk feature. There are a few modifications that you will need to make to your virtual machine in order to utilize the feature, but in some cases they are well worth the small amount of effort that it takes to implement them.
What does It Do?
Both Windows and Linux systems (be them physical or virtual) use a virtual memory area called swap. Swap is a place on a storage device that the operating system places pages of memory if “real” memory (RAM) isn’t available. Normally this happens when the system has an under allocated amount of RAM for the workload it has been assigned.
While swap is not a bad thing it can have negative effects on storage devices, mainly because every time a page of swapped memory is needed I/O operations happen to the underlying disks. So the problem with replication and swap is that every time a page of memory is swapped to a disk that is being replication (via Zerto or any other replication technology) it must then be sent to the replication target. Therefore swap operations consume WAN bandwidth.
Swap space is treated just like RAM to an operating system, meaning that it is needed while the power is on … but once the power goes out anything still in swap is no longer needed. So if we were to fail-over a virtual machine, the data in the swap disk is no longer needed… therefore there is really no reason to replicate it… or waste WAN bandwidth in the process.
Hence Zerto’s Swap Disk feature, the rest of this article will explain how to utilize the feature with Linux virtual machines.
Looking for the How to for Windows?
More details on the different levels of swap space in my other post here.
Linux VM’s + Zerto Swap Disk
Before we start, lets first look at what a normal linux virtual machine might look like.
Before Implementation
I am most familiar with Debian based linux distro’s. In this example I will be using an Ubuntu 16.04 VM.
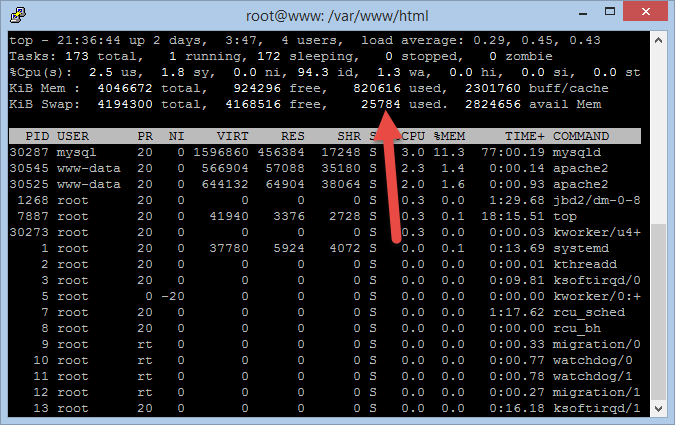
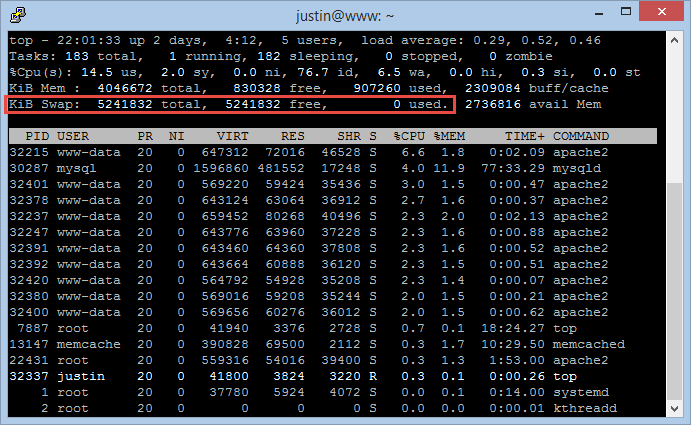
First, to see if your system is configured for a swap location you can run ‘top’. In the upper section you will see stats on free RAM as well as SWAP space.
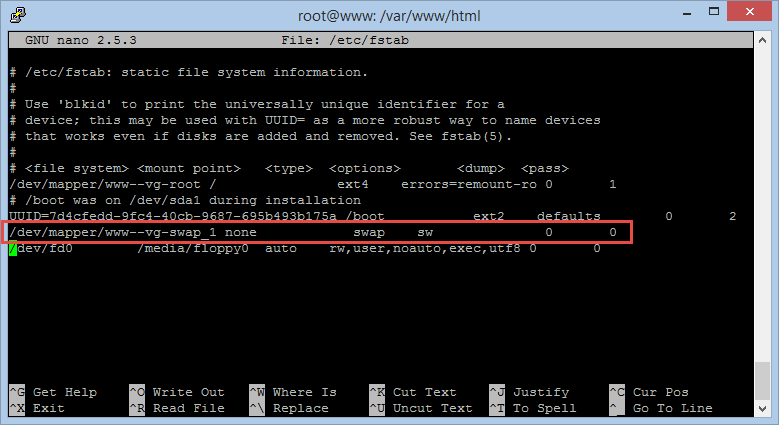
The next step is to check to see where the swap space is writing data to on disk we can check this by viewing the /etc/fstab file. We are looking for a line in the file that has the word “swap” located in it. In this example, where all of the default settings were accepted during installation, the swap space is a partition on the same VMDK file as the data. In order to use the Zerto Swap Disk feature we need to separate out this partition to its own VMDK file so that we can mark that VMDK as a swap disk.
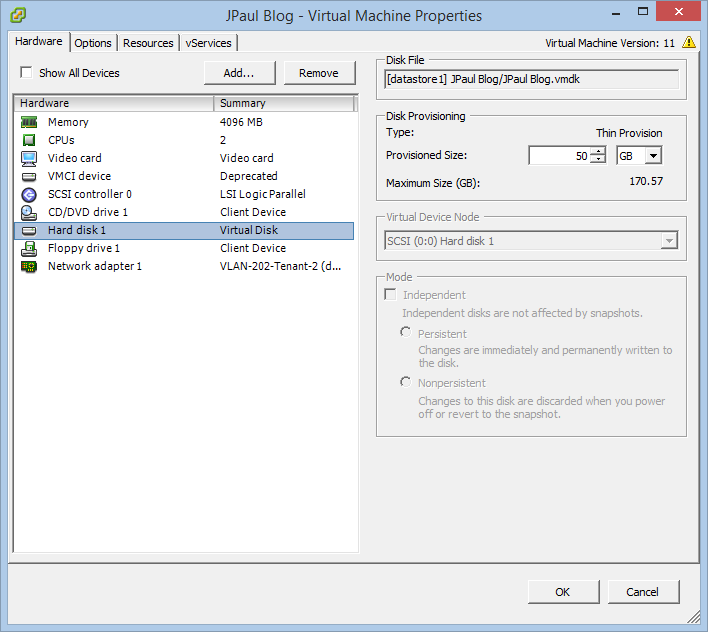
Here is what the Virtual Machines Configuration looks like before we add a virtual disk dedicated to swap space.
Modifying the VM
Virtual Hardware Modifications
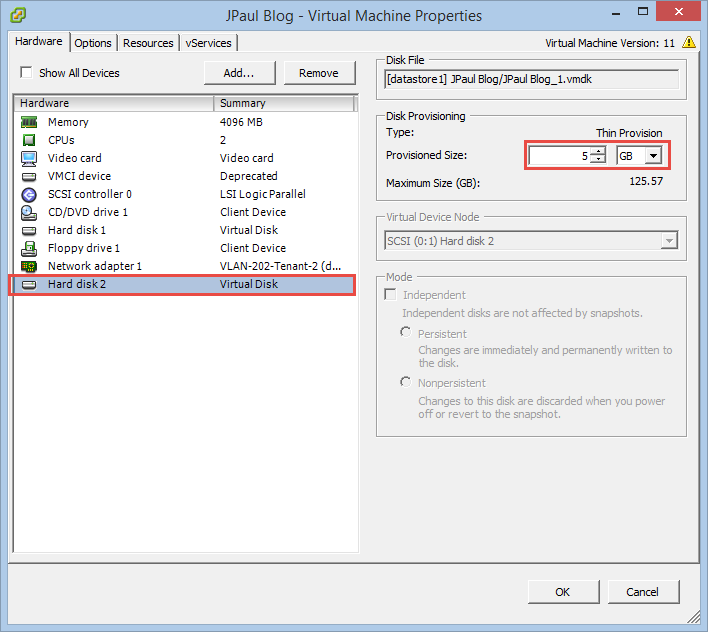
The next step in implementing this feature is to add a new virtual hard drive to the VM. We only need to add a disk that is about the same size as the amount of RAM in the VM. In my example that is about 4GB, but I went ahead and created a disk at 5GB. (Note there was no special reason for this, I just felt like creating 5GB instead of 4GB).
Now our virtual machine configuration looks like this:
Modifying Linux to use the new VMDK
The next step is to switch linux over from the swap partition to the new dedicated SWAP disk. This can be done without a reboot or downtime as long as you minimize RAM usage before you remove your old swap partition. Failure to reduce memory usage to below your physical RAM size will result in ‘out of memory’ or ‘could not allocate memory’ errors.
Prepping the Disk
Before we can put the new disk to use we have to do a few things:
- Re-scan the SCSI bus on the virtual machine so linux knows it’s there
- Partition the disk
- Format the disk with the swap file system
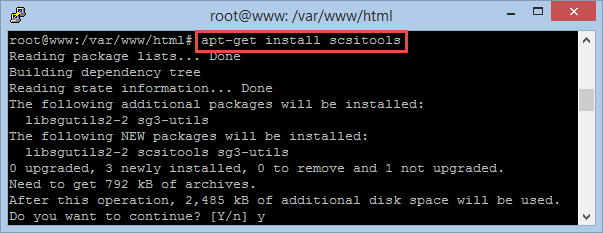
If you don’t already have the tools to rescan the SCSI bus you can either install them, or simply reboot the VM is that isn’t a big deal for you. To install the tools on Ubuntu you can run “apt-get install scsitools” as root (or sudo).
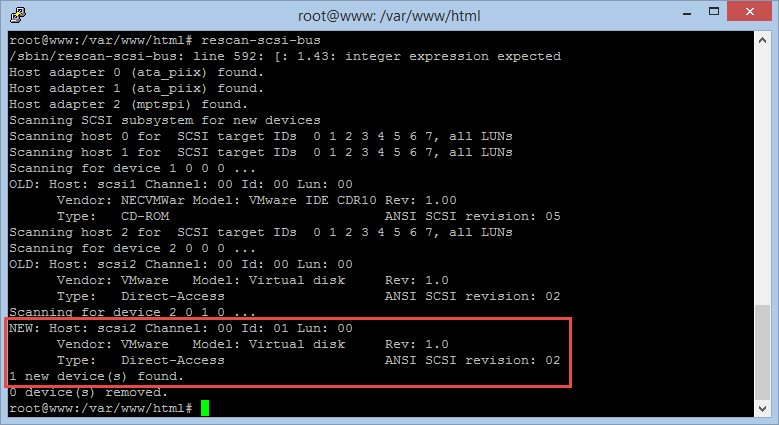
Once installed you can run “rescan-scsi-bus” which will look for the new disk that we added in the previous section. For my VM the new disk was detected as /dev/sdb.
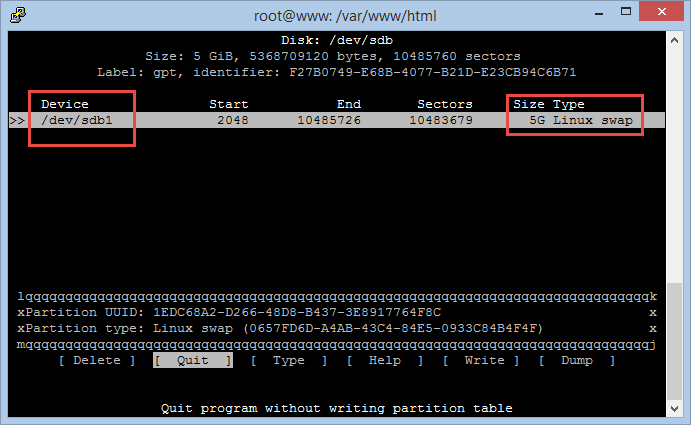
Next we need to partition the disk. To do that I ran “cfdisk /dev/sdb” and created a gpt partition table and one partition. I then set the partition type to “Linux Swap” and wrote the changes to disk.
Now we can format the partition as a swap space. Run the command “mkswap /dev/sdb1”. This will format the partition and then we can work on switching the OS over to it, but first lets go ahead and mark the disk as swap in Zerto.

Zerto VPG Modifications
Now is as good of a time as any to go ahead and modify our VPG and mark the new disk as a swap disk. Why? Well because at the moment the vmdk is formatted and ready to be used… but contains no data and if we mark it as swap now no WAN bandwidth will ever be used by this disk. If you were watching Zerto’s web GUI while you added the new virtual disk you will have noticed that Zerto already created the virtual disk at the recovery site and is doing its initial volume sync… which will take all of about 30 seconds since there is no data on the disk.
Here are some screenshots of the process in case you didn’t have the GUI open yet.
What the VPG looks like before adding the dedicated swap VMDK
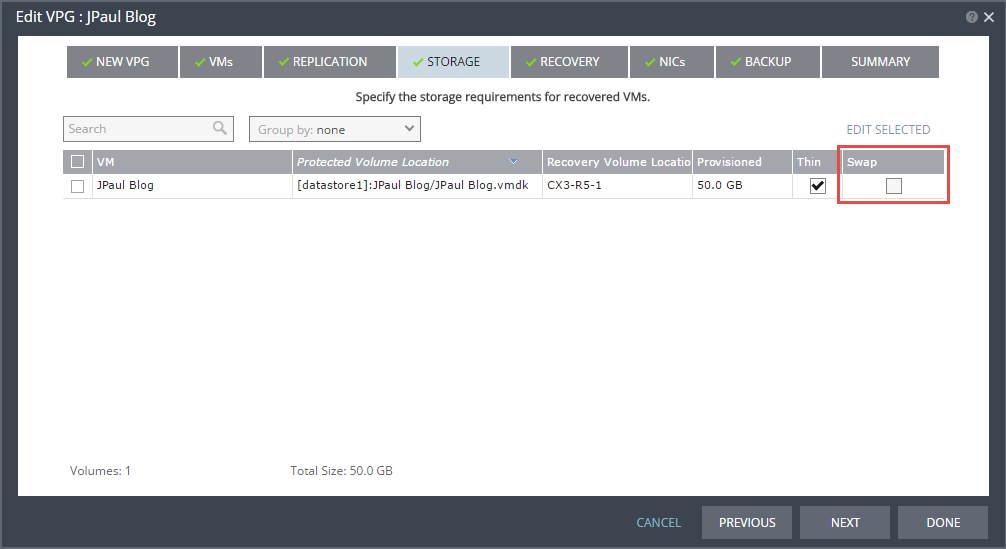
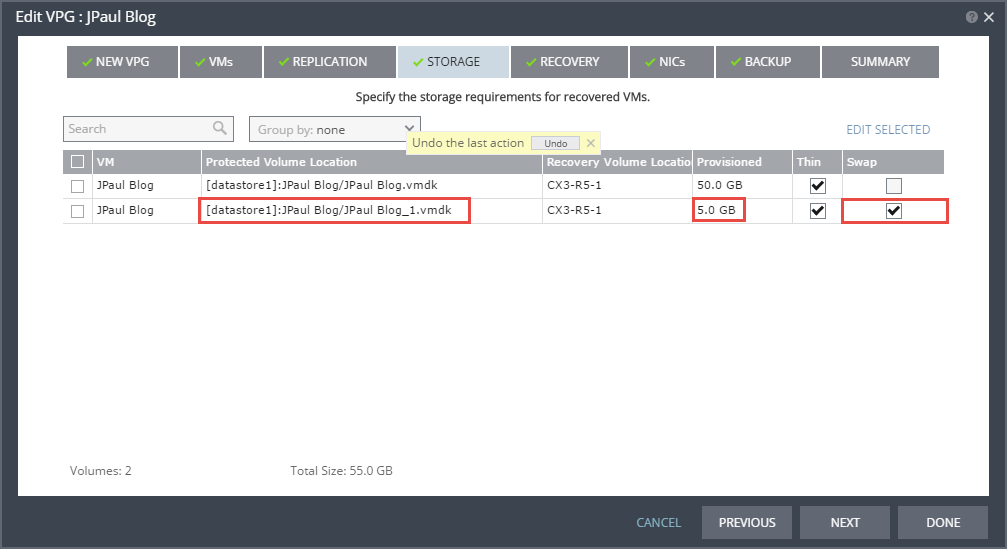
After adding the new dedicated VMDK for swap
As you can see the only real difference between this screenshot and the one above is that we have checked the “Swap” box aside the swap VMDK. Once you do this go ahead and click Done to save the changes. That is all that is needed on the Zerto side.
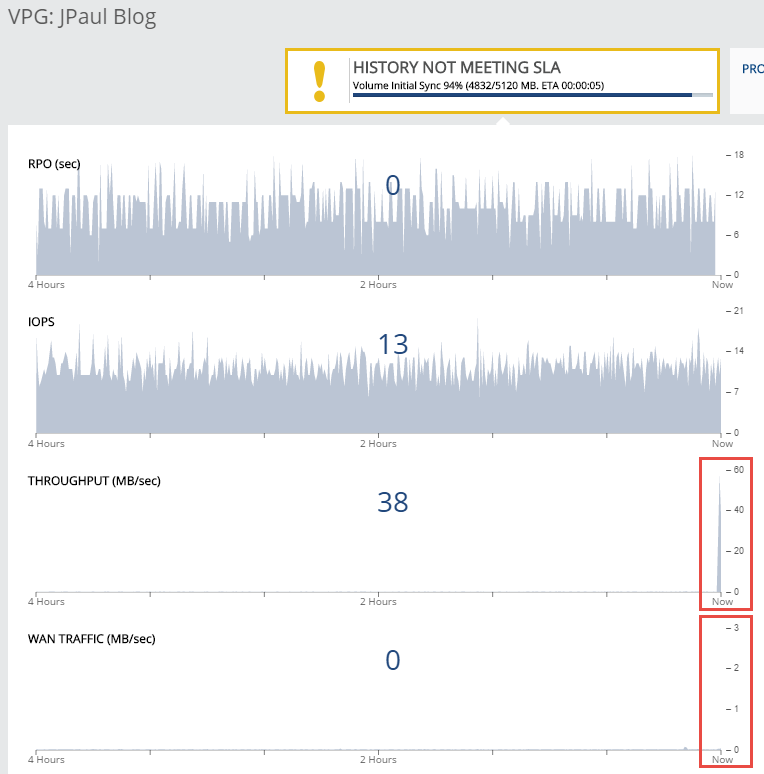
History Not Meeting SLA after adding the new VMDK

WAN usage for Initial Sync of new VMDK
You will notice some extra throughput as the new VMDK is scanned for data, but because it is mostly blank (aside from formatting) you will see minimal WAN usage during this sync. And as long as we mark it as swap before putting it into service as the swap disk, very little WAN bandwidth will ever be used by this disk.
Activating the new swap space
In order to use the new swap space we need to deactivate the old swap partition, to do this we will turn swap space off… this is where it is critical that your memory usage is less than the amount of physical ram you have. If you cannot make that happen then your best bet is to skip turning off swap at this time…. proceed with modifying the fstab file… and then rebooting the VM when it is able to be rebooted.
To turn off swap run the command “swapoff -a”. Depending on how much swap space was in use this can take a little time while linux moves everything that was in swap, back into RAM. Once it is all moved out “top” will show 0 KB used. Then we can modify fstab and lastly turn swap back on.
The purpose of modifying the /etc/fstab file is to add an entry for the new swap disk as well as remove the old partition’s entry. To make things easier you can cut and paste the old line and then modify it with the new disk’s details.
CTRL + K will cut the old line and then CTRL + U will paste it (make sure to paste twice so that you can comment out one of them and then modify the other)
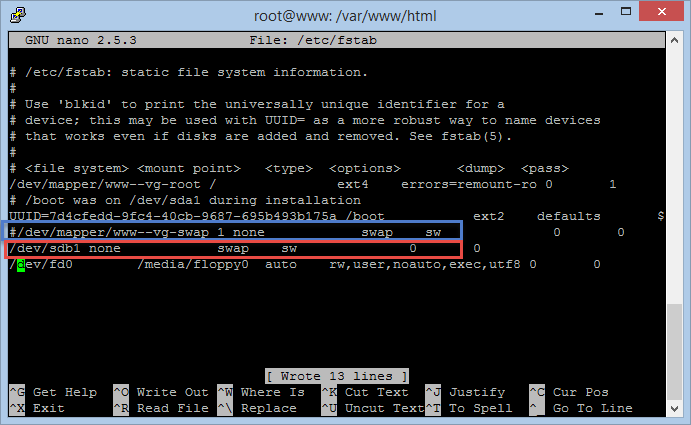
Save the fstab file with CTRL + X and then confirm that you want to save the file.
We can now reactive swap with “swapon -a”. To verify that swap is back in action you can run “top” again and see if a total swap value is listed.
Conclusion
At this point Linux us using the new swap disk for any memory paging that goes above the amount of physical RAM. It will generate storage I/O locally at the production site, however now Zerto will ignore those write I/O’s and save you bandwidth!
Disclaimer: I work for Zerto, however any views or opinions expressed here are strictly my own. I am solely responsible for all content published here. This is a personal blog, not my employers blog. Content published here is not read, reviewed, or approved in advance by my employer and does not necessarily represent or reflect the views or opinions of my employer or any of its divisions, subsidiaries, or business partners.
![]()


Thanks for the article, it is always nice to read and learn from you.
For this swap problem, isn’t it easier to use the VMware feature to store the VM swap file on a dedicated Datastore and not to replicate that datastore ? I guess it is pretty much the same but I could save some configuration time.
Thanks !
So the VMware swap file is completely different than the in guest OS swap space.
VMware swap space is only used when the hypervisor is running low on memory (ie when you have over provisioned your host) … For example if your physical box has 100GB of ram and the VM’s that are running on it are consuming 200GB of ram…. that means that at some point ESX might not know what to do with that extra 100GB of ram that was allocated… so when that happens it swaps data out to a vswap file on your datastore. To prevent this youcan simply reserve all the VM RAM for every VM on your host and not over allocate the host. I should also note that Zerto does NOT replicate the vswap files anyhow… SAN based replication would however replicate these files.
This doesnt do anything for windows though or linux… I think the best thing to do is to do a short video on this as it will be much easier to explain that way.
Pingback: How To Use Zerto's Swap Disk Feature with Windows - Justin's IT Blog | Justin's IT Blog
right !
I don’t why I was thinking that the “swapfile location” option you can configure on the VM was the swap inside the VM OS. Thanks for the clarification
Pingback: VMware Swap and OS Swap: Whats the difference? - Justin's IT Blog | Justin's IT Blog