With the release of VMware vSphere 5 also came the release of many other products, one of those was Site Recovery Manager 5. Site Recovery Manager is an add-on product to vSphere that allows for a disaster recovery plan to be scripted out and followed to the “t” during a recovery process.
In older versions of SRM, storage plugins (and compatible arrays) were required for the replication of virtual machines from site A to site B. However in this latest release compatible storage arrays are no longer required, in fact you don’t even need to have the same brand of array on each side. Why? well VMware has introduced its own replication appliance which handles all of this for you. Of course if you do have compatible arrays and have already purchased replication features you are still able to use those as well.
When I first started working with VMware Infrastructure 3, SRM was considered a real pain to setup because of all of the steps involved. This is not the case in SRM5, in fact I was able to set it up from scratch in less than a day (with my vSphere backend already in place).
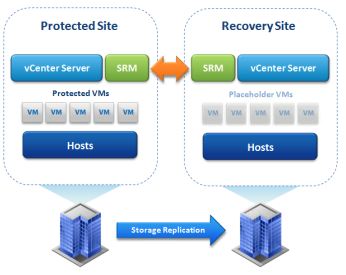
So the principal behind SRM is that you have at least two sites, one of them has virtual machines that you intend to protect from a disaster, and to make sure they are protected you replicate them to a Recovery Site. (Pretty graphic below) The beauty of SRM is that it automates the process of recovery and reduces (and maybe eliminates) the need for a run book. It makes it so easy that even the entry level help desk tech could do it 🙂
There are many limitations to SRM 5’s new vSphere Replication feature, so make sure to read the product documentation before purchasing to make sure its the right fit for you. But here is a quick over view of what I was able to achieve with some lab time.
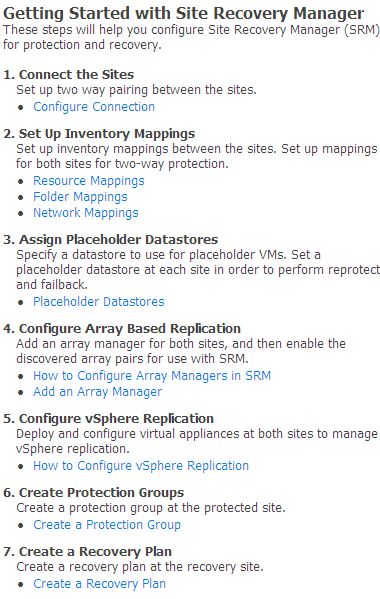
 Remember those annoying “Summary” tabs that you have probably turned off in the vSphere client ? Well it turns out that there is actually one that is very useful. The graphics to the right is a screenshot of the “To Do” list that is on the Summary page for SRM 5. It lists out step by step all of the configuration steps that we need to take in order to implement SRM. I won’t go through all of them in this post, but the main take away is that with 7 major steps we can have SRM up and running.
The biggest hang up I had was configuring vSphere Replication (Step 5), and that was only because I did not have SQL configured properly on each site. After resolving a misconfigurated SQL instance I was able to connect to my databases on each side and SRM was ready to go.
After going through all of the steps I was then able to pick any of my virtual machines at the protected site and tell it the Recovery Point Objective I needed, and the rest is history…. It just took off and started working. One gotcha is that I don’t think seeding your DR site is supported in this initial release of vSphere Replication (at least I didn’t see the option to). But where I was testing we have a dedicated 100Mbps point to point link, so seeding was not a big deal.
![]()


Where can I find the stencil for those datacenter images at the bottom of your picture? I have looked all over the internet for that or something similar.
I believe those came from a canned slide deck from VMware when they released vSphere 5. I will take a look and see if I still have it, as those were all on my old company laptop.
Will VR work to replicate a virtual machine that has iSCSI attached secondary volumes?
VR won’t replicate anything that’s visible only to the guest OS. If you have an in-guest iSCSI initiator logged into an iSCSI target and has one or more iSCSI LUNs mounted, VR can’t “see” them and won’t replicate them.