vSphere 5.1 Web Interface Hands on Lab
Lab Duration: Approximately 1 hour
Lab Skill level: Basic
Overview
In this lab you take the role of an administrator who has just installed VMware vSphere 5.1 with the full featured web interface.
The goal of this lab is for you to get to know the new web interface and how to perform common tasks, just as you would in the legacy vSphere Client. The take away is simply to be better prepared to use the web interface once you deploy it in your environment.
Prerequisites
It is recommended that lab users have some familiarity with VMware vCloud Director, therefore Lab 0 – Intro to vCloud Director is recommended before taking any other labs.
This lab uses the VMware vSphere Web Interface exclusively, therefore lab users should be familiar with it. Lab 1 is a suggested prerequisite, but not required.
Tasks Include:
- Licensing vCenter from the Web interface
- Building vCenter object hierarchy
- Adding a host
- Creating a Virtual Machine
- Uploading ISO media
- Performance Monitoring
For the best experience use a device with two monitors. Ideally you would use one screen for displaying this lab manual, and the other for the VMware View Desktop/vCloud Lab environment. If two monitors are not available, other suggestions include using an iPad or other tablet for the lab manual or working with another person and using their device for one thing and yours for the other. Printed lab manuals may be available if none of the above are possible.
Step 1 – Login and Lab Deployment
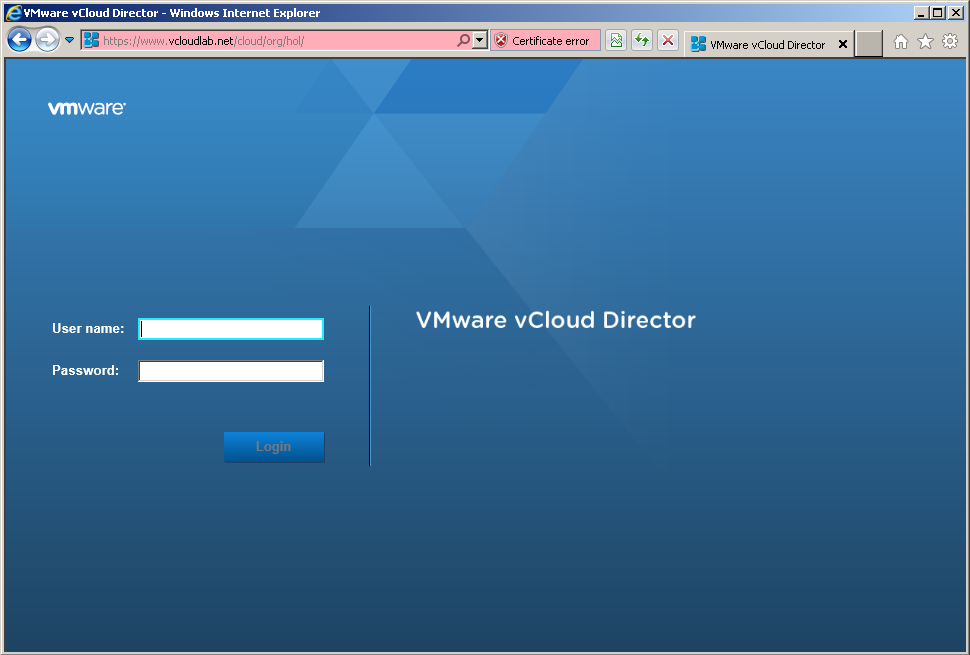
This lab will leverage VMware vCloud, in order to access the lab you will need to navigate to this URL:
https://www.vcloudlab.net/cloud/org/<username>/
(your username and password was in your welcome email)
Login with the username and password assigned to you or your group.
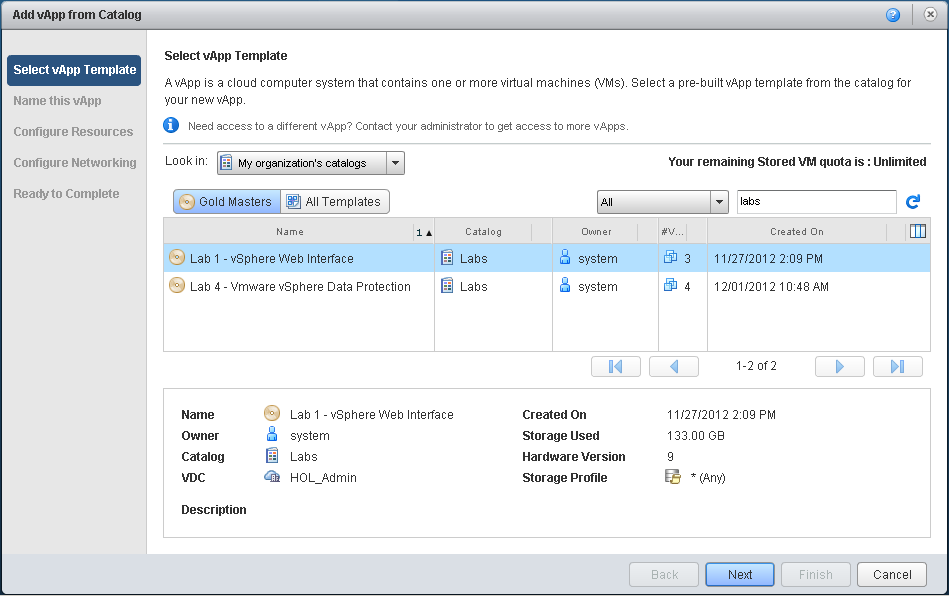
Once logged in you will need to deploy the “Lab 1 – vSphere 5.1 Web Client” vApp, to do this click on the “Add vApp from Catalog” button. Next Select “Public Catalogs” from the “Look in:” drop down menu. You should now see a list of the available labs, Select the “Lab1 – vSphere 5.1 Web Client” lab and click “Next”. You can now name the vApp if you would like or leave it at the default. The lease settings can be left alone. Click “Finish” to deploy your lab.
vCloud Director will now deploy all of the virtual machines and networking components necessary for your lab. This process should not take more than 10 seconds.
Please proceed to the next step.
Step 2 – Power Up your Lab
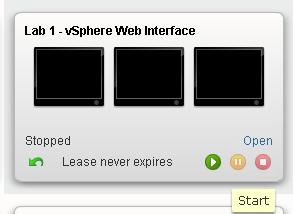
Once the lab has been provisioned it will be in a “Stopped” state, to power it up simply click the green play button on the vApp.
Because vCenter has many services to start, it will take about five minutes to fully boot up. We can review some lab info while we wait.
Step 3 – Lab Information and Setup
This lab is built on top of VMware vCloud Director. vCloud Director leverages VMware vSphere and adds a layer of abstraction so that resources can be offered to consumers through a self service interface, and without them needing knowledge of how those resources are configured on the backend.
This technology is the same thing you would get from a vCloud Powered VMware Service Provider, and can be leveraged for anything from test/dev environments to mission critical business applications.
This lab consists of several pieces:
1.) A manager workstation – which will be used to access the vCenter server and contains all of the needed tools and files.
2.) An ESXi 5.1 Server – 192.168.2.20 – Credentials: root / vmware1
3.) A vCenter Server Appliance VM – 192.168.2.10 – Credentials: root / vmware1
4.) A virtual network that is completely isolated from other lab users.
How the lab works
At this point the boot process of vCenter should be getting close to finishing up, let’s take a minute and explain how you will interact with your lab.
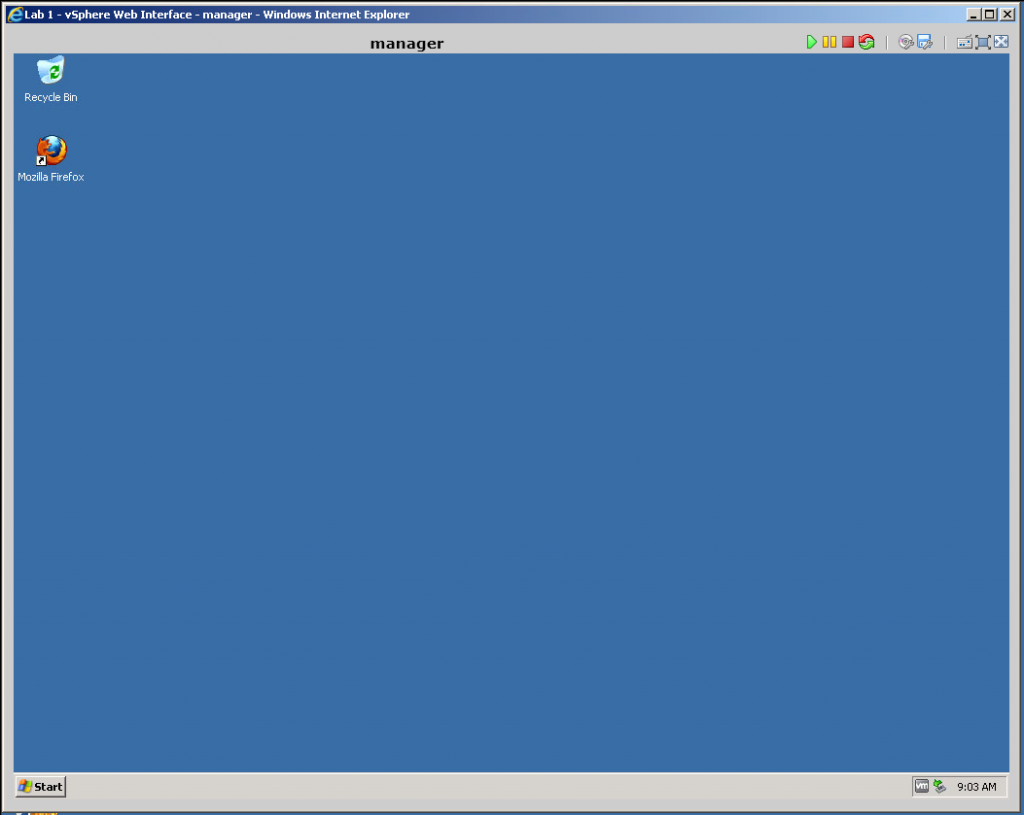
The ‘manager’ virtual machine will be our jumping point to access the web interface. Because the lab is 100% isolated, the only way to access anything in your lab is through that management host.
The lab can be accessed from a VMware View desktop, or directly from your personal machine, as the www.vcloudlab.net URL is publicly accessible. However for best video performance, using the VMware View Desktop is preferred. Check your welcome email for more information on how to access the View Desktops.
Step 4 – Opening the Manager’s Console
Let’s first open up the vApp so that we can see our individual virtual machines. Click open on the vApp.
Next, click once on the Manager VM, then click again on the console thumbnail. This will open the console of the VM. Click continue or accept on any SSL warnings. You may also need to allow popups in the browser.
NOTE: You will need to click “Allow” on the Remote Console plugin the first time that you open a console. It will appear at the bottom of the Internet explorer window at the same time that a popup box telling you to install it appears. YOU DO NOT need to install it, just click allow at the bottom as seen in the following screenshot.
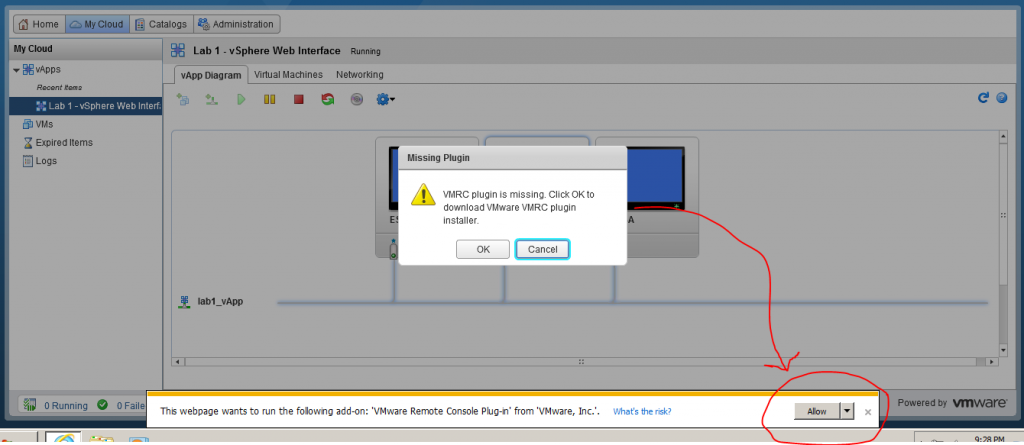
Note: it can takes 3 attempts before the console will open due to popups and allowing the “Add on” to run, this will largely depend on if you are using a view desktop or if you are using your local machine.
Step 5 – Checking vCenter’s boot status
After the Manager VM’s console is open, start a web browser and navigate to the following URL:
https://192.168.2.10:9443/vsphere-client/
Alternatively, you can just browse to https://192.168.2.10 and then click “vSphere Web Client on the right side.
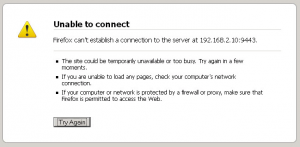
If vCenter has not fully started, you will receive one of the following in the browser:
If you receive any of the issues above simply wait for one or two minutes and refresh the page. vCenter can take up to 5 minutes to fully start depending on how many other users are running labs. In the labs we are also running vCenter on a limited amount of RAM which also slows things down a little over what you could expect from a production system.
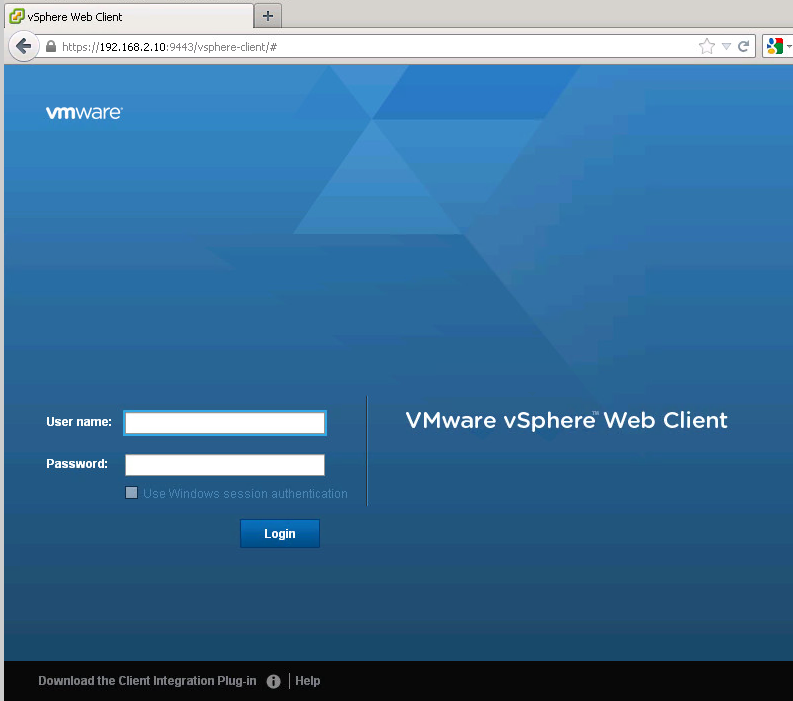
Once vCenter is ready you will see a login prompt like the one below, login to vcenter using root as the user name and vmware1 as the password.
Step 6 – Licensing vCenter
Licensing vCenter
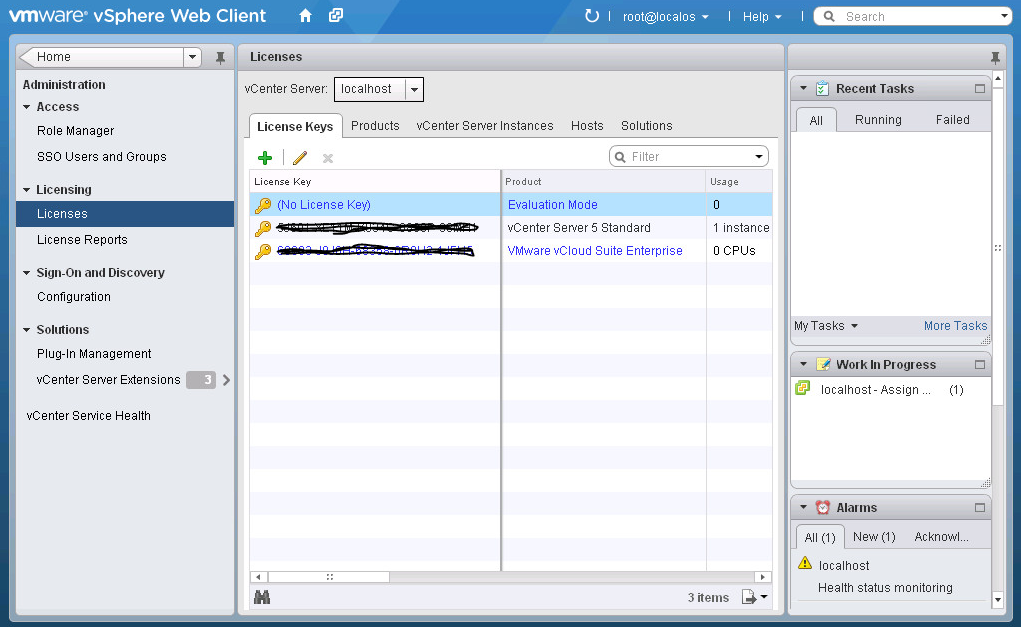
For lab purposes license keys have already been entered, but it is still a good to know where you enter license keys so that way when you need to upgrade yours you know where to go.
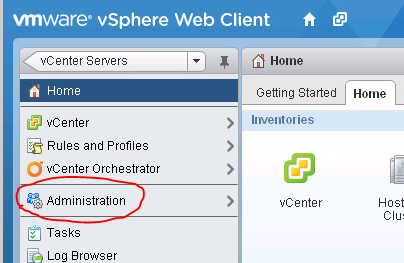
First we need to select the “Administration” in the left menu.
Now select “Licenses” from the left menu, and you will see the current license keys in the system. If this were not a lab, and you were adding the license keys you purchased, you would click the green plus icon above the license keys and follow the wizard.
Step 7 – Creating a vCenter Management Structure
At the top of the interface there is an icon to take us quickly to the vCenter home page. Click the vCenter logo icon.
Creating a Datacenter
Next Select “Hosts and Clusters” from the left menu. Now we have a view that closely resembles the legacy vSphere client.
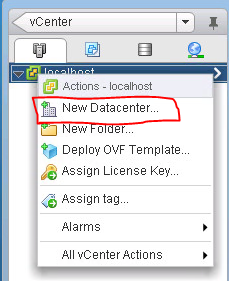
Now right click on the vCenter server and select “New Datacenter”.
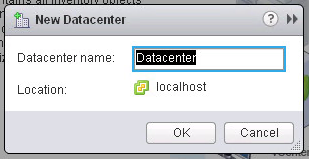
Enter the name of your new datacenter (you can use anything you prefer).
After clicking O.K. the Datacenter object will be created and you can expand out the inventory,by clicking the arrow to the left of “localhost” in the left tree menu, there you will see your datacenter object.
Creating a Cluster
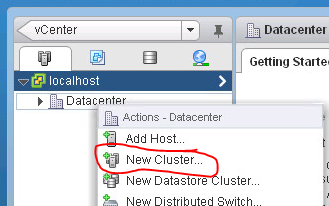
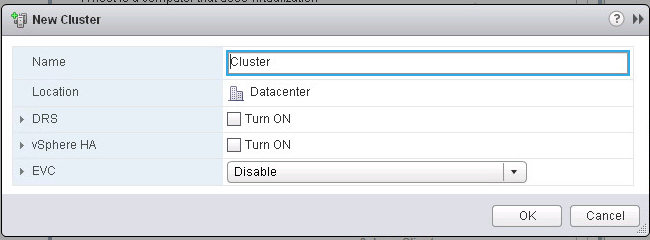
Right click on your new datacenter and select “New Cluster”
In the wizard that appears you will need to name the cluster, this is also where you would turn on features like VMware HA and DRS as well as EVC. For now leave those options turned off and click O.K.
Step 8 – Adding a Host
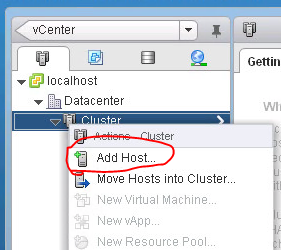
Now that you have a datacenter and a cluster created you can add an esxi host into that cluster. Right Click on the cluster and select “Add Host”.
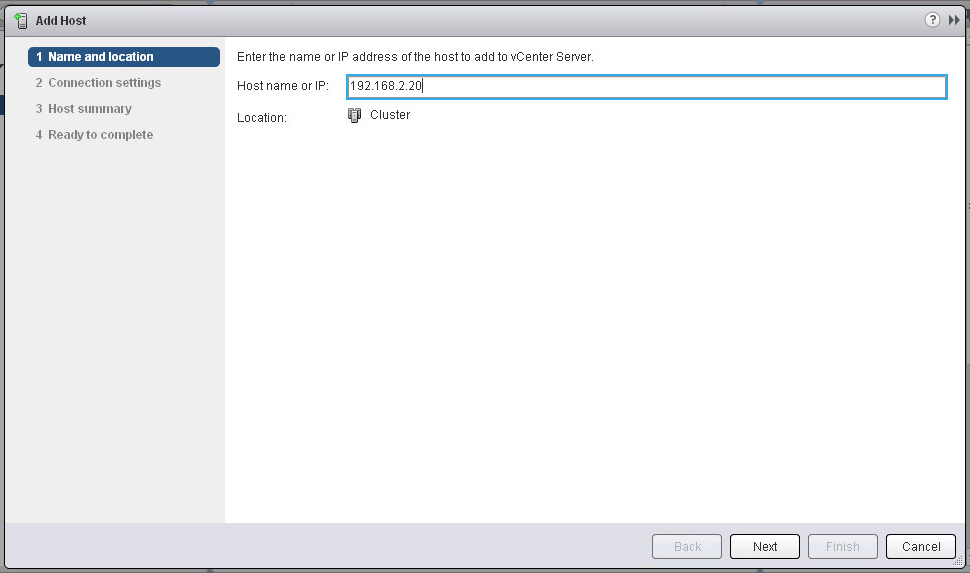
We will need to provide the IP address of the host, the IP address of your ESXi host is “192.168.2.20”.
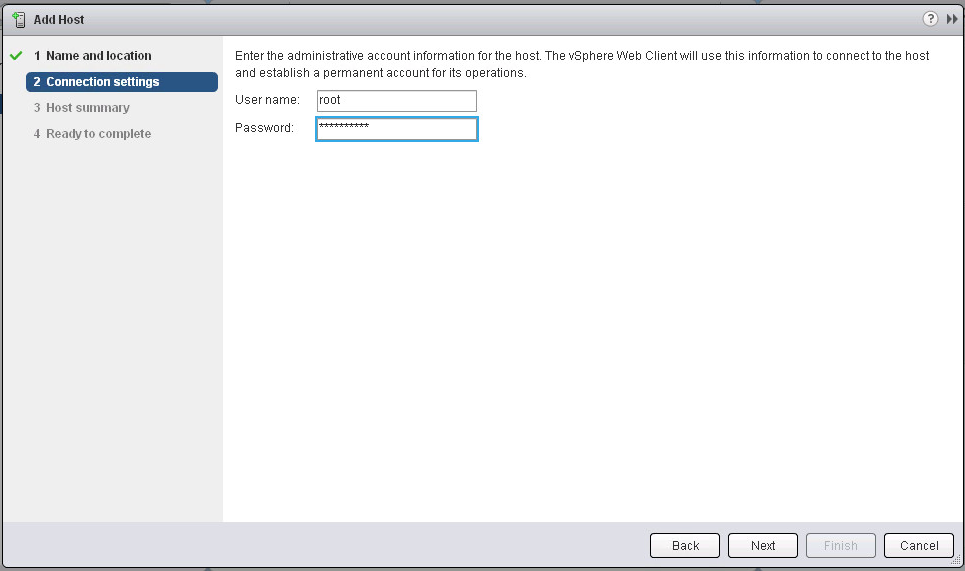
Next we will need to enter the username and password to connect to the host. Use “root” as the username and “vmware1” as the password.
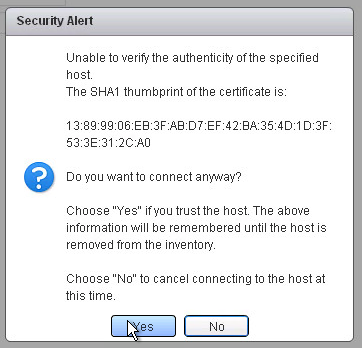
Click Yes to accept the security certificate on the warning popup.
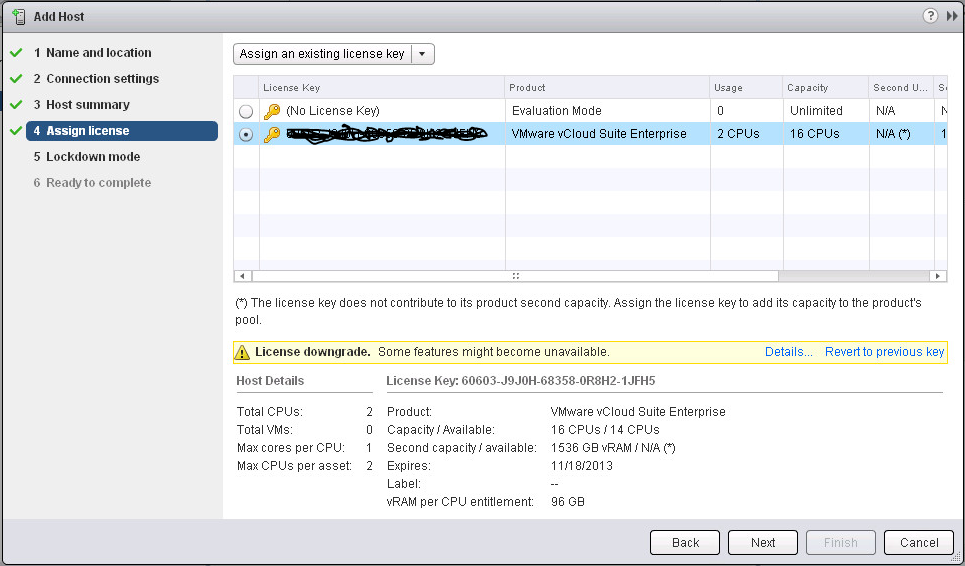
Click Next on the host summary page and proceed to the “Assign License” section of the wizard.
Licensing the new host
Because license keys were already entered for you we can simply select an existing key. If this were a new install and the key had not yet been entered you could assign a new license key from the add host wizard. For this lab we just need to select the radio button next to the 16 CPU license listed in the box, then click next.
The next step in the wizard asks you if you want to enable lockdown mode. In almost all use cases you WILL NOT want to enable lockdown mode.
Finish the remaining steps in the wizard to add your host.
Step 9 – Creating a Virtual Machine
Now that we have our infrastructure set up we can create a virtual machine. First we will create the virtual machine and then we will upload an ISO file from our management workstation to a datastore. Later we will also do a little performance monitoring, and check for any alarms.
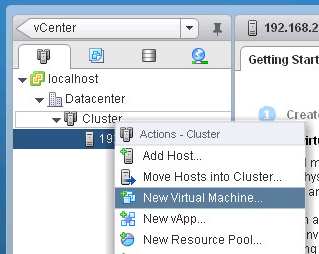
You can add new virtual machines many different ways, because you are already in the “Hosts and Clusters” view we will add our new VM from here. To get started right click on your cluster and select “New Virtual Machine…”
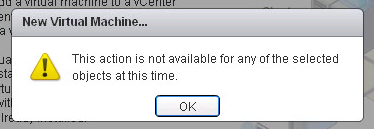
Note: If you receive the following error, click the refresh icon at the top of the web interface. After the web interface refreshes you will be able to add a virtual machine.
The next several steps are almost identical to what you would have selected in the legacy client. But there are some options that we will change from the wizard defaults.
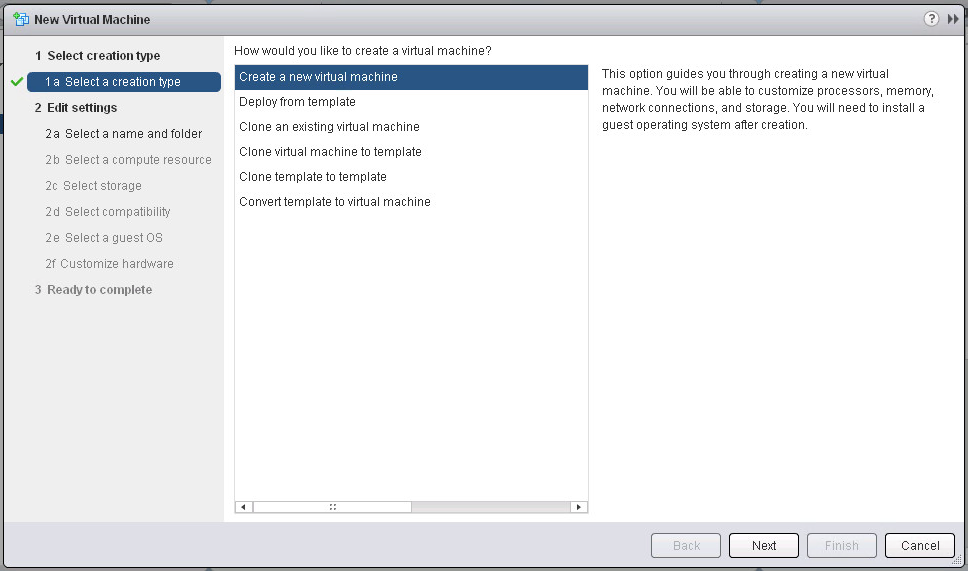
The first step is simply to select what type of new VM you want to add. We want to choose “Create a new virtual machine”, then click next.
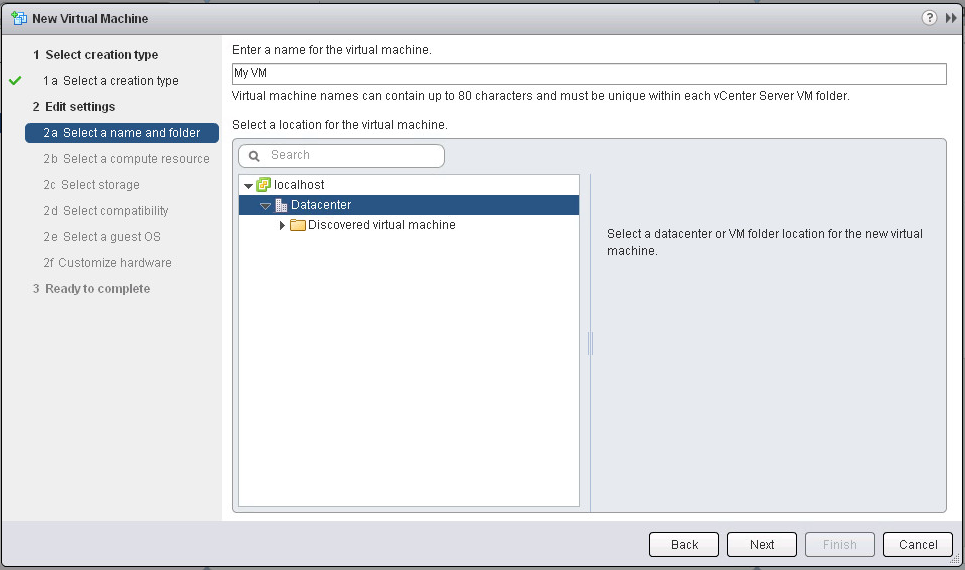
Now we need to name the VM and tell vCenter where to store the virtual machine in its inventory. The name can be whatever you want and the location will be your datacenter object.
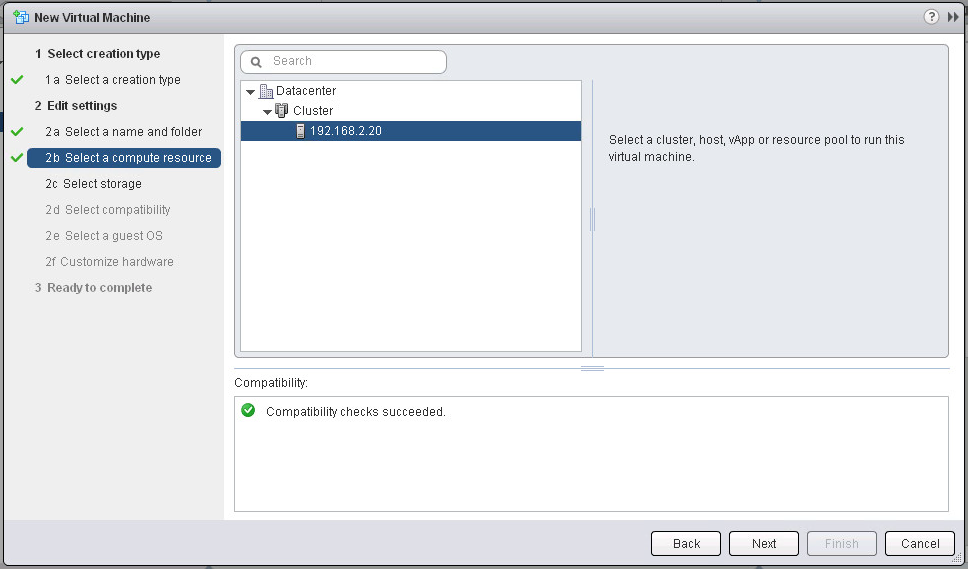
Next we have to tell it which host to live on. In production where you would have a SAN and possibly DRS enabled you could just select the cluster, but in this lab we will need to select our ESXi host since we dont have shared storage and do not have DRS enabled.
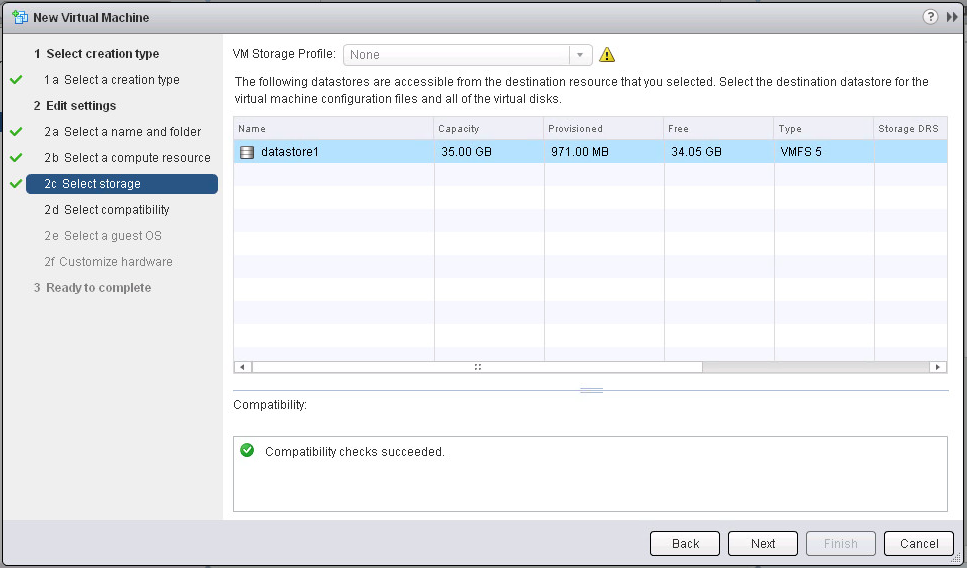
Select the “datastore1” datastore. Note that we could also select a “Storage Profile” here, in this basic lab we wont use storage profiles, but a storage profile is a way to distinguish types of storage, so in production you may have a SAS-15k storage profile that you put all of your critical servers on, while non critical would maybe go on a SATA-7200 profile.
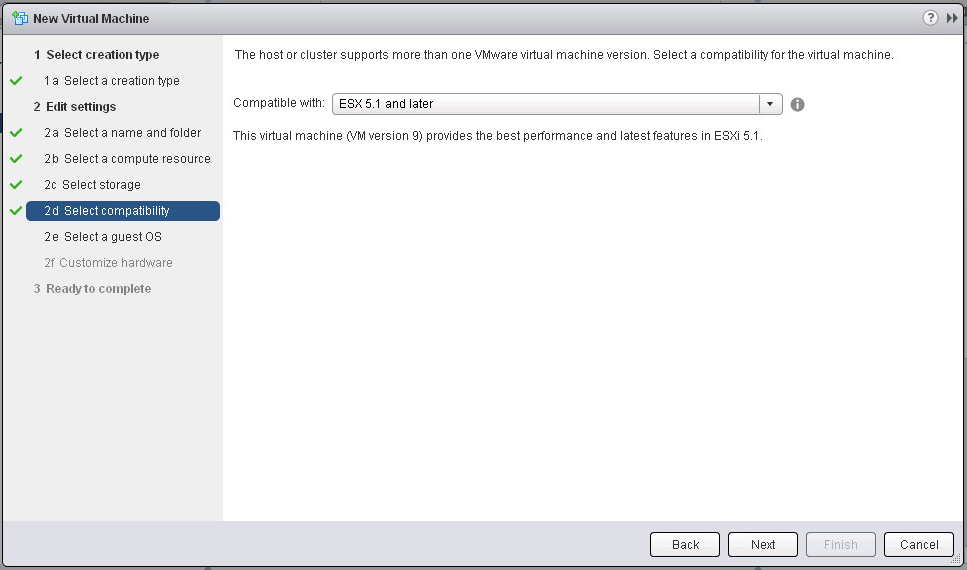
Because we only have ESXi 5.1 in our cluster and no legacy 4.x or 3.x hosts we can select ESX 5.1 and later compatibility. If we had older hosts we would need to select a lower level so that vmotion could take place.
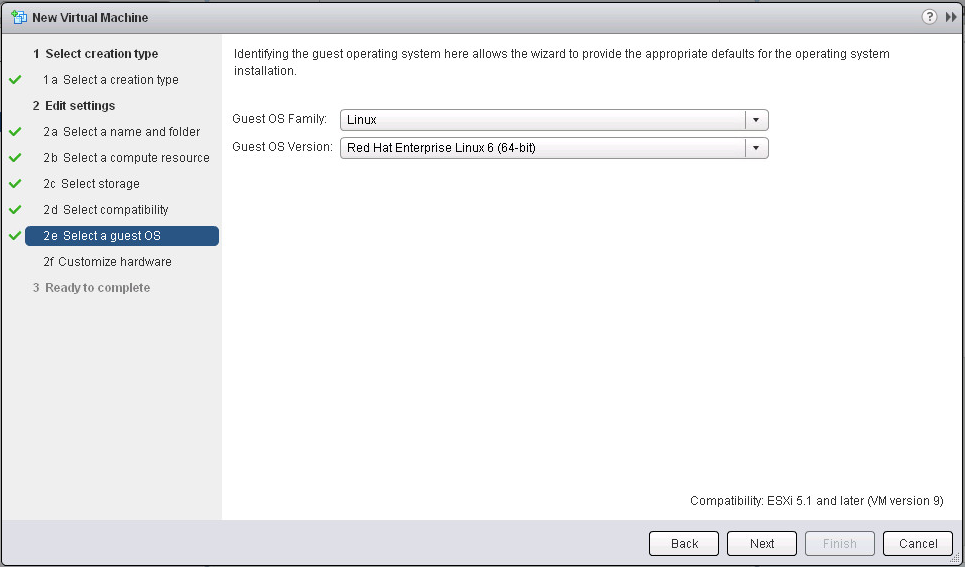
This VM will boot a small linux distro, so choose Linux as the OS Family Type and pic any OS Version you want as long as it is 32bit.
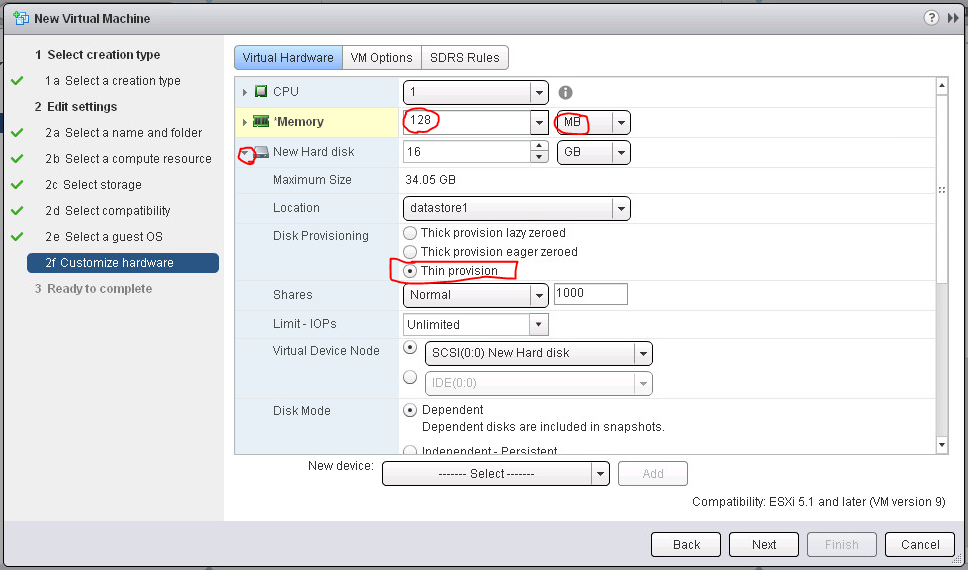
Here is where things get interesting, and some changes need to be made.
First change the memory to 128 MB.
Next, click the drop down arrow to the left of “New Hard disk” and make sure to select “Thin Provision”, then click next.
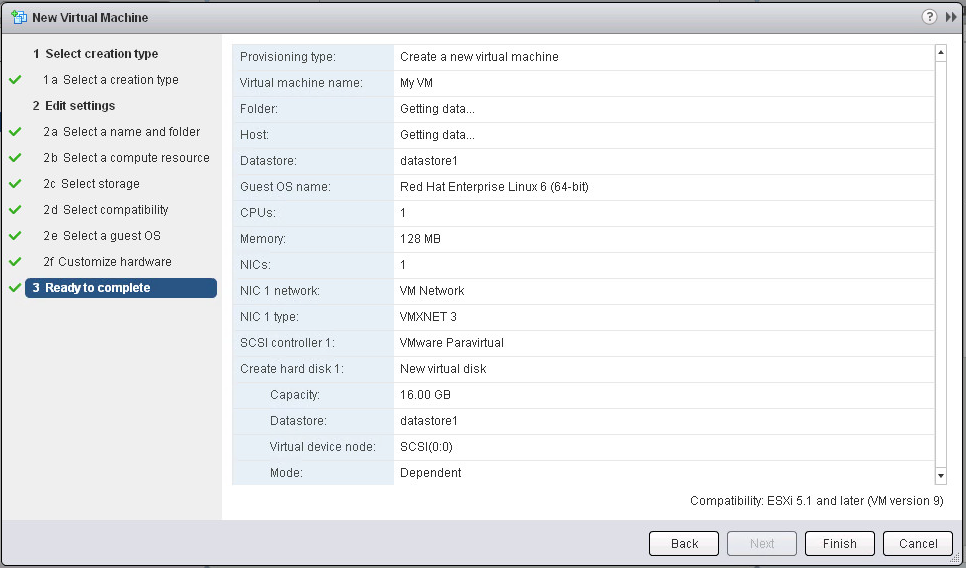
Click Finish on the summary page
Step 10 – Monitoring Task Progress
Now that you have provisioned your first virtual machine, you may want to check its progress. Normally for a thin provisioned VM it will be completed almost instantly, but in some cases it may take some time.
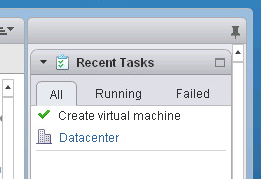
On the right there are three areas, the top one shows tasks that are in progress, much like the bottom panel in the legacy client did.
Step 11 – Uploading an ISO CD Image
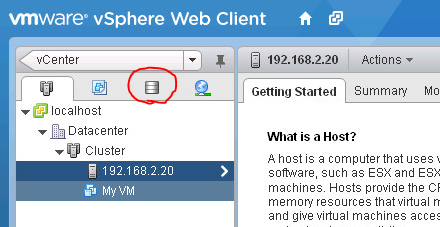
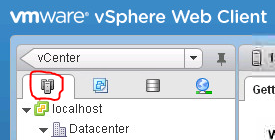
On the left side of the web interface you will see four icons above the inventory. One of these icons is for “Datastores”. Click the one that looks like a drum and expand out the inventory.
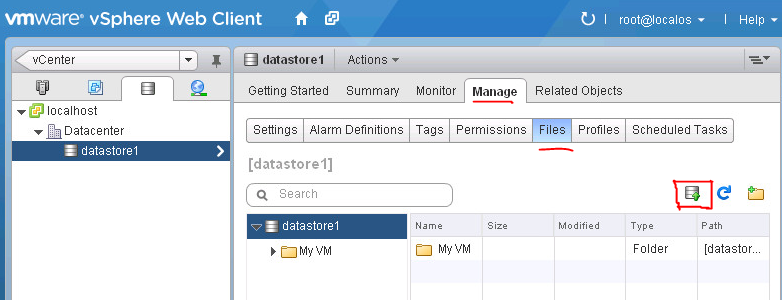
Now expand out the tree on the left and click on “datastore1”. Then select the “Manage” tab in the middle window. After selecting “Manage”, select the subsection called “Files”.
Here you will see a small drum icon with a green up arrow, this is the upload icon. Click it to start the upload wizard. The ISO to upload is on the desktop in the “Lab Files” Folder.
Note: you may need to make sure popups are allowed. And you will need to click “Allow” on the security popup
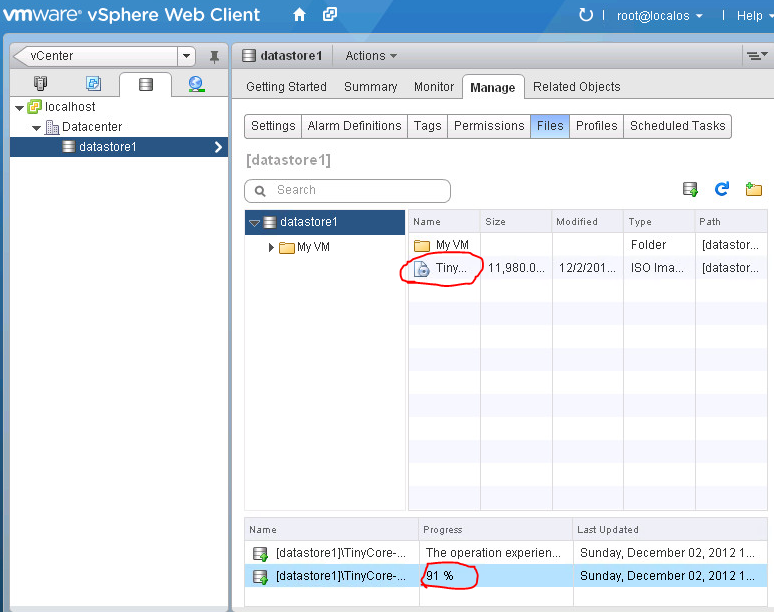
The ISO to upload is “TinyCore-4.7.1.iso” from the “Lab Files” folder that is on the desktop of the manager vm.
After starting the upload you can monitor its progress in the area below the Files browser.
Step 12 – Modifying a Virtual Machine
Now that we have an ISO uploaded we can use it to boot our new VM. But first we have to tell the VM to use it. Select the “Hosts and Clusters” icon on the left and then click on your VM.
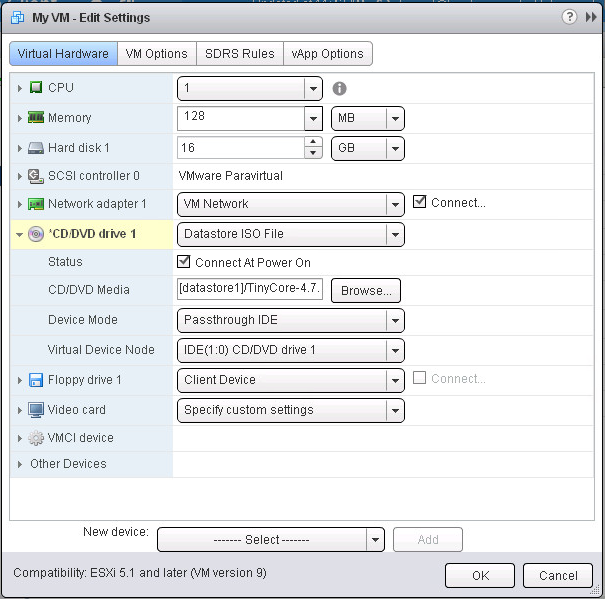
Now in the middle section of the page select the “Manage” tab, by default you should be on the “Settings” section, but if not click Settings…and click “Edit”.
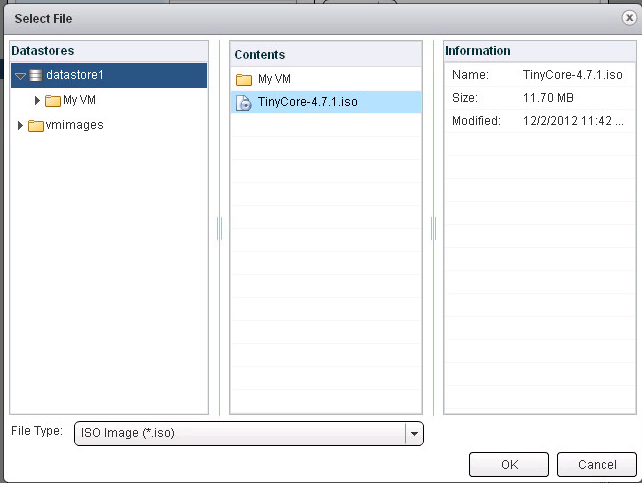
Find the virtual CD/DVD drive in the settings and from the drop down menu select “Datastore ISO file”. This will open up a box where you can click on “datastore1” and then the ISO file that we uploaded earlier.
Make sure to select the checkbox next to “Connect At Power On” on the CD/DVD drive before proceeding, otherwise the VM will not boot from the ISO file. Click O.K. to close the selection box.
Step 14 – Powering on your Virtual Machine
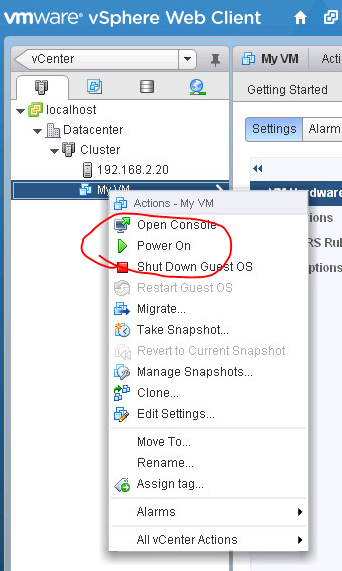
Now that we have an ISO mounted in our VM we can power it on. To do this right click on the VM and select “Power On” from the menu.
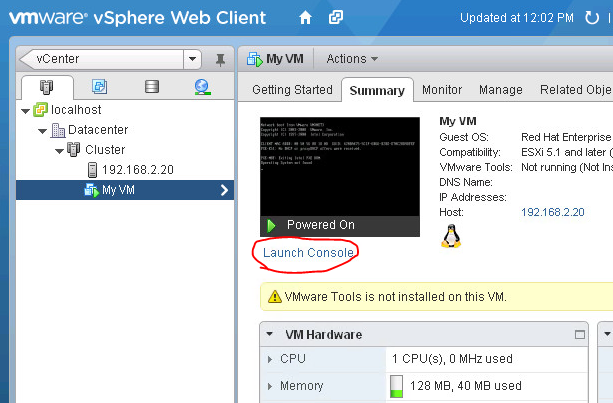
After the VM powers on we can open the console and view what it is doing. You should see it starting the Ubuntu boot wizard. To open the console you can right click the VM again, then select Open Console. Alternatively if you go back to the summary page you can select “Launch Console” underneath the Console thumbnail.
Step 14 – Checking Performance
For the purpose of this lab, you do not need to install an OS on the virtual machine we created, but because we have it running we can use it for performance monitoring practice. There are many different levels at which you can monitor performance, but since you are probably still on the VM summary page we will monitor the individual virtual machine’s performance stats.
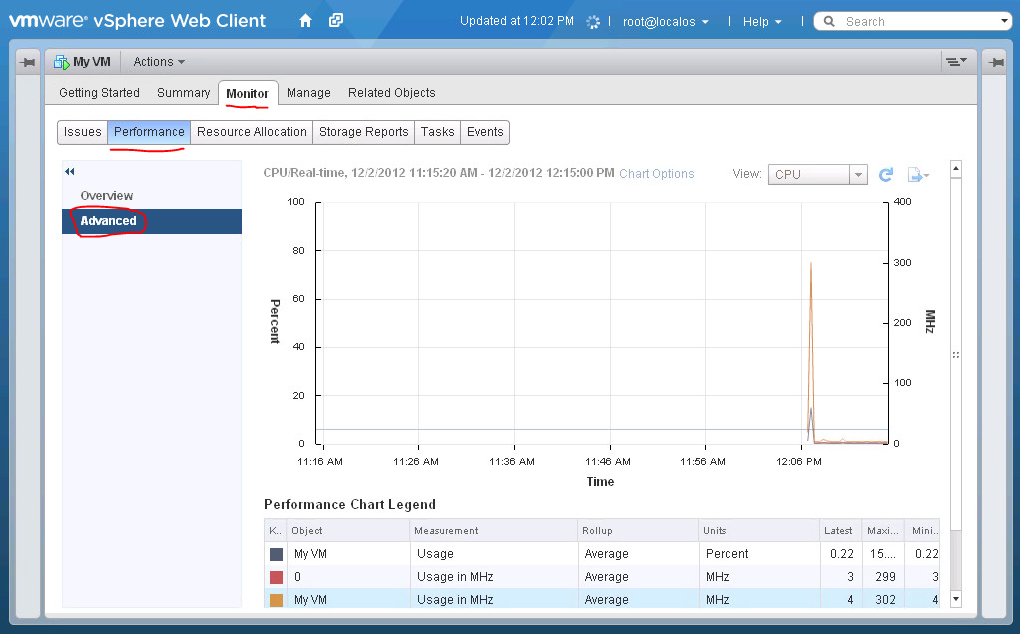
Click on the “Monitor” tab and then “Performance” under it. There you should see “Overview” and “Advanced”, because the VM has not been running a long time the overview section wont do us much good, so click on the Advanced option. Here you can see real-time CPU, Memory, or Disk stats for this VM. To get a good picture of the middle panel you may need to unpin the right and left panels, to do that just click on the pin icons. When you are done, click them again to repin those panels.
Step 15 – Checking Alarms
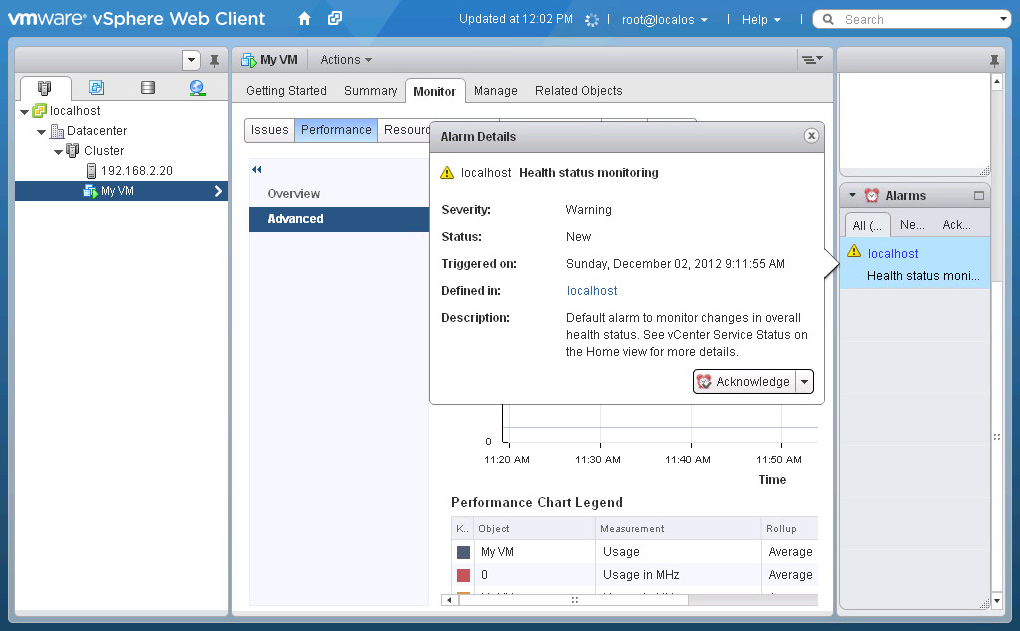
One of the most important things an administrator can do for their VMware environment is make sure that alarms are monitored and resolved as quickly as possible. With vSphere 5.1 the alarms have been given their own area at the bottom of the right panel, underneath Tasks and the Work in Progress area. Take a look at the Alarms and see if anything needs attention.
You may or may not have any active alarms because there isnt too much going on in your vSphere environment.
Congratulations! You can completed Lab 1
If you still have time remaining feel free to explore around the environment.
More highlights in the vSphere Web Interface include:
- Ability to “minimize” tasks you are working on and come back later. For example start creating a new virtual machine and click the minimize button. You will see it move over to the “Work in Progress” box on the right. If you click on that task it will reappear where you left off.
- Tagging – almost all objects can be tagged with information to help you organize them. Right click on the object and look for “Assign Tag…”
Housekeeping and Cleanup
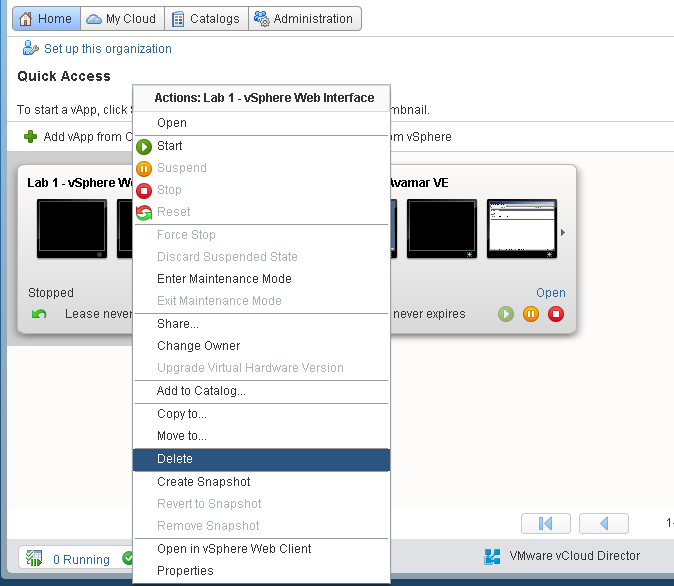
When you are done with the lab, you can delete it from the HOL Cloud. To do this click on the “Home” button in vCloud Director (on the left upper part of the vcd web page). Next find your lab vApp that you deployed at the beginning of the lab and press the Red Stop Button. after your vApp has stopped you can right click on it and select “Delete”.
Note: If you want to do another one of the labs with your HOL Account you will need to stop and delete one lab BEFORE starting the next lab, as there is a limit on the number of VM’s your account can have.
Questions and Feedback
Once you have finished the lab please complete the HoL Survey by clicking this link:
Any questions can be sent to [email protected] or submitted via the survey.
![]()

