Part 2 will be about how to get the VM that we created in Part 1 online, for both outbound access to the internet as well as inbound access to ssh and http services that the VM is providing.
(Also I don’t plan to go over how to install a LAMP stack as there is plenty of info on the net about that, but at a super high level we just need to issue “apt-get install phpmyadmin mysql-server” to our ubuntu server and it will install everything we need to get apache, php, and mysql up and running.)
So lets first talk about what we are going to need to do at a logical level so that it makes sense when we start doing stuff in the interface.
- we need to create a rule so that the firewall (or gateway in vCloud terms) knows how we want internal traffic to flow to the internet (this will be our outbound NAT rule)
- we will need a firewall rule to allow the traffic translated in part 1 above out. Don’t forget about this part… just because you tell the firewall to do something with traffic, doesn’t mean that it will allow the traffic to actually go anywhere unless you have a rule. (this is our outbound firewall rule)
So we need to do two things in order to get traffic outbound. Replies to our outbound requests will automatically be allowed to come back inbound to the server that requested it. but no other inbound requests will be accepted at this point.
But what if we want inbound ssh access ? After all we probably don’t want to go to vCloud’s interface and open a console each time we need on the server. Plus we want people to be able to hit our web server so we will also need to allow http traffic inbound to the ubuntu server as well. For these two things we will need to following rules
- we need a NAT rule to translate port 22 (ssh) on our public IP address to our ubuntu server on port 22 (this is called a DNAT rule)
- we need a firewall rule to allow traffic from the internet to hit port 22 on our public ip address (this is the firewall rule for ssh)
- we need a NAT rule to direct traffic from port 80 (http) on our public IP address to our ubuntu server on port 80 (another DNAT rule)
- we need another firewall rule to allow the internet traffic to hit port 80 and come through the firewall
OK so let’s get started and make this happen.
First thing we need to do is get a public IP address added to our edge gateway (or firewall). To do that go to the Gateways tab in the service console and click on the gateway.

Next click on the Public IPs tab. In here all we need to do is click the “Add IP Address”

Click Add on the pop up box that lets you know that you will be charged for the IP address you are about to add.
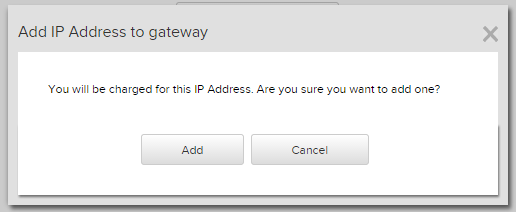
This process can take a couple of minutes but once it is complete we can start creating our NAT and Firewall rules.
NAT rules
Lets start on the NAT rules first, but note that it doesn’t matter if you create the NAT or the firewall rules first… both need to be in place before traffic will pass.
NAT Rule to allow traffic from our internal network get to the internet
Once on the NAT tab click the Add button. There will be a simple wizard that pops up where we can select SNAT or DNAT as the rule type. The rule that allows traffic to get outbound is called an SNAT rule.
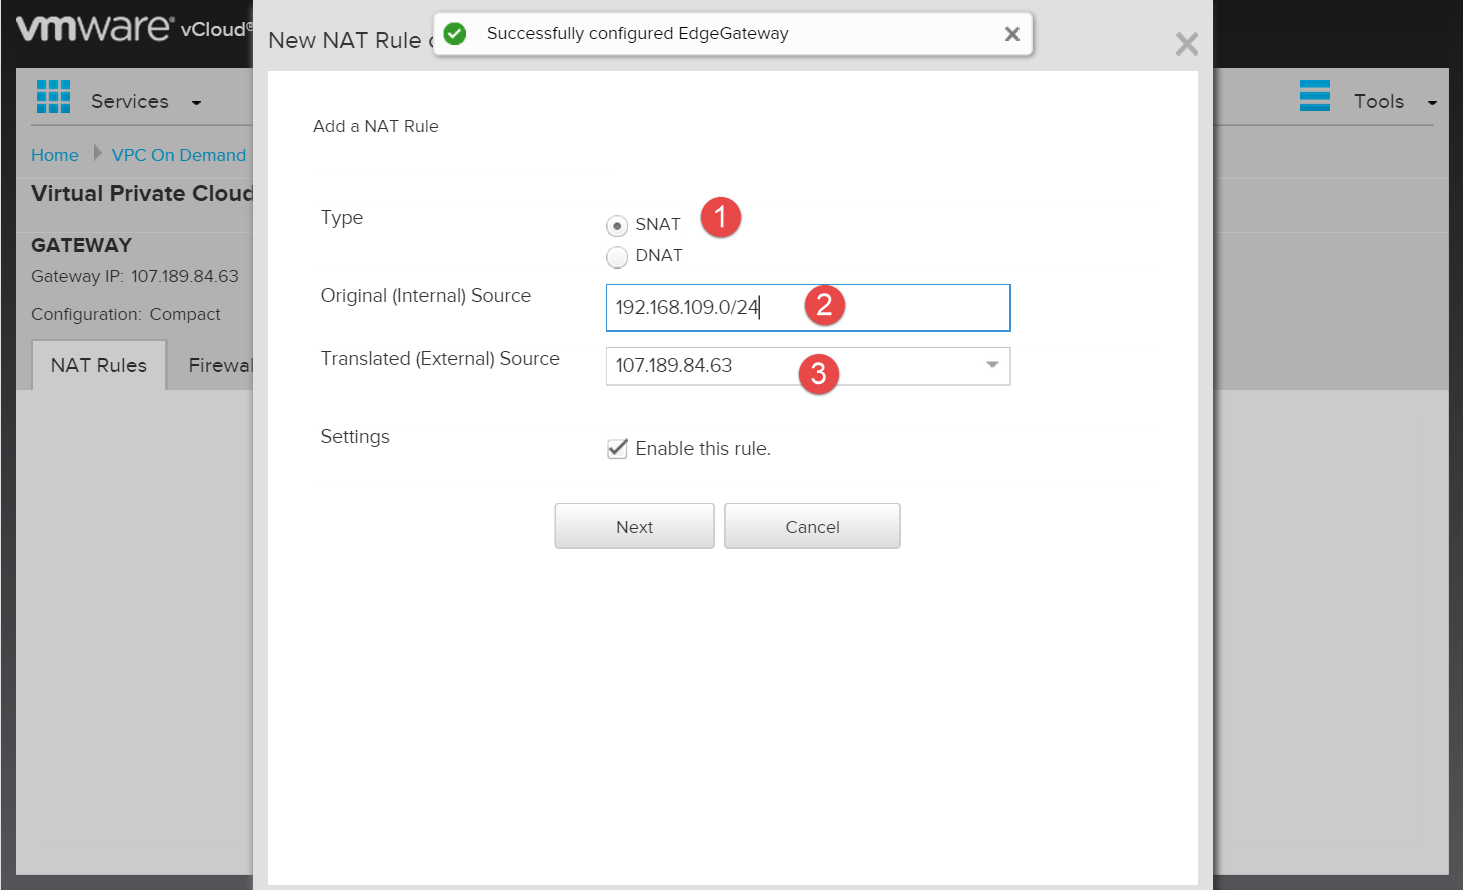
There is three settings on this page we need to fill out. First thing … pick SNAT, second thing… fill in your internal subnet info (for a default vCloud internal network it is 192.168.109.0/24), lastly enter the external IP address you want to translate the traffic to. This will be the IP address that you were assigned from the “Add IP Address” section above. Then click Next and Finish on the next page.
OK so time for a little personal experience. adding ANY rule to your gateway will take a minute or two. My best advise is to let each change finish before going on to another one. If you don’t I’m personally not entirely convinced that it catches all of your changes. If you have a lot of rules and changes to make you are probably better off to go into the vCloud Director interface and add all the rules in there. This is because you don’t have to let it apply after each rule… you can create all your rules then click ok and they are all applied at the same time.
OK back to the regular program.
Once that NAT rule has created you can add the other NAT rules
DNAT rules
The next two rules are only if you want http and sh traffic to come through the firewall. If you are a windows only shop you will want to adapt these to maybe RDP (port 3389) or something else.
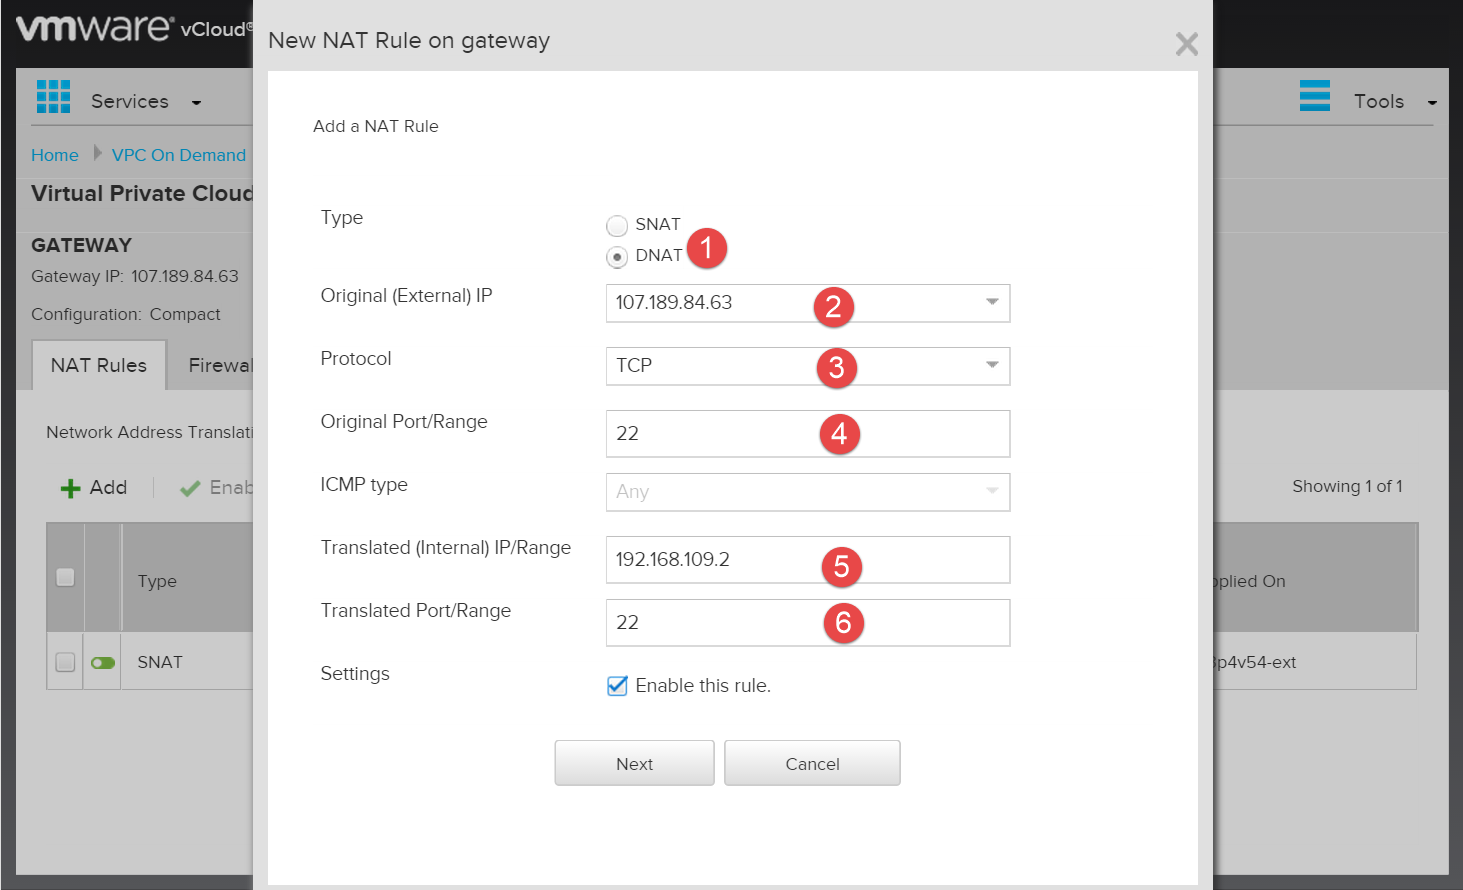
For a DNAT rule we have a few more fields to fill out.
- select DNAT
- enter the public IP that you were assigned
- select TCP (at least for ssh and http)
- type 22 for ssh
- enter the ip address of your ubuntu vm (again adapt to your windows vm if that is what you’re using)
- enter the port that you want the traffic passed to.
Again once you are finished click Next and then Finish… then wait for it to completely create the record. Once it does you can create another DNAT rule for the http traffic, the only difference is that instead of putting in port 22 put in port 80. When completed you should have three NAT rules.
Next up are the firewall rules
We will need three firewall rules as well, the first one will allow the internal traffic to get to the internet, and the second two will allow internet traffic to get to ssh and http services.
Outbound rule
Click on the Firewall Rules tab now and click Add.
For this rule we will need to enter some info.
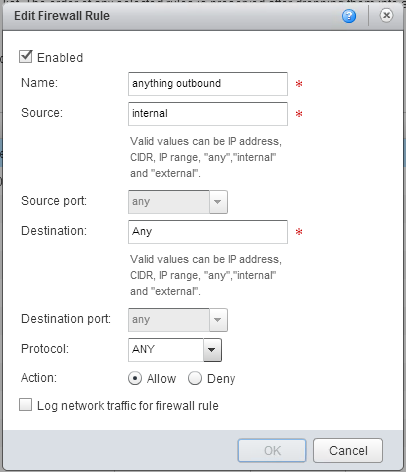
It’s really pretty simple, we just put “ANY” everywhere except the source. 🙂
Allow Internet client to reach internal servers
These next two rules are to allow people on the internet to reach the services provided by our ubuntu server.
- Give the rule a name.. something that will actually describe what the rule does
- pick TCP for SSH and HTTP traffic, again adapt this to whatever your trying to do
- source will need to be Any… if you want ANYONE to be able to get through, if you just want your home connection to be able to connect use the CIDR option and enter a specific address in the box to the right
- source port will be Any as well… this is because we really have no way to know what port the client computer is going to try to connect to
- we need to tell it where this traffic will end up, so pick Specific CIDR, IP, etc and enter the ip address of your internal vm (in my case its 192.168.109.2)
- lastly put port 22 in the destination port (adapt this for whatever your service needs)
Finally click Next and Finish and the rule will be added. Again LET THE PROCESS COMPLETELY… it wont work until it has completely finished.
You can also do this same process for the http service, and when you are done you should be able to connect to both HTTP and SSH services on the internal VM now. 🙂
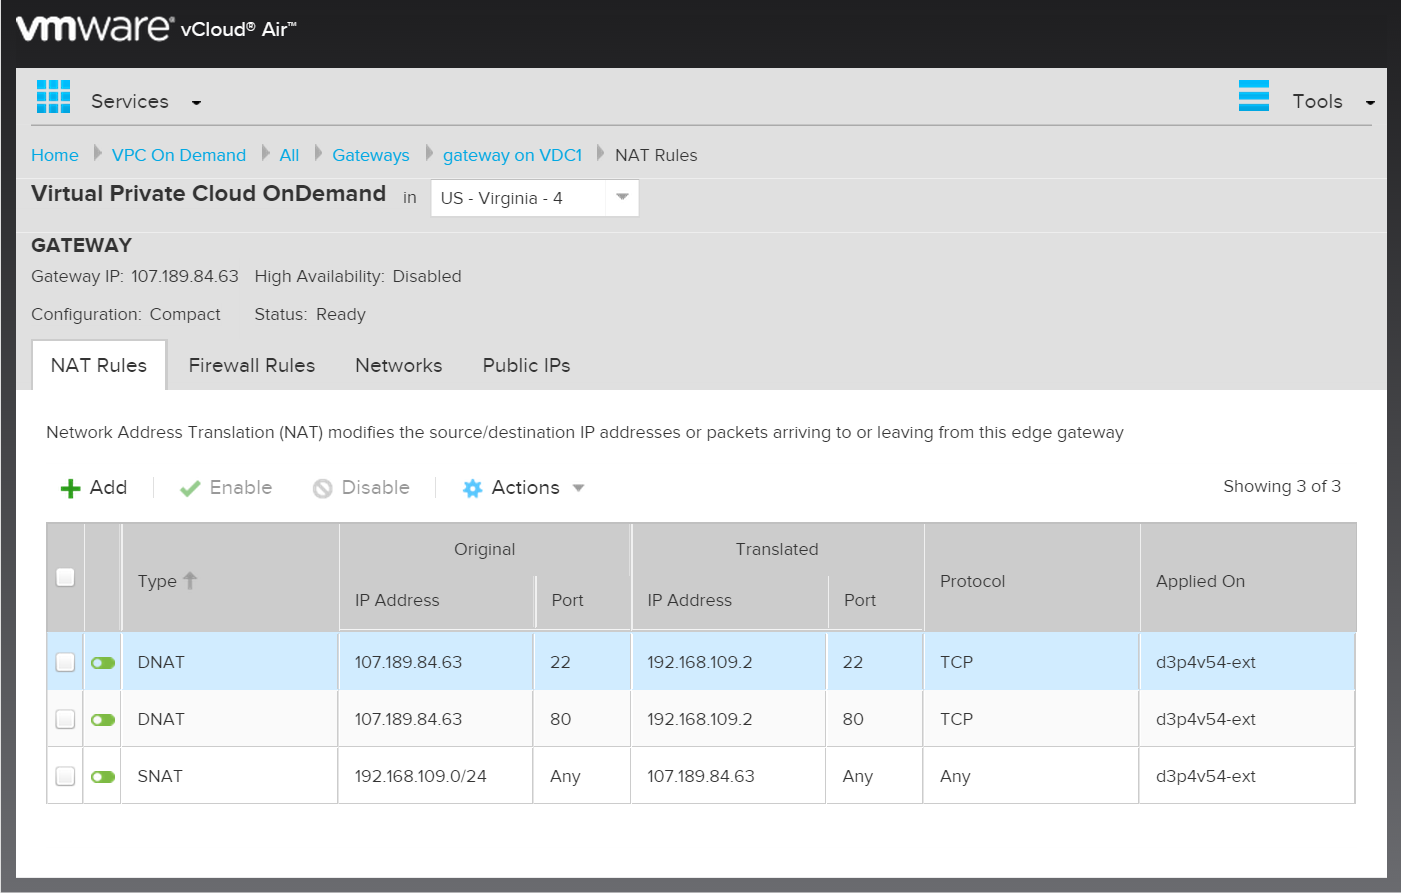
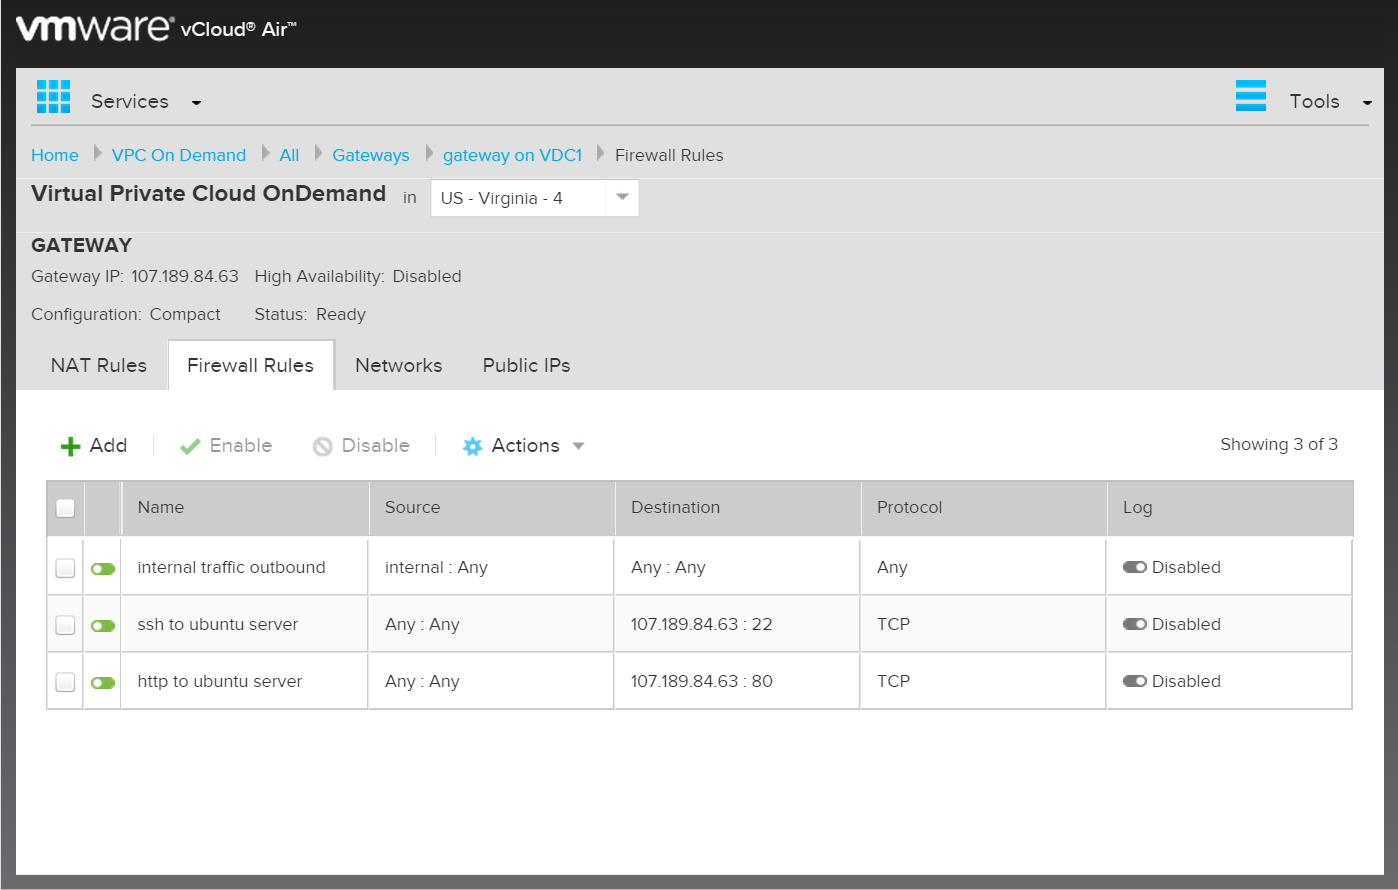
Your rules list should now look like this:
(one more side note… the ssh service on the ubuntu template vmware provides does not allow password authentication… only shared key auth. To change this behavior use nano to edit /etc/ssh/sshd_config … find the line that says “PasswordAuthentication no” and just put a “#” at the beginning of the line. Then restart ssh with /etc/init.d/ssh restart
you can now use your root username and password to get into the vm remotely.
More to come on vCloud Air OnDemand.
![]()
Pingback: VMware vCloud Air On Demand Part 1 | Justin's IT Blog
Followed your steps and still no have internet connection in VM. They changed the policies after this post?
Ill check into it and make sure i didnt miss a step or that they didnt change anything
For me, everything works without any problem! Thanks Justin! I am looking forward to the next part! 🙂
For me, everything works without any problem! Thanks Justin! I am looking forward to the next part! 🙂
Awesome article!
Hi Justin, great article but the final step led me astray a little until I got a point in the right direction from VMware. In the section entitled ‘Allow Internet client to reach internal servers’ under step #5 you mention to use the internal IP address of your VM. This should be the public IP address of the gateway, not the internal IP of the VM. Your screen shot of the rules above is correct though.
This is because the firewall traffic gets evaluated first, and then the NAT rules are applied – becoming a 2 step process. So the destination for the firewall rules will likely be the public IP address of the gateway, and the source address of the NAT rules will also be the same.
Hope this helps put the final bit in place for someone.
Thanks yet none of the default instructions work including this article’s helpful verbose yet omissive critical bit that the external NAT rules be applied to the external network name instead of ‘default-routed-network’ which you should oppositely apply to internal NAT rules.
VMware should really automate all this because their apparent automation hook through ‘Connect VM to Internet’ should effectively do these steps imo instead of costing a new user hours of learning time just to get connected. GCE was much easier! 🙂
I agree peter, and have heard from many customers that vCloud AIR has a lot of UI work to do compared to the competition.